23 Incredible DIY Short Hairstyles For Women To Try In 2024
Experiment with these stunning hairdos on your chopped locks in the comfort of your home.
 Khamis MaioufHairstylist
 Khamis Maiouf is a professional barber who graduated from Hinckley College in England with a degree in barbering. He has also won several barbering contests and successfully operated a barbershop for the last two decades. As a skilled hair ... more
 anjali sayeeBTech Experience: 7 years
Anjali is an associate editor at StyleCraze. She specializes in hairstyles and hair and skin care and has written over 200 articles in these domains. She has 7 years of experience, and her philosophy ... more
 subhrojyoti mukherjeeMA (English) Experience: 4 years
Subhrojyoti is an associate editor at StyleCraze with four years of experience. He has a master’s degree in English from Presidency University, Kolkata, and has also done a post-graduate certificate c... more
 joyce joysonMA (Mass Communication & Journalism)
 Joyce Joyson is a beauty and lifestyle writer with over a year of experience crafting short-form content for the beauty, fashion, and lifestyle niches. She has a triple majors bachelor’s degree in His... more

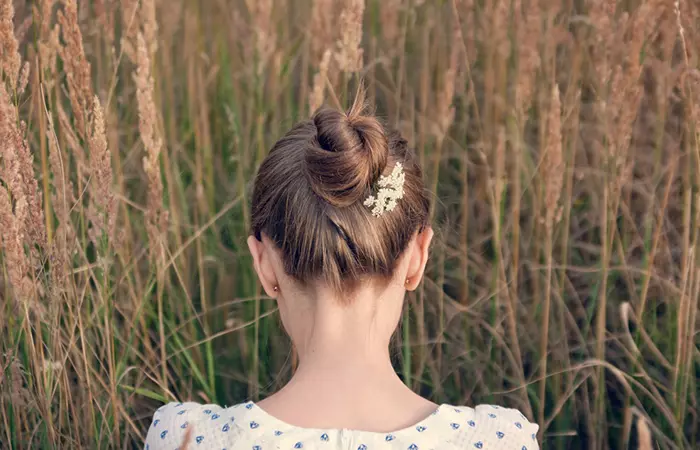
Image: ShutterStock
Short hairstyles for choppy haircuts provide the sassiest, most eye-catching, low-maintenance appearances that automatically get the most style points. Short hair is so playful that there are many cool ways you can style it. Whether for work, a casual meeting, or a party, you can definitely create some impressive looks with it. Read on to find out how you can glam up with the following 23 DIY hairstyles for short hair.
 Before You Get Started
- As opposed to long hair that can conveniently be tied into a bun, short hairstyles like shag, asymmetrical bobs, and undercurt are high maintenance. They take more time to style and appear flat when exposed to humidity.
- Certain haircuts for short hair require monthly trims and excessive use of styling products to maintain.
- Ask your stylist for tips on textures that will suit your face shape. Also, ask them how long your short hair hairstyle will last and decide accordingly.
- Be careful with using heat-styling tools too close to the face.
- Keep lots of pins and ties handy to keep your style in place.
In This Article
23 Incredible DIY Short Hairstyles
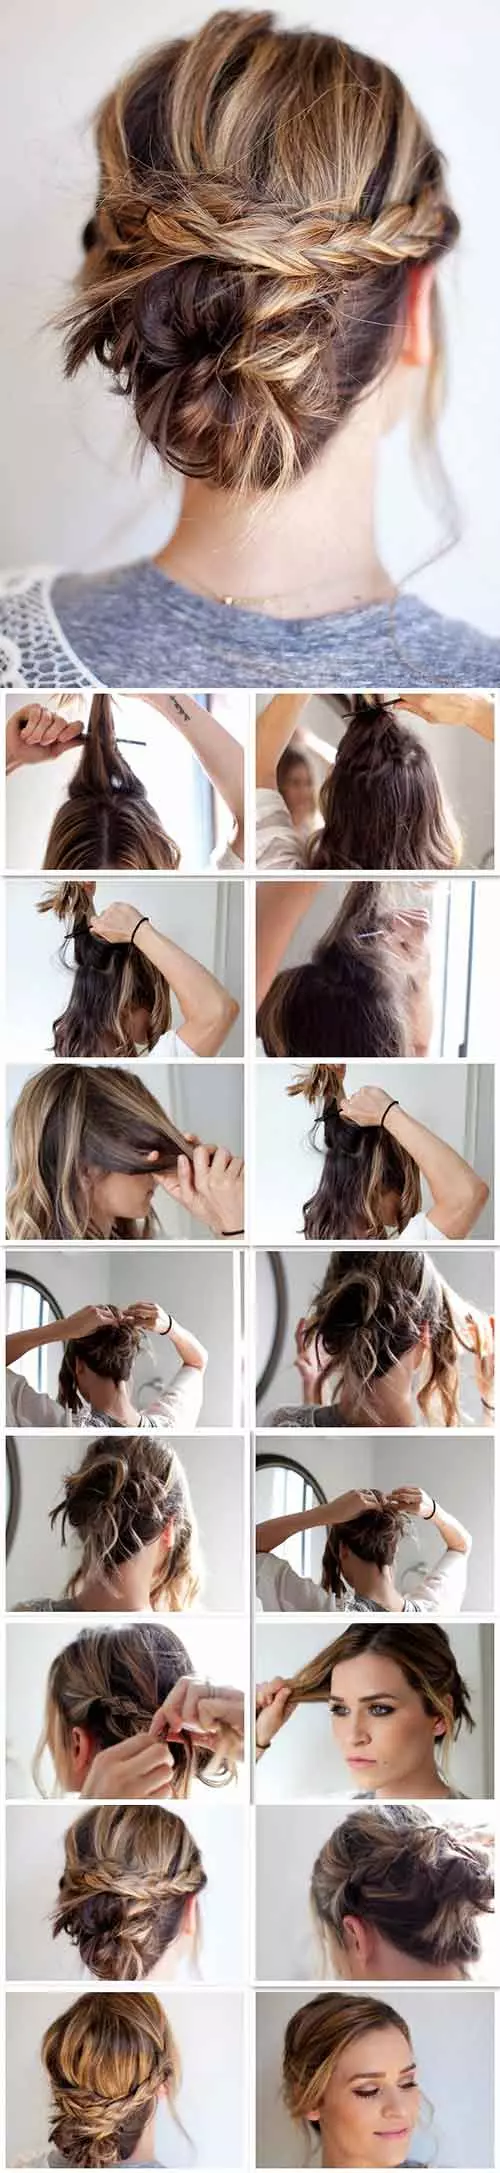
1. Open Hair With Double Side Twists
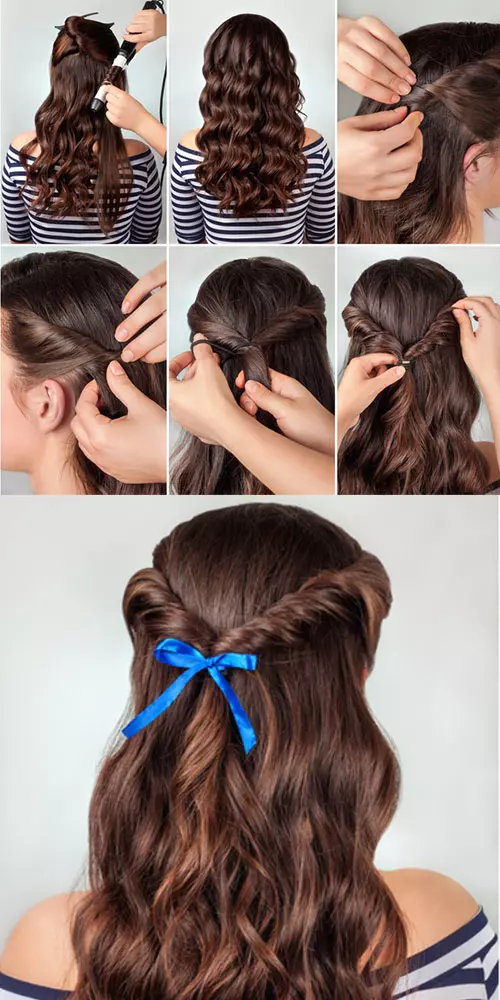
What You Need:
- Hair straightener
- Comb
- Hair ties
- Bobby pins
What To Do:
- Start by straightening your hair with a hair straightening machine.
- For this hairstyle, take a small portion from one side of your hair near the crown section.
- Tie it into a ponytail and flip it through.
- Repeat the same on the other side and pin the hair at the back with a bobby pin to complete the look.
2. Faux Waterfall Braid
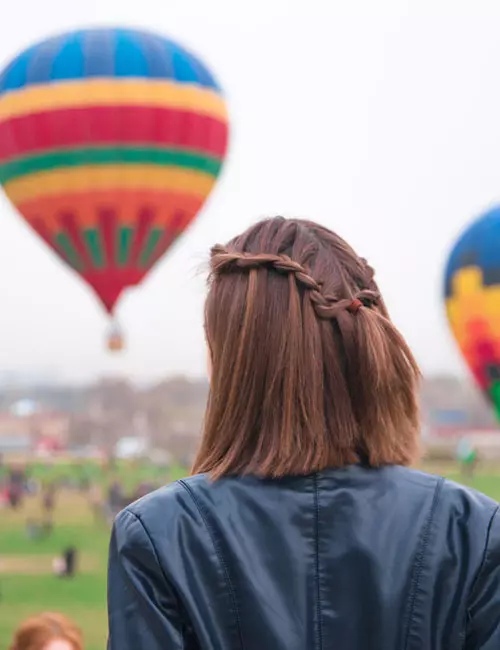
What You Need:
- Comb
- Hair tie
What To Do:
- Begin by making a side partition in the front.
- Take a small portion of your hair from the partitioned front end.
- Begin braiding until you reach the opposite end of your ear and secure the braid with a hair tie.
- Now, go to the very top of the braid and pull the very first outer loop.
- Then, take a tiny portion of the hair from the front and pull it through the loop.
- Move on to the next loop and repeat the same until you make at least 6-8 stitches.
- Pin the remaining hair underneath with a bobby pin.
Brush all the hair backwards to complete the short hairstyle.
3. The Easy Twist Hairdo
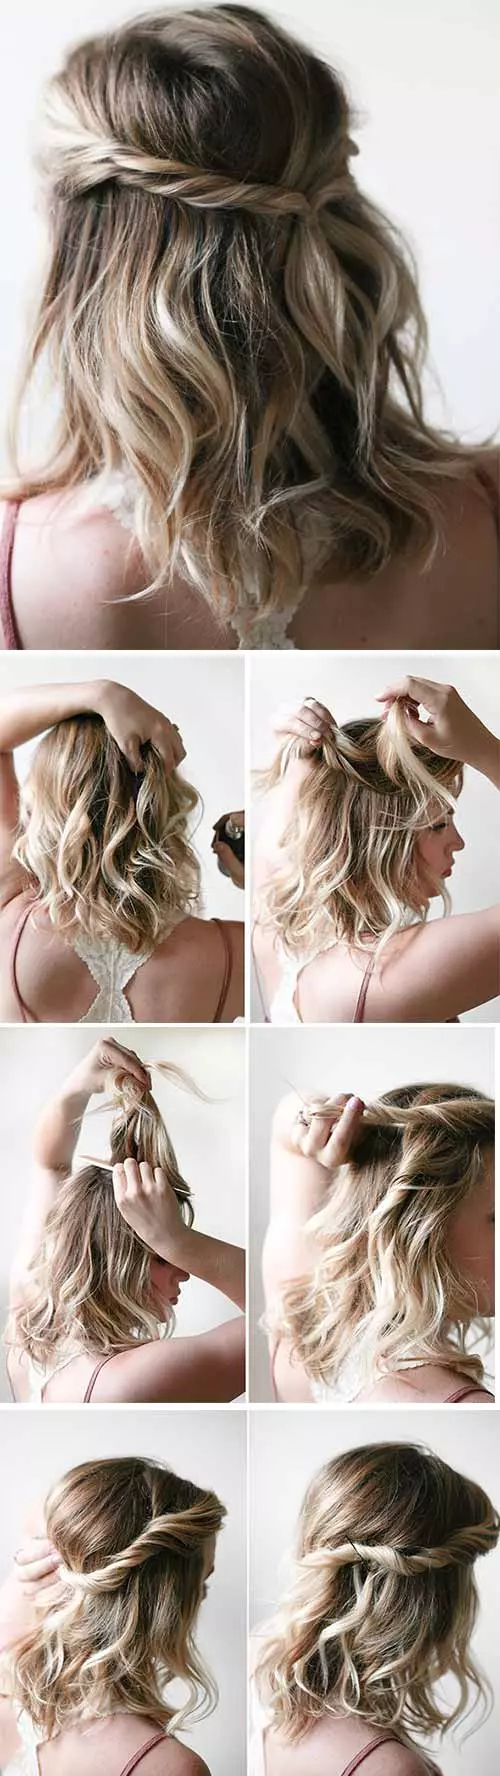
What You Need
- Hair pins
- Texturizing spray
- Comb
- Elastic band
What To Do
- Detangle your hair with a comb.
- Spritz on some texturizing spray.
- Part your hair down the middle.
- Pick up a 3-inch section of hair from one side and comb it neatly.
- Twist the hair and pin it up at the back.
- Repeat the same on the other side.
- Tie both the twists together with an elastic band.
4. The Cool Pixie Hairdo

What You Need
- Hair mousse
- Hair gloss creme
- Comb
- Blow dryer
- Hair brush
What To Do
- Detangle your hair with a comb. Mix some hair mousse and gloss creme and apply it to your damp hair for a sleek and tapered look.
- Comb it through your entire hair.
- Blow dry your hair while brushing it upwards.
- Style your hair, leaving your bangs to fall on your face. Your hair has to stand in messy spikes near the crown.
- Spritz on some hairspray.
- Comb the fringe neatly to set it apart.
 Quick Tip
Maria, a blogger, shared her impulsive experience of getting a pixie haircut at a time when she felt stressed and nervous. She used to have long, thin brown hair but began experimenting with her hair by getting a short bob before ultimately deciding to chop it all off. She said, “I think that the style really suits me, and I enjoy what it does for my look and my confidence (i).” She also mentioned that she does not want to look the same and would love to add some color to her hair in the future.
5. The Bouffant Scarf Hairdo

What You Need
- Dry shampoo
- Hair pins
- Elastic bands
- Comb
- Scarf
What To Do
- Comb your hair to detangle it.
- Spritz on some dry shampoo. The dry shampoo not only cleans your hair but also gives it texture and volume.
- Comb your bangs and leave them to fall on your forehead. Pick up hair from the crown of your head and backcomb it from the middle to the roots. This teasing will create a bouffant.
- Pin up this section of hair after combing the top of it neatly.
- Pin up the rest of your hair using hairpins that are the same color as your hair. Pin your hair up in sections to keep it in place.
- Take your scarf, wrap it around the back of your head, and tie it in a double knot at the top of your head. Tuck the ends in the scarf. Pull the scarf up and spread it out to cover the pins at the back.
6. Short Curls

What You Need
- Sectioning clips
- Comb
- Hairspray
- Curling iron
What To Do
- Detangle your hair with a comb.
- Clip up the top section of your hair.
- Curl the bottom half of your hair in sections. Keep each section in the curling iron for about 6 seconds before you unclip it.
- Don’t touch your hair until it has cooled down.
- Unclip the top section and curl only the ends.
- Spritz on more hairspray to secure the curls in place.
7. The Bouffant
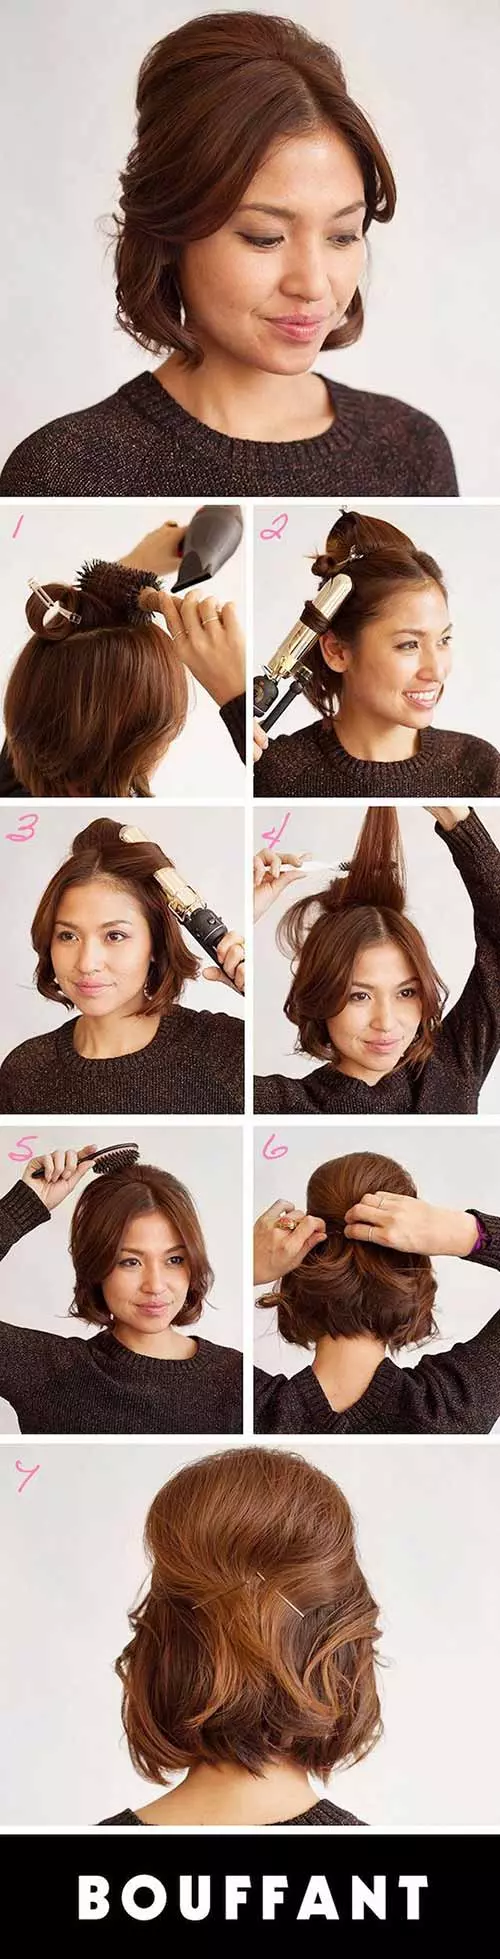
What You Need
- Sectioning clips
- Hair pins
- Comb
- Brush
- Blow dryer
- Curling iron
What To Do
- Detangle your hair with a comb. Take a section of hair at the crown, roll it up and pin it up with some sectioning clips.
- Part your hair as you naturally would. Using a curling iron, curl your hair.
- Unclip the hair at the crown of your head. Backcomb this hair to add volume and create a bouffant. Comb the top part of this hair neatly to smoothen it down.
- Gather some hair from both sides and pin it at the back of your head along with the bouffant to finish off the look.
 Trivia
8. Half Up Party Lob
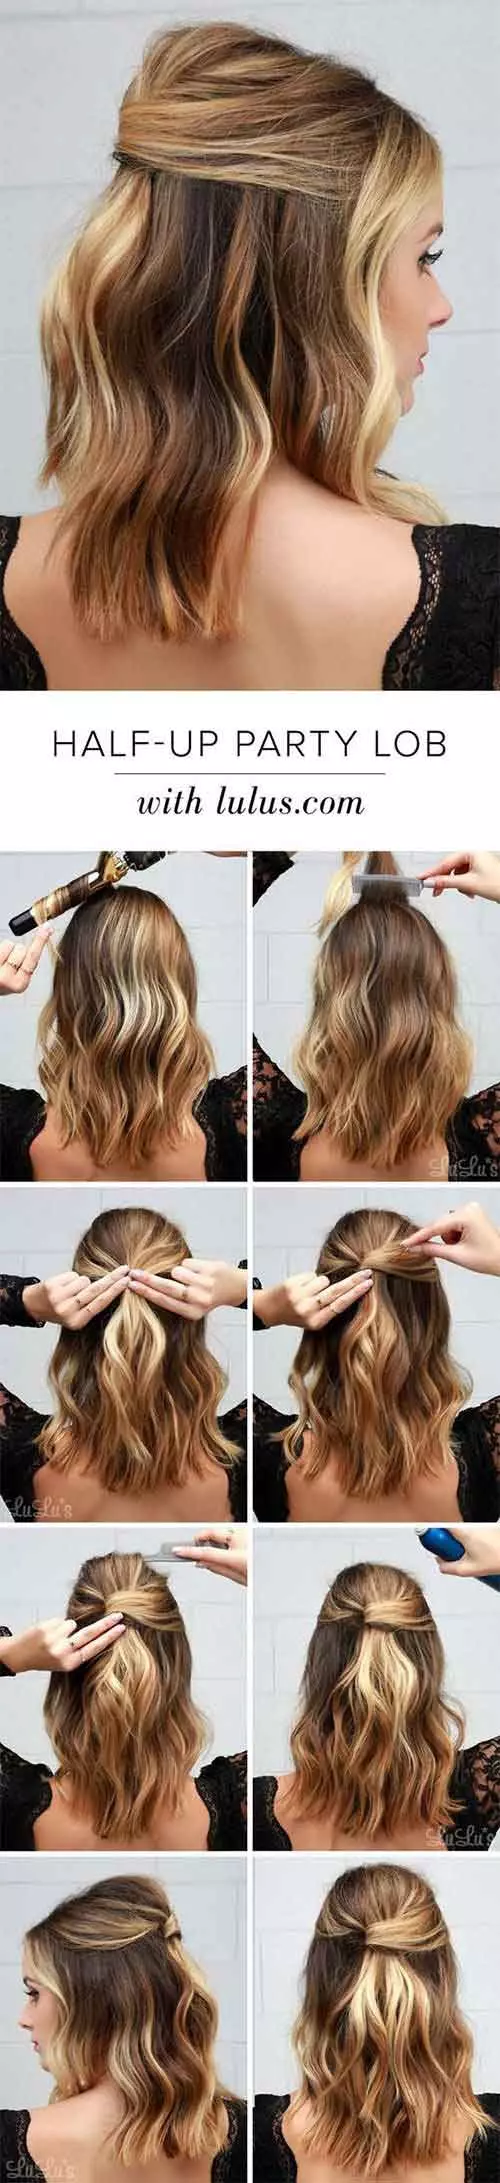
What You Need
- Curling iron
- Hair pins
- Rat-tailed comb
- Hairspray
What To Do
- Detangle your hair with a comb.
- Curl your hair.
- Tease down the hair at the crown of your head. This teasing will give it a bouffant look.
- Pick up hair from both sides and twist them once at the back of your head. Pin this twist from below at the back of your head.
- Allow your bangs to fall freely.
- Spritz on some hairspray to finish off the look.
9. The Twisted French Twist
What You Need
- Crimping iron
- Sectioning clips
- Comb
- Hair pins
- Hairspray
What To Do
- Crimp the top sections of your hair.
- Divide your hair into three sections: one on each side, and one in the center. Clip the side sections.
- Take the front part from the center section and backcomb it to add height to the hairdo.
- Take the center section and twist it till the end. Pin it up at the nape of your neck to secure the twist.
- Unclip the side sections. Take a small section of hair from one side and twist it. Pass it over the center twist, roll it and pin it on the other side.
- Repeat the same with both side sections alternately until all your hair has been twisted and pinned.
- Take the ends from the center section and tuck it underneath. Pin it in place.
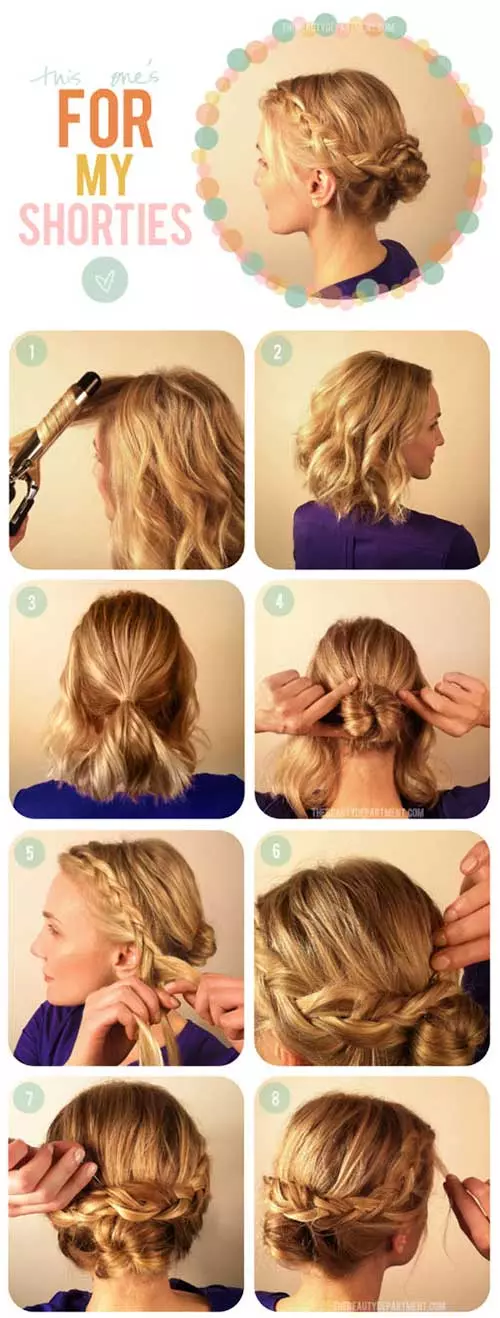
10. The Simple Side Braid

What You Need
- Hair pins
- Elastic bands
- Comb
What To Do
- This hairdo is perfect if you have two-day unwashed hair and the front section of your hair is always greasier than the rest of your hair. Comb your hair to detangle it.
- Leaving a section of hair in the front, tie up the rest of your hair.
- Braid this section of hair in a side Dutch braid.
- Braid it till the end and then secure it with an elastic band.
- Pancake the braid by tugging it apart to make it look voluminous.
- Using hair pins, pin the braid to the side of your head.
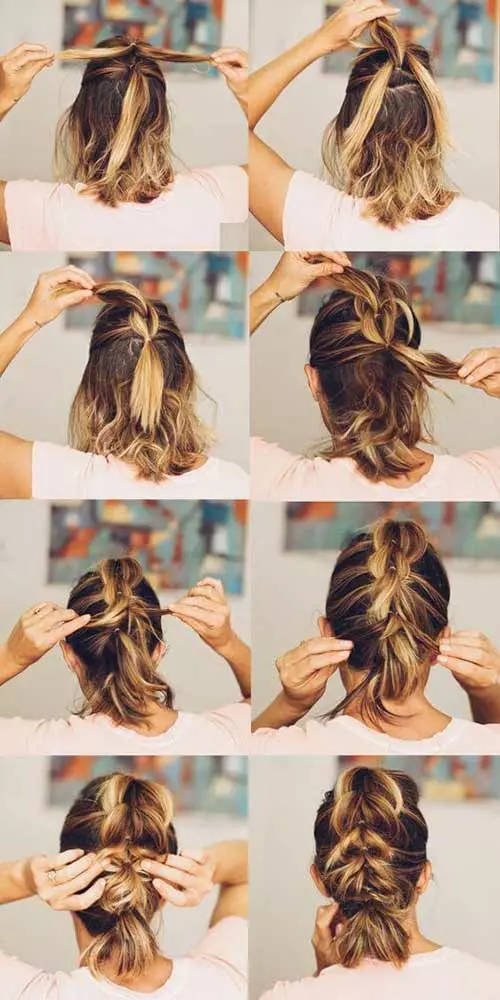
11. French Braid With A Top Knot

What You Need
- Elastic bands
- Comb
- Bobby pins
What To Do
- Detangle your hair with a comb. Pick up some hair from the front.
- Begin weaving this section of hair in a braid.
- As you would in a Dutch braid, keep adding hair to the side sections of the braid with each stitch.
- Braid your hair until you reach the crown of your head.
- Using an elastic band, secure the braid.
- While tying the elastic band, don’t pass your hair completely through the band at the last twist. This will create a fold that looks like a bun.
- Use the bobby pins to secure any stray strands from the braid.
12. Half Up Top Knot
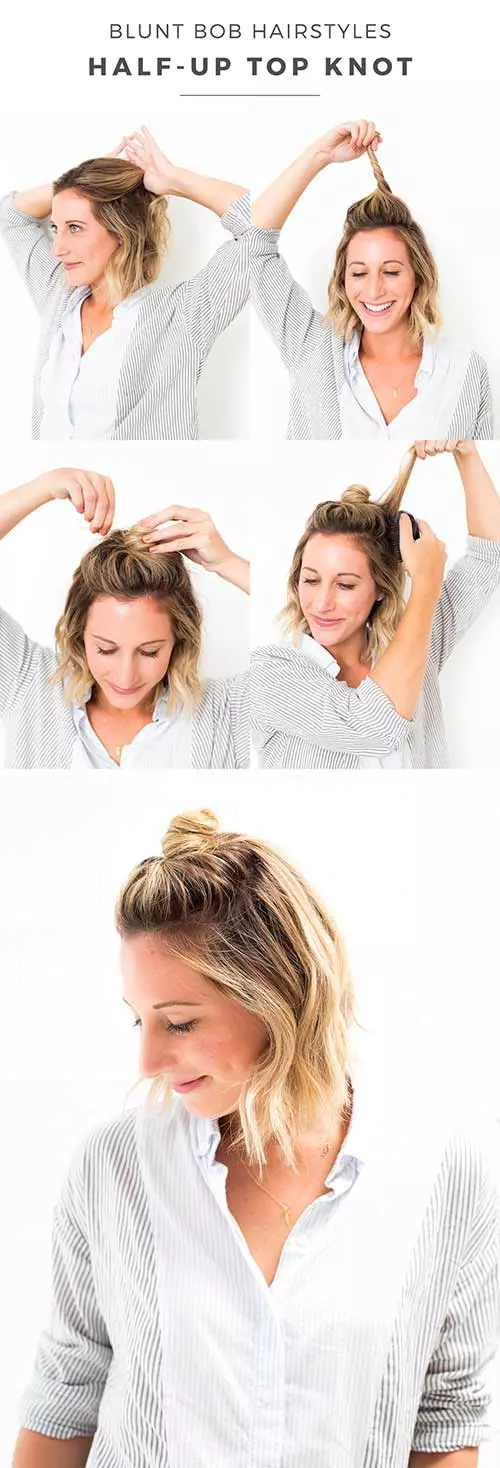
What You Need
- Hair pins
- Elastic bands
- Brush
What To Do
- Detangle your hair with a comb. Take a section of hair from the front and crown of your head.
- Hold the hair up and twist it.
- Wrap the twist around itself to form a bun.
- Secure the bun in place with an elastic band and hair pins.
- Tease down the hair around the bun to add volume to your hairdo.
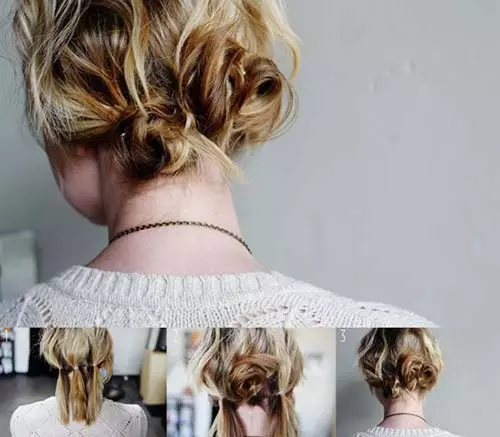
13. Messy Bouffant With A Low Bun
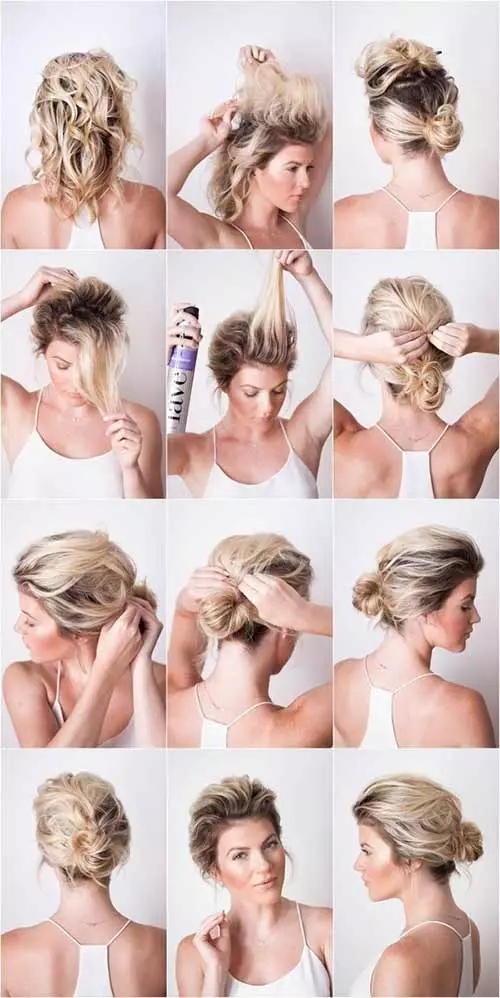
What You Need
- Hair pins
- Elastic bands
- Comb
- Texturizing spray
What To Do
- Divide your hair into a top section and a bottom section.
- Tease the hair in the top section from the middle to the roots.
- Clip the top half up and tie the lower half in a bun.
- Unclip the top half and take the front section of the hair. Spritz some texturizing spray all over it.
- Pin up the whole of the top section back neatly.
- You can pin up the sides as well, but allow loose strands of hair to fall out as you want the updo to look tousled.
14. Triple Twisted Buns
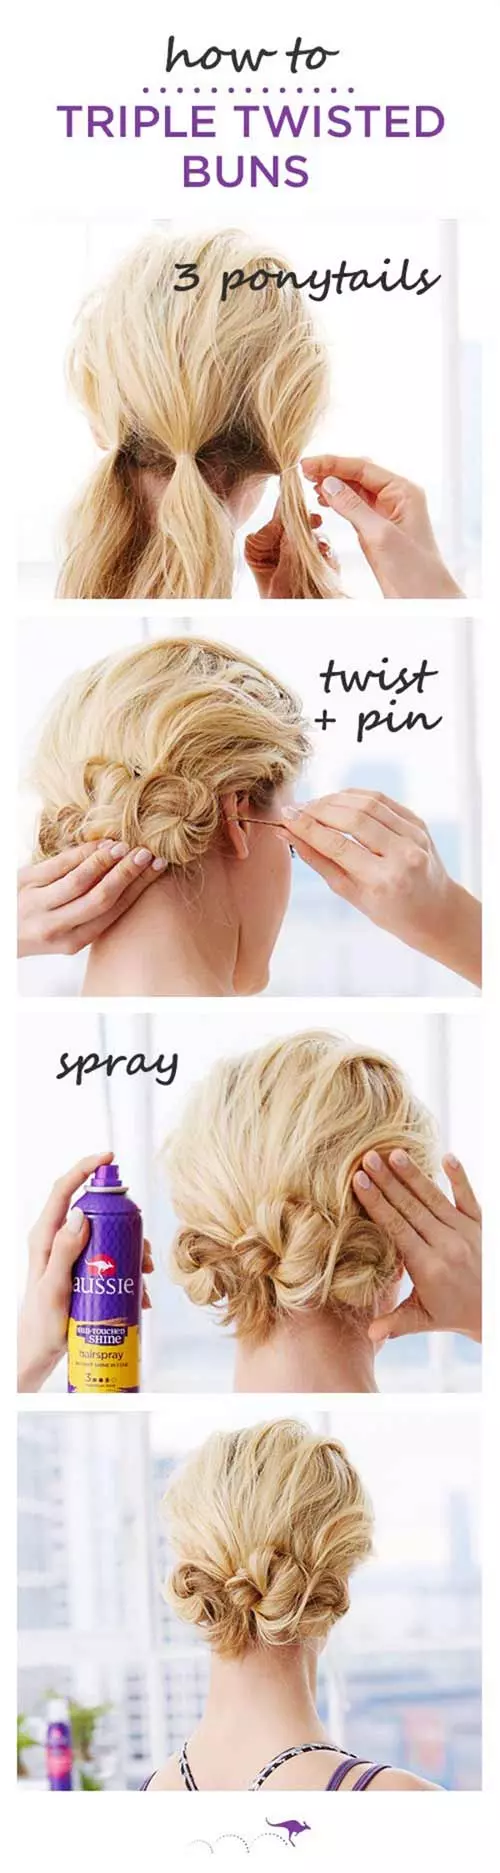
What You Need
- Hair pins
- Elastic bands
- Comb
- Hairspray
What To Do
- Detangle your hair with a comb and divide it into three equal sections.
- Tie each section into a low ponytail using elastic bands.
- Take the first ponytail and twist it around itself to form a small bun. Pin it in place.
- Repeat the same with the other two sections.
- Spritz on some hairspray to set the do in place.
15. Perfect Loose Waves
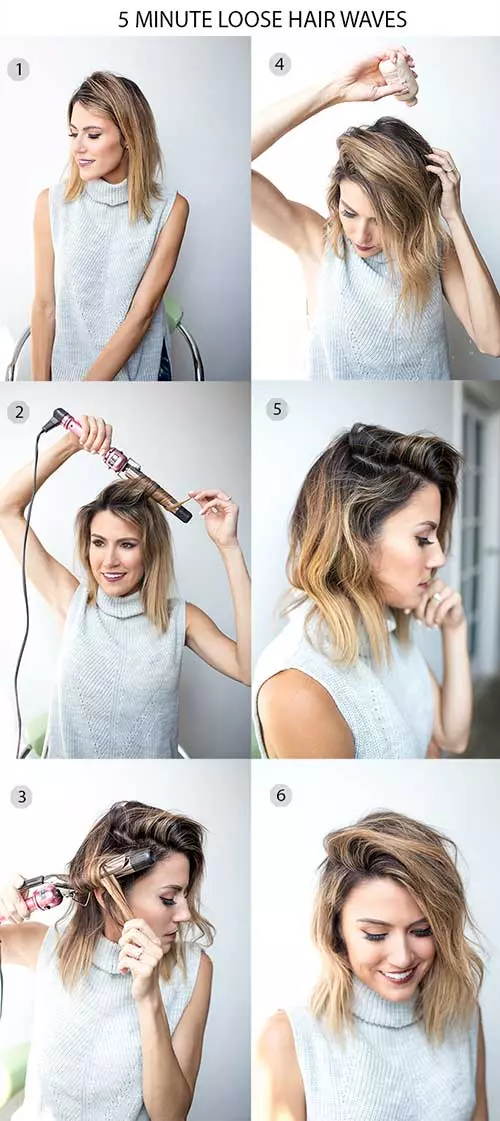
What You Need
- Heat protectant
- Comb
- Curling iron
- Dry shampoo/talcum powder
What To Do
- Detangle your hair with a comb and part it how you normally would.
- Apply a heat protectant.
- Curl your hair with a curling iron. Keep your hair in the iron for about 3-5 seconds. Roll your hair in big sections, leaving out about two inches in the end. The bigger the sections, the looser the waves.
- Keep your curling iron at a 45-degree angle while waiting for your hair to curl and then slide it down.
- Sprinkle some talcum powder or dry shampoo powder all over your hair. Shake your hair and run your fingers through it to make the powder blend in. The powder will add texture and volume to your hair, giving you loose waves.
16. The Twist and Pin
What You Need
- Hair pins
- Elastic band
- Comb
What To Do
- Detangle your hair with a comb and tie it into a neat low ponytail.
- Take some hair from the ponytail. Twist it and pin it at an angle.
- How you want to pin it depends on how you want the bun to form. If you wrap each twist at an angles, it can form a flower. You can also fold the twists and pin them at the center.
- Repeat the same for the rest of the ponytail until all your hair is in a bun.
17. Tri Flower Updo
What You Need
- Hair pins
- Elastic bands
- Comb
What To Do
- Detangle your hair and tie it into three low ponytails.
- Take the center ponytail and wrap it around itself to form a bun.
- Pancake the bun and pin it in place.
- Repeat the same with the side ponytails, but make them smaller than the center bun.
18. Neat Bun With Braids
What You Need
- Hair pins
- Elastic bands
- Comb
- Curling iron
What To Do
- Detangle your hair with a comb.
- Curl the lower half of all your hair.
- Divide your hair into three sections: two side sections and one center section.
- Tie the center section into a low ponytail and then wrap it around into a bun. Pin it in place.
- Dutch braid the side sections. Pancake the braids.
- Pin the braids above the bun and tuck the ends underneath it.
19. Simple Cat Ear Knots
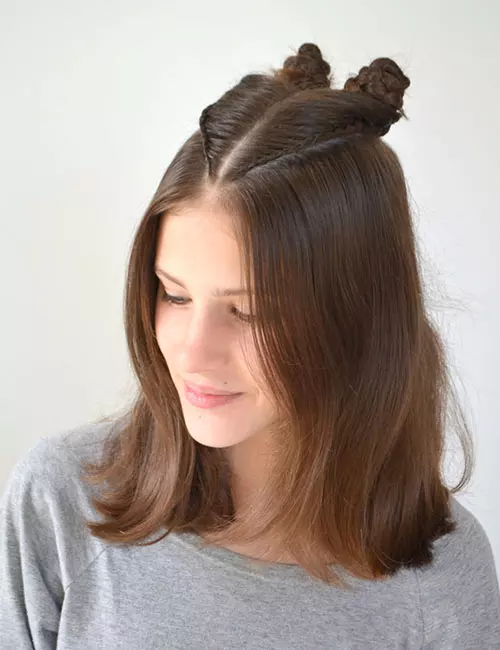
What You Need
- Hair pins
- Elastic bands
What To Do
- Part your hair down the middle.
- Take some hair from one side.
- Hold the hair up and roll it to form a bun.
- Secure the bun with an elastic band and some hair pins.
- Repeat the same on the other side.
20. Pull-Through Braid
What You Need
- Elastic bands
- Comb
What To Do
- Detangle your hair with a comb. Pick up some hair from the top of your head and tie it in a ponytail.
- Pick up some hair from both sides and tie it in a ponytail just below the first ponytail.
- Divide the first ponytail in half. Hold up the second ponytail and, using an elastic band, tie both the halves of the first ponytail below the second ponytail.
- Tie another ponytail under the second ponytail.
- Divide the second ponytail in two. Hold the newest ponytail up, and, using an elastic band, tie both the sections from the second ponytail below the newest ponytail. This time, though, add hair from the sides to the sections of the second ponytail before you tie them.
- Repeat the previous two steps until you reach about an inch before the end. Then, tie the end of the pull-through braid with an elastic band.
- Pancake the braid to add some volume and dimension to it.
21. The Perfect Messy Updo
What You Need
- Hair pins
- Elastic bands
- Comb
What To Do
- Backcomb the hair at the crown of your head. This will add height to your hairdo.
- Pin up this section of hair in a bouffant half ponytail.
- Leaving out the hair on the sides, tie the rest of your hair in a messy low bun.
- Take the side sections and weave them into a braid.
- Pin back the braids above the bun.
22. The Twisted Half Ponytail
What You Need
- Hair pins
- Elastic bands
- Comb
What To Do
- Detangle your hair with a comb. Part it down the middle.
- Take some hair from the front, on one side.
- Divide this section into two and twist them together. You want to form big defined twists. Each time you do a twist, drop the bottom section and pick up a new section of hair.
- Pin this twisted braid at the back of your head.
- Repeat the same on the other side.
- Take some hair from right under the first twisted braid, divide it in two, and and weave it in a twisted braid exactly the same way. Tie it with an elastic band and pancake it.
- Repeat the same on the other side.
- Tie all the four twists together at the back of your head.
23. Waterfall Braid
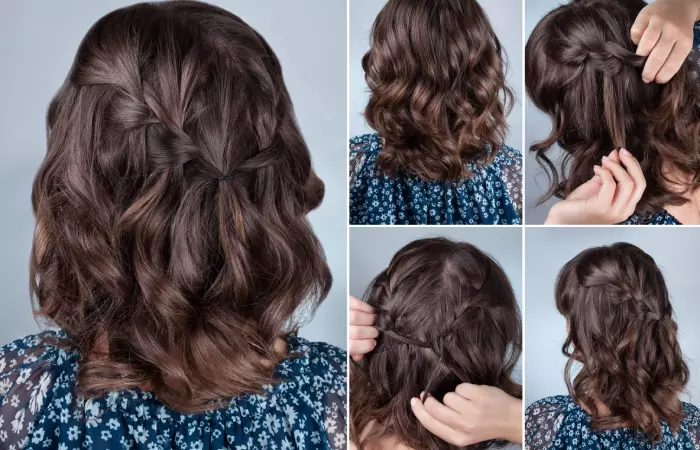
What You Need
- Elastic bands
- Comb
What To Do
- Detangle all the knots from the hair with a comb.
- Take a section of your hair from the hairline and another section from behind, and cross one over the other, such that the former moves away from the face.
- Take another section from the top of the head and cross it with the one you pulled away from your face.
- Drop that new section of hair into the twist to create a waterfall effect.
- Take another section from the bottom and pull it over the dropped hair.
- Pull another section from the top and cross it with the braid in your hand and drop it.
- Repeat this until you reach the desired length and tie it with an elastic band.
- Repeat the above process on the other side and tie the ends of both braids.
Accessories can make a regular bob hairstyle look formal or party-ready. Check out these trending hair accessories that you can style your short hairstyles with!
Accessories
- The Designer U-Pin
Definitely eye-catching! This U-pin is simple but elegant. Find hair pins that add a classy touch to your hairdo.
- Barrettes
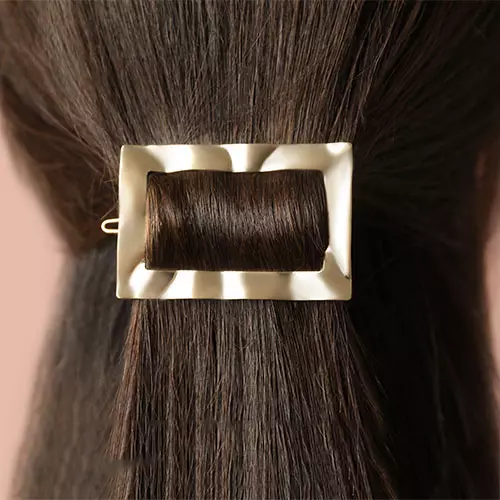
You can now find barrettes in unique shapes that add a sophisticated look to your hairdos.
- The Thin Ribbon
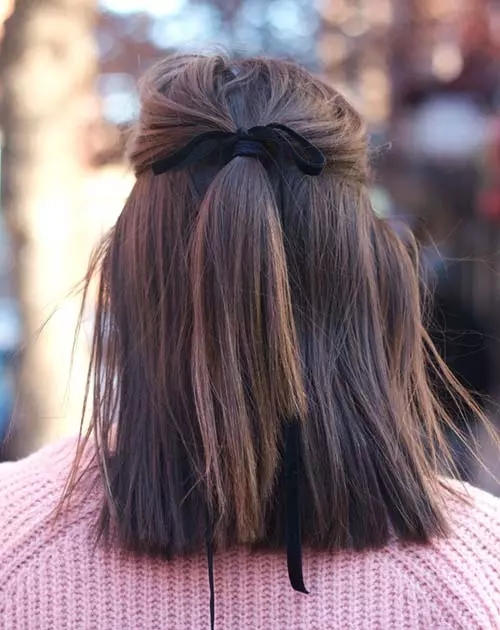
As we all know, less is more. Glam up your short hairstyle with a simple thin ribbon in a neutral color. It’s the perfect hair accessory for those formal events.
- Multi-Colored Scarves
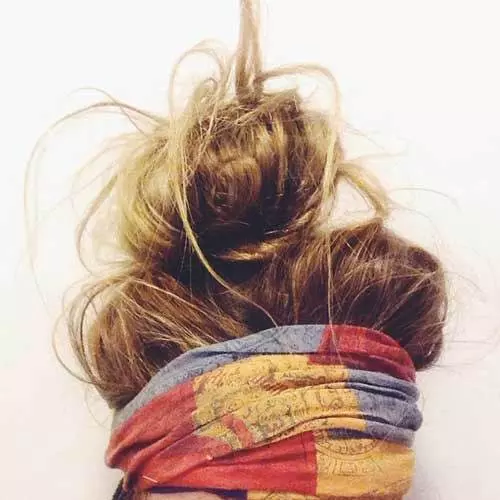
Scarves are cool. They can make you look vintage, hippy, classy, and oh-so-fabulous! Find a multicolored scarf that suits your hair color and gives a peek into your personality.
- Printed Bandanas
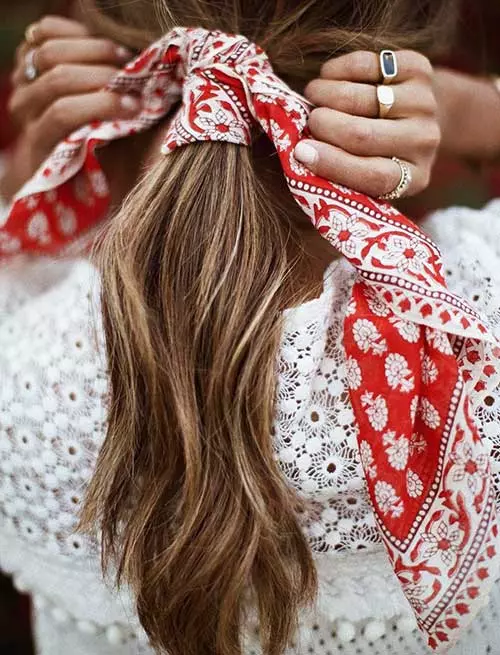
Printed bandanas are trending right now like never before. You can get a simple one with a classy print or an all-out colorful one. It’s the perfect way to ramp up your cute short hairstyle.
The best part about short hairstyles for girls is that it requires less maintenance. Here are a few tips to help you take care of your short locks.
How To Maintain Short Hair
- Get regular trims every 4 weeks to keep your hairstyle perfect.
- Wash your hair every three days with a shampoo and conditioner combo that solves your hair issues. For example, if you have dandruff and thin hair, use a dandruff specific shampoo and a volume conditioner.
- Deep condition your hair at least once a week for about 10 minutes.
- To add volume to your short tresses, comb your hair backwards and upwards with a round brush. If you have curly hair, do the same with a wide-toothed brush or wide-toothed comb.
- Apply natural oil to your hair at least once a week.
- Use a heat protectant before you use heat styling tools on your hair. This will protect your hair from heat damage.
Infographic: The Top Coolest Short Hairstyles
With the big compilation in place, choosing the coolest hairdos for different settings may be challenging. Well, worry not. We have a round-up of the best hairstyles for short-haired girls that are suitable for all face shapes. They look chic and are suitable for all occasions. So check out the infographic because it’s time to turn heads. Illustration: StyleCraze Design Team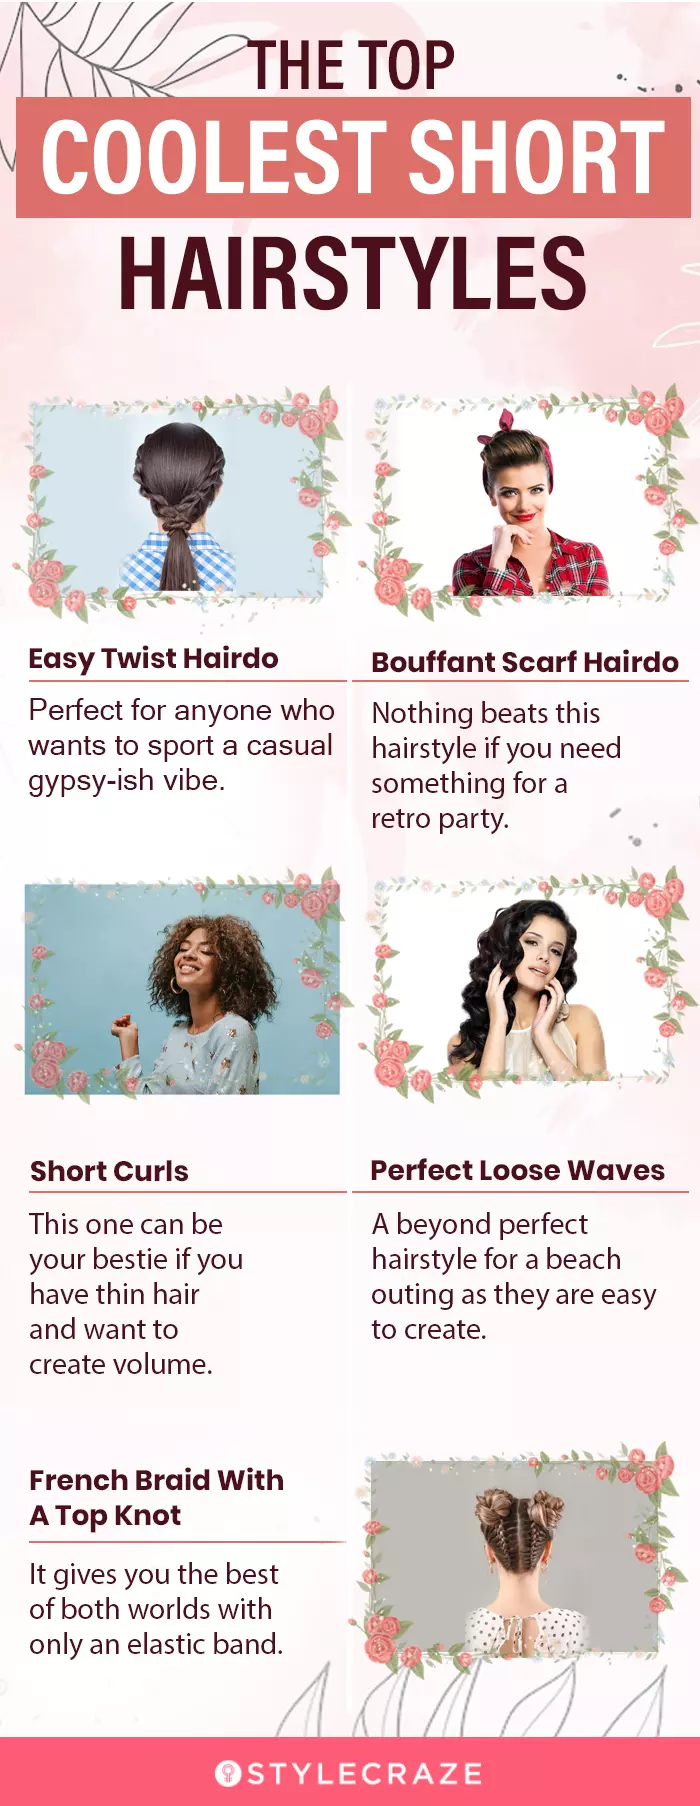
Quarantine is difficult for many people, and let’s face it, our hair is suffering the consequences. Since salons are closed, we cannot get our regular haircut, color, or style. However, this does not imply that our hair must be drab in appearance. With short hair, you may still achieve a variety of styles and appearances at home.
We adore short hair for various reasons: it is easier to style in the morning, more practical at work, and also comfier. Who says short hair cannot make for a knockout hairstyle? There are many cute and easy hairstyles for short hair that can be done quickly at home and provide you with the perfect look for any event.
Frequently Asked Questions
What does short hair say about a woman?
A short haircut may symbolize increased independence, confidence, or self-acceptance for many women.
What is the easiest short haircut to maintain?
You should choose a short, layered haircut if you want something charming and easy to maintain. It is a manageable length to style regularly. Professional hair stylist Khamis Maoiuf recommends The Cool Pixie Hairdo from our list. He says, “The pixie cut is a classic and versatile short haircut that is easy to style and maintain. It involves cutting your hair short on the sides and back, with longer layers at the top.”
How do you blend layers in short hair?
You need to use shears instead of scissors to create layers in short hair. However, you may quickly rock gorgeous layers by following the instructions below:
• Divide your hair into top and bottom sections.
• Clip up the top half and leave the bottom half loose.
• Layer the top half.
• Layer the sides and bottom.
• Touch up with point cutting.
Khamis Maiouf also recommends using a razor. He says, “A razor can be used to blend in short hair. To do this, hold the hair taut. Make small, precise cuts with the razor to create a textured, blended effect.”
Key Takeaways
- Short hairstyles need less maintenance, offer versatility, and suit formal and casual occasions alike.
- There are numerous DIY styles for short hair; from open hair with double-side twists to chic pixie cuts.
- Accessories such as barrettes, ribbons, and scarves can elevate short hairstyles for a party-ready look.
- Regular trims and conditioning are essential for maintaining short hair.
Image: Stable Diffusion/StyleCraze Design Team
Learn how to style your short hair in no time! Check out this video for 3 easy hairstyles for short hair along with simple tips to follow.
Personal Experience: Source
StyleCraze's articles are interwoven with authentic personal narratives that provide depth and resonance to our content. Below are the sources of the personal accounts referenced in this article.
i. FROM LONG HAIR TO PIXIE CUT: A CHRONICLE OF MY IMPULSIVE HAIR DECISIONShttps://marialikesmakeup.wordpress.com/2018/03/28/from-long-hair-to-pixie-cut-a-chronicle-of-my-impulsive-hair-decisions/


")


")

