What Is Bikram Yoga? 26 Yoga Asanas To Do In This Session
A special set of asanas put together by Bikram Choudhury that claims to change your life.
 Tatiana SokolovaAdvanced Ashtanga Yoga Instructor
 Tatiana Sokolova is an advanced Ashtanga yoga instructor with 6 years of experience. This retreat guide discovered Ashtanga during a trip to Sri Lanka. She completed her 200-hour teacher training with the Ashtanga Yoga Studio in Paris while... more
 shirin mehdiBA Experience: 3 years
Shirin is a health and wellness writer with three years of experience and specializes in writing articles on yoga and has extensive knowledge about the postures of the asanas. Prior to joining Stylecr... more
 arshiya syedaBA (Literature & Psychology), PG Diploma Experience: 7 years
Arshiya Syeda is a senior editor at StyleCraze with 7 years of experience. Prior to that, she was a content writer and combined her writing and research skills to write over 200 high-performing articl... more
 moksha gandhiBPharm, Certified Health & Wellness Coach Experience: 2 years
Moksha is a health and wellness writer and a certified diet and nutrition coach. Her passion for science and writing has helped her excel in crafting evidence-based articles. Her previous experience i... more

Image: Shutterstock
Bikram yoga consists of a set of asanas practiced in a controlled environment (a studio). This yogic method is highly popular in the United States, and practicing it is said to be a life-changing experience. So, what is this method all about? What yoga poses does it comprise? How does it benefit your health? Read on to know the answers.

In This Article
What Is Bikram Yoga?
Back in the 70s, a young lad, armed with yoga championship laurels from India, went to the USA and popularized a new way of practicing yoga. He devised a suitable method that he put together after years of experimenting and practicing. His name is Bikram Choudhury, and he called the method he devised Bikram Yoga. It became a big hit in the United States, and soon, people were flocking to join his classes across the world called the Bikram Yoga Studios.
The method entails practicing a set of predesigned exercises synthesized from the traditional Hatha Yoga asanas in a studio with a temperature of about 40°C and 40% humidity. The session includes the practice of 26 asanas for 90 minutes; it is synonymously known as hot yoga.
 Trivia
Below, we compiled a list of all the 26 yoga asanas done in a Bikram Yoga session. Take a look at them.
The Bikram Yoga Technique
- Pranayama (Deep Breathing)
- Ardha Chandrasana (Half Moon Pose)
- Utkatasana (Awkward Pose)
- Garudasana (Eagle Pose)
- Dandayamana-Janushirasana (Standing Head To Knee Pose)
- Dandayamana-Dhanurasana (Standing Bow Pose)
- Tuladandasana (Balancing Stick Pose)
- Dandayamana-Bibhaktapada-Paschimotthanasana (Standing Separate Leg Stretching Pose)
- Trikonasana (Triangle Pose)
- Dandayamana-Bibhaktapada-Janushirasana (Standing Separate Head To Knee Pose)
- Vrikshasana (Tree Pose)
- Padangustasana (Toe Stand Pose)
- Savasana (Dead Body Pose)
- Pavanamuktasana (Wind-Relieving Pose)
- Padahastasana (Sit Up Pose)
- Bhujangasana (Cobra Pose)
- Salabhasana (Locust Pose)
- Poorna Salabhasana (Full Locust Pose)
- Dhanurasana (Bow Pose)
- Supta Vajrasana (Fixed Firm Pose)
- Ardha Kurmasana (Half Tortoise)
- Ustrasana (Camel Pose)
- Sasankasana (Rabbit Pose)
- Janushirasana-Paschimottanasana (Sitting Head To Knee Stretching Pose)
- Ardha Matsyendrasana (Spine Twisting Pose)
- Kapalbhati Pranayama (Skull Shining Breathing Technique)
1. Pranayama (Deep Breathing)

Benefits: Pranayama is a great form of restorative yoga as it increases your focus and expands the lungs. It enables maximum oxygen to reach your muscles and organs and improves blood circulation. It will prepare you for the following exercises by easing and calming your mind. The breathing energizes and detoxifiesi XTo get rid of a dangerous element (such a poison, alcohol, etc) or its effects until the bloodstream is clean of toxins. your body.
How To Do The Pose
Stand straight. Keep your spine erect, and legs together. Interlock your fingers and place them under your chin and along the arc of your neck. Keep your elbows together. As you inhale, pull up your arms with your wrists slightly touching your ears. Keep your head straight. As you exhale slowly and deeply, tilt your head back and let your hands follow the movement of the head.
2. Ardha Chandrasana (Half Moon Pose)

Benefits: Ardha Chandrasana strengthens your core. It increases your spine’s flexibility and improves kidney functioning. The Half Moon Pose firms your body and tones your hips, buttocks, thighs, and abdomen.
How To Do The Pose
Stand straight and lift your arms up. Join your palms to form the prayer mudra above your head. Don’t bend your elbows. Keep your hands straight, flexed, and firm. Now, in that position, bend on your right hip, with your torso falling on the right. Keep your legs straight while doing this. Repeat the same on the left side.
3. Utkatasana (Awkward Pose)

Benefits: Utkatasana tones and shapes your legs. It cures slipped discs and other spine related problems. It stretches your hips, spine, and chest muscles. It strengthens your torso, tones your legs, and relieves joint and back pains.
How To Do The Pose
Stand straight and keep your feet arm length apart. Stretch your arms forward, with your palms facing downwards. Keep your arms straight. Now, bend at your knees and push your body down as if you are sitting on an imaginary chair. Do not bend your knees beyond your feet. Hold the pose.
To know more about the pose, click here: Utkatasana
4. Garudasana (Eagle Pose)

Benefits: Garudasana opens up the largest joints in your skeletal system. It improves the flexibility of your hips, knees, and ankles. It enables fresh blood to flow through your kidneys and reproductive organs. It also increases your focus and improves balance.
How To Do The Pose
Stand straight. Bend your right knee. Wrap your left knee over your right knee such that they seem stacked on top of each other. Place your left leg on the posterior of your right shin. Raise your arms forward to the shoulder level and bend your elbows at a 90-degree angle. Wrap your right hand over your left. Repeat the same with the other side.
To know more about the pose, click here: Garudasana
5. Dandayamana-Janushirasana (Standing Head To Knee Pose)

Benefits: The pose strengthens your hamstringsi XA trio of muscles that extend from the hip to the area just below the knee along the back of the thigh. and leg muscles. It improves the flexibility of your sciatic nerves and tones the muscles of your back, biceps, and triceps. It improves concentration, builds mental strength, and tightens the abdominal muscles.
How To Do The Pose
Stand straight with your feet together. Form a cup with your palms by interlocking your fingers. Bend at your waist and lift your right leg up towards your chest by bending at the knees and cupping your palms around the sole of your foot. Slowly straighten your right leg, taking your hands with it. Bend your torso further, making your chest touch the knee of your right leg. You must also bend your elbows slightly to accommodate this stance. Hold the pose.
6. Dandayamana-Dhanurasana (Standing Bow Pose)

Benefits: This pose develops balance and firms your upper thighs. It also improves the strength and flexibility of the lower spine. It builds patience and concentration and clears cardiovascular problems. It stimulates the blood vessels and supplies fresh blood to the entire body.
How To Do The Pose
Stand straight. Lift one of your legs with your hand from the inside at the ankle. Stretch the other arm out to the sky with the palms facing forward. Now, slowly extend the leg you lifted upwards. Make sure your torso is going slightly forward while doing so. Keep your hips and the foot of the leg on the ground in a straight line. Kick the other leg further up till you can with the arm of the hand holding the foot stretching along with it. As you stretch higher, your upper body should bend more forward.
7. Tuladandasana (Balancing Stick Pose)

Benefits: Tuladandasana stretches your heart muscles, rejuvenates your brain, and strengthens your concentration. It strengthens your core and back muscles and gently stretches the entire spinal column. It increases your stamina and helps burn calories.
How To Do The Pose
Stand straight and raise your arms to the sky. Clasp your hands, leaving your index fingers pointing to the sky. Now, lift your left foot off the floor while keeping your spine straight. Take your left leg further up. You will form a ‘T’ with your outstretched left leg and your arms. Hold the pose.
8. Dandayamana-Bibhaktapada-Paschimotthanasana (Standing Separate Leg Stretching Pose)

Benefits: This pose strengthens and stretches your sciatic nerves. It massages the abdominal organs and the small and large intestines. It increases the flexibility of your ankles and hip joints, releases tension in your lower back muscles, and creates emotional stability.
How To Do The Pose
Stand straight. Take a big step to the right with your right leg. Stretch your leg to the right as wide as possible. Stretch your arms on their respective sides and bend forward towards the ground and between the legs. Reach your hands towards your feet and clasp them around the ankles. Use that grip to push your torso further down till your head touches the ground. Keep your arms, legs, and spine straight. Hold the pose.
9. Trikonasana (Triangle Pose)

Benefits: Trikonasana, a part of Iyengar yoga revitalizes your veins, tissues, and nerves. It reduces rheumatismi XAny illness characterized by pain and inflammation in the muscles, joints, or connective tissue, particularly rheumatoid arthritis. and lower back pain and strengthens your knees, ankles, legs, chest, and arms. It cures anxiety and improves digestion and coordination between the heart and lungs.
How To Do The Pose
Stand straight with your feet arm distance apart. Keep your waist straight and bend towards the right. Lift your left hand up and let your right hand touch the ground, forming a straight line. Your right hand should touch the tips of your right toes, with the palm facing outward. Keep your right foot facing towards the right. Bend your right knee as much as you can and stretch out your left leg. The legs should be flexed and taut. Turn your head left and look up at your left hand. Hold the pose.
10. Dandayamana-Bibhaktapada-Janushirasana (Standing Separate Head To Knee Pose)

Benefits: The pose tones your abdomen, waist, hips, thighs, and buttocks. It stimulates your thyroid gland and regulates your metabolism and immune system. It helps those suffering from depression. It cures constipation, low blood pressure, and menstrual problems.
How To Do The Pose
Stand straight with your feet together. Raise your arms overhead and join your hands together in a firm clasp. Move your right leg towards the right, about two to three feet distant from the left leg. Turn your right foot towards the right. Now, tuck your chin into your chest and bend your torso towards your right leg till your head touches your right knee. Make sure your legs and hands are straight while you do this. Hold the pose. Repeat on the other side.
11. Vrikshasana (Tree Pose)

Benefits: Vrikshasana improves your posture and balance. It increases the flexibility of your hip joints, knees, and ankles. It prevents hernia and aids neuromuscular coordination. It strengthens your eyes and shoulders and reduces flat feet. It also increases your patience.
How To Do The Pose
Stand straight with your feet together. Keep your arms along the sides of your body. Get your palms together in a prayer mudra and place them in front of your chest. Raise your right foot. Bend it at the knee and place it on the upper thigh of your left leg near the root of the left thigh. Square your shoulders and keep your left leg straight. Hold the pose.
12. Padangustasana (Toe Stand Pose)

Benefits: The pose strengthens and opens up your knees. It cures hemorrhoidi XA condition in which the veins of the rectum and anus veins get swollen and irritated, resulting in pain and bleeding. Also known as piles. problems and develops mental strength. It strengthens your joints, abdominal muscles, hips, ankles, and toes. It increases your focus and improves your posture. The pose will also keep you calm and balanced.
How To Do The Pose
Stand straight with your arms by the side. Bend your right knee towards your chest. Bring your right foot to rest on your left knee. Make sure the sole of your right foot is facing upwards. Now, bend down on your standing left leg and bring your buttocks to rest on the heel of your left foot. The thigh of your left leg should be parallel to the ground. Bring your hands together in the prayer mudra and place them in front of your chest. Hold the pose.
13. Savasana (Dead Body Pose)

Benefits: Savasana relaxes and cleanses your body internally. It releases stress, depression, tension, and fatigue. It relaxes your muscles and cures insomnia. It improves your mental health and concentration and stimulates blood circulation. It helps in curing constipation, diabetes, and asthma.
How To Do The Pose
Lie down on your back. Keep your legs slightly apart. Place your arms along both the sides of your body. Let your palms face upwards. Relax. Close your eyes and breathe deeply through your nose. Consciously relax your body from head to toe as you breathe. Hold the pose till you feel completely relaxed.
To know more about the pose, click here: Savasana
That is half of the regimen done. Relax well in Savasana, drink some water, and gear up for the next 13 challenging poses that are sure to test your stamina.
14. Pavanamuktasana (Wind-Relieving Pose)

Benefits: Pavanamuktasana compresses and massages your digestive system. It strengthens your arms, improves hip flexibility, and tones your abdomen and thighs. It helps in the release of gas and aids digestion. It eases tension in the lower back and enhances blood circulation in the hip joints.
How To Do The Pose
Lie down on your back with your feet together and arms placed along the sides of your body. Clasp your hands and wrap them around your right knee. Bring it towards your chest and press your thigh on the abdomen. Keep your neck and left leg straight. Square your shoulders. Hold the pose.
15. Padahastasana (Sit Up Pose)

Benefits: Padahastasana increases your flexibility and stretches your spine. It firms your lower body and improves blood circulation in the legs. It stretches your shoulders and hamstrings and strengthens the biceps and calf muscles. It also stimulates the kidneys and pancreas.
How To Do The Pose
Sit down on your buttocks with your legs stretched out in front of your torso. Leave your arms hanging on both sides of your torso. Keep your back erect and feet together. Bend your torso towards your knees and place your head on them. Reach for the toes with your hands and clasp them. Flex your arms at the elbows and place them on the ground beside your calf muscles on both the sides.
16. Bhujangasana (Cobra Pose)

Benefits: Bhujangasana, is a part of Kundalini yoga and it improves your appetite and digestion. It relieves menstrual disorders and regulates blood pressure. It enhances the functioning of your liver and spleen and makes your spine stronger and more flexible. The pose balances weight by regulating your metabolism.
How To Do The Pose
Lie down on your stomach. Keep your toes together, and your arms gently placed on both the sides of your torso. Place your palms on both the sides near your chest, facing downwards and gently pressing into the ground. Now, apply pressure on your palms and lift your head, chest, and stomach off the floor. As you do this, bend your arms a little at the elbows. Square your shoulders and keep them away from your ears. Hold the pose.
17. Salabhasana (Locust Pose)

Benefits: Salabhasana works perfectly for slipped discs and sciatica. It strengthens your upper spine and relieves tennis elbow. It also helps in removing varicose veins on legs. It firms your buttocks and hips and encourages perseverance.
How To Do The Pose
Lie down on your stomach, keeping your chin on the floor. Let your heels touch each other. Now, snug your arms under your abdomen. Your palms should be facing downward and fingers spread and pointing towards your knees. Lift your right and left legs separately. Release your chin and place your mouth on the ground as if you are kissing it. Get your legs together, apply pressure on your hands, and lift both your legs as if they are one. Hold the pose.
18. Poorna Salabhasana (Full Locust Pose)

Benefits: Poorna Salabhasana works good for spondylosisi XA degenerative condition that gradually worsens with age and affects the facet joints and spinal discs. and slipped discs. It increases the elasticity of your rib cage and tones your arms, thighs, abdominal muscles, and hips. It prevents lower backache and relieves rheumatism and menstrual problems. The pose corrects bad posture.
How To Do The Pose
Lie flat on your stomach. Stretch your arms out at the sides with the palms facing downwards. Keep your legs together. Lift your head, chest, and torso off the floor. Lift your arms along with them, stretching them outward, with the palms facing down as you do so. Lift your legs off the floor. Hold the pose.
19. Dhanurasana (Bow Pose)

Benefits: Dhanurasana expands your lungs. It strengthens and revitalizes your spinal nerves. It improves the functioning of your large and small intestines, relieves constipation, and improves digestion. It treats bronchitis and diabetes and helps the liver, kidneys, and spleen function better.
How To Do The Pose
Lie down on your stomach. Keep your arms along the sides of your body. Keep your legs hip-width apart. Bend your knees and stretch out your arms to hold your ankles. Lift your chest and legs off the floor and pull your legs back by applying pressure on your ankles with your hands. Look straight and hold the pose.
To know more about the pose, click here: Dhanurasana
20. Supta Vajrasana (Fixed Firm Pose)

Benefits: Supta Vajrasana prevents hernia and stimulates the thyroid glands. It stretches and expands your rib cage. It loosens up your legs and regulates the adrenal glands. It eliminates anger and increases courage. The pose relieves constipation and relaxes your mind.
How To Do The Pose
Sit in Vajrasana and place your palms beside your buttocks with your fingers facing forward. Bend backward, keeping your right forearm and elbow on the floor and then the left forearm and elbow. Bear the weight of your torso on the elbows and look ahead. Reach for your toes with your fingers and grasp them. Hold the pose.
21. Ardha Kurmasana (Half Tortoise)

Benefits: Ardha Kurmasana releases tension in the neck and shoulders. The Yin yoga pose enhances your memory and mental clarity. It is good for asthma and irritable bowel syndrome. It tones your thighs and abdomen and gives a relaxing stretch to your spine. It also increases the flexibility of your hips.
How To Do The Pose
Sit in Vajrasana and lift your arms up towards the sky. Bring your palms together and entwine both your thumbs together. Keep your arms straight and stretched, with your biceps touching the ears. Now, bend down at your waist, bringing your entire torso towards the ground. Get your forehead and little fingers to touch the ground. Hold the pose.
22. Ustrasana (Camel Pose)

Benefits: Ustrasana stimulates your nerves. It improves the flexibility of your neck and cures backaches. It stretches your throat and is good for the thyroid gland. It opens up your chest, improves your posture, relieves menstrual pain, and strengthens your back.
How To Do The Pose
Kneel down on a mat and place your hands on your hips. Your shoulders and knees should form a straight line, and the soles of your feet should be facing upwards towards the ceiling. Bend backward gently and reach for the soles of your feet with your fingers. Keep your arms straight and look upwards. Hold the pose.
23. Sasankasana (Rabbit Pose)

Benefits: Sasankasana increases the mobility and elasticity of your back muscles and spine. It sends fresh blood and oxygen to your nerves. This asana relieves tension in your neck and shoulders. It helps reduce sinus and colds and rejuvenates the thyroid gland.
How To Do The Pose
Sit in the Vajrasana. Raise your buttocks off the heels of your foot. Leave your arms along the sides of your body and keep your back straight. Now, bend forward from your waist, arching your back. Place your forehead on the lower thighs, and your arms stretched out backward and reaching out to the soles of your feet. Place the thumbs on the ankles. The other four fingers should gently touch the soles of your feet. Hold the pose.
24. Janushirasana-Paschimottanasana (Sitting Head To Knee Stretching Pose)

Benefits: The pose increases blood circulation to liver, pancreas, thyroid, and intestines. It keeps allergies at bay, is good for digestion, and cures chronic diarrhea. The asana balances your blood sugar levels and enhances the function of your kidneys.
How To Do The Pose
Sit down on your buttocks with your legs stretched out in the front. Bend your left leg and place the heel near the anus and the rest of the sole on the inner upper right thigh. Stretch your arms over your head and bend forward towards your right leg. Clasp the big toe of your right foot with both your hands while your hands are bent at the elbows. Place the crown of your head on your right knee. Hold the pose.
25. Ardha Matsyendrasana (Spine Twisting Pose)

Benefits: The pose improves the elasticity of your spine and prevents slipped discs and arthritis. It calms your nervous system and relieves tension trapped in the back. The asana increases the supply of oxygen to your lungs. It also detoxifies the internal organs and improves reproductive health.
How To Do The Pose
Sit straight on your buttocks. Keep your legs stretched out in the front and your feet together. Bend your left leg, take it over your right leg, and place your left foot near your right thigh. Now, bend your right leg and get it closer to your pelvis. The sole of your right foot must press against your left buttock. Bend your torso towards the left and keep your gaze over your left shoulder. Keep your spine erect. Take your left arm behind and place your palm on the back. Stretch out your right arm and clasp your right knee with your right hand. Hold the pose.
To know more about the pose, click here: Ardha Matsyendrasana
26. Kapalbhati Pranayama (Skull Shining Breathing Technique)

Benefits: Kapalbhati Pranayama stimulates digestion and dissolves toxins and other waste matter in your body. It uplifts and rejuvenates your brain. The breathing technique will make your face glow with regular practice. It cures asthma, sinus, and hair loss.
How To Do The Pose
Sit down in Sukhasana and place your palms on your knees in the meditation mudra. Inhale deeply and slowly through your nose. Pull your stomach in towards your back. As you relax from this contraction, exhale in an outburst, and follow it up by an automatic inhalation. Doing this 20 times counts as one round of Kapalbhati. Relax deeply in Sukhasana at the end of each round by closing your eyes and listening to your body.
To know more about this breathing technique, click here: Kapalbhati Pranayama
Benefits Of Bikram Yoga
- Bikram Yoga flushes out the toxins in your body
- It strengthens and tones your body, making it more flexible
- It improves your immunity
- The practice heals old injuries and prevents future injury
- It helps you lose weight effectively
- You develop better breathing and increase your joint mobility
- It increases your focus and determination
- Regular practice of Bikram Yoga makes you sleep well as well as happy and energetic
- Bikram Yoga keeps your body young and glowing
- It improves the coordination between your mind and body
Now that we know what a Bikram Yoga session entails, let’s look at the difference between hot yoga and Bikram yoga!
Hot Yoga Vs. Bikram Yoga
Hot yoga and Bikram yoga are quite similar, but they differ in some key aspects. Hot yoga most often refers to any style of yoga practiced in a manually heated room, with temperatures generally ranging from 80°F to 105°F (27°C to 40°C). It includes various yoga styles and sequences, allowing for flexibility and creativity. Bikram yoga, on the other hand, is a specific style practiced in a room heated to 105°F (40.6°C) with a humidity of 40%. Bikram yoga consists of a fixed sequence of 26 postures and two breathing exercises lasting 90 minutes. The sequence and room conditions in Bikram yoga are consistent across all classes, emphasizing predictability and routine. While both styles offer benefits, Bikram yoga strictly follows the same sequence in every class, providing a more structured and uniform experience compared to the diversity found in hot yoga classes.
Infographic: What To Bring To A Bikram Yoga Class
Now that you know all the amazing benefits of Bikram yoga, you must try it out! However, this yoga session is different from your regular yoga routines. It could be a messy affair, quite literally. Make sure you are armed with the right essentials to make the most out of this popular yoga session. Check out the infographic below on how to gear up for a Bikram Yoga class. Illustration: StyleCraze Design Team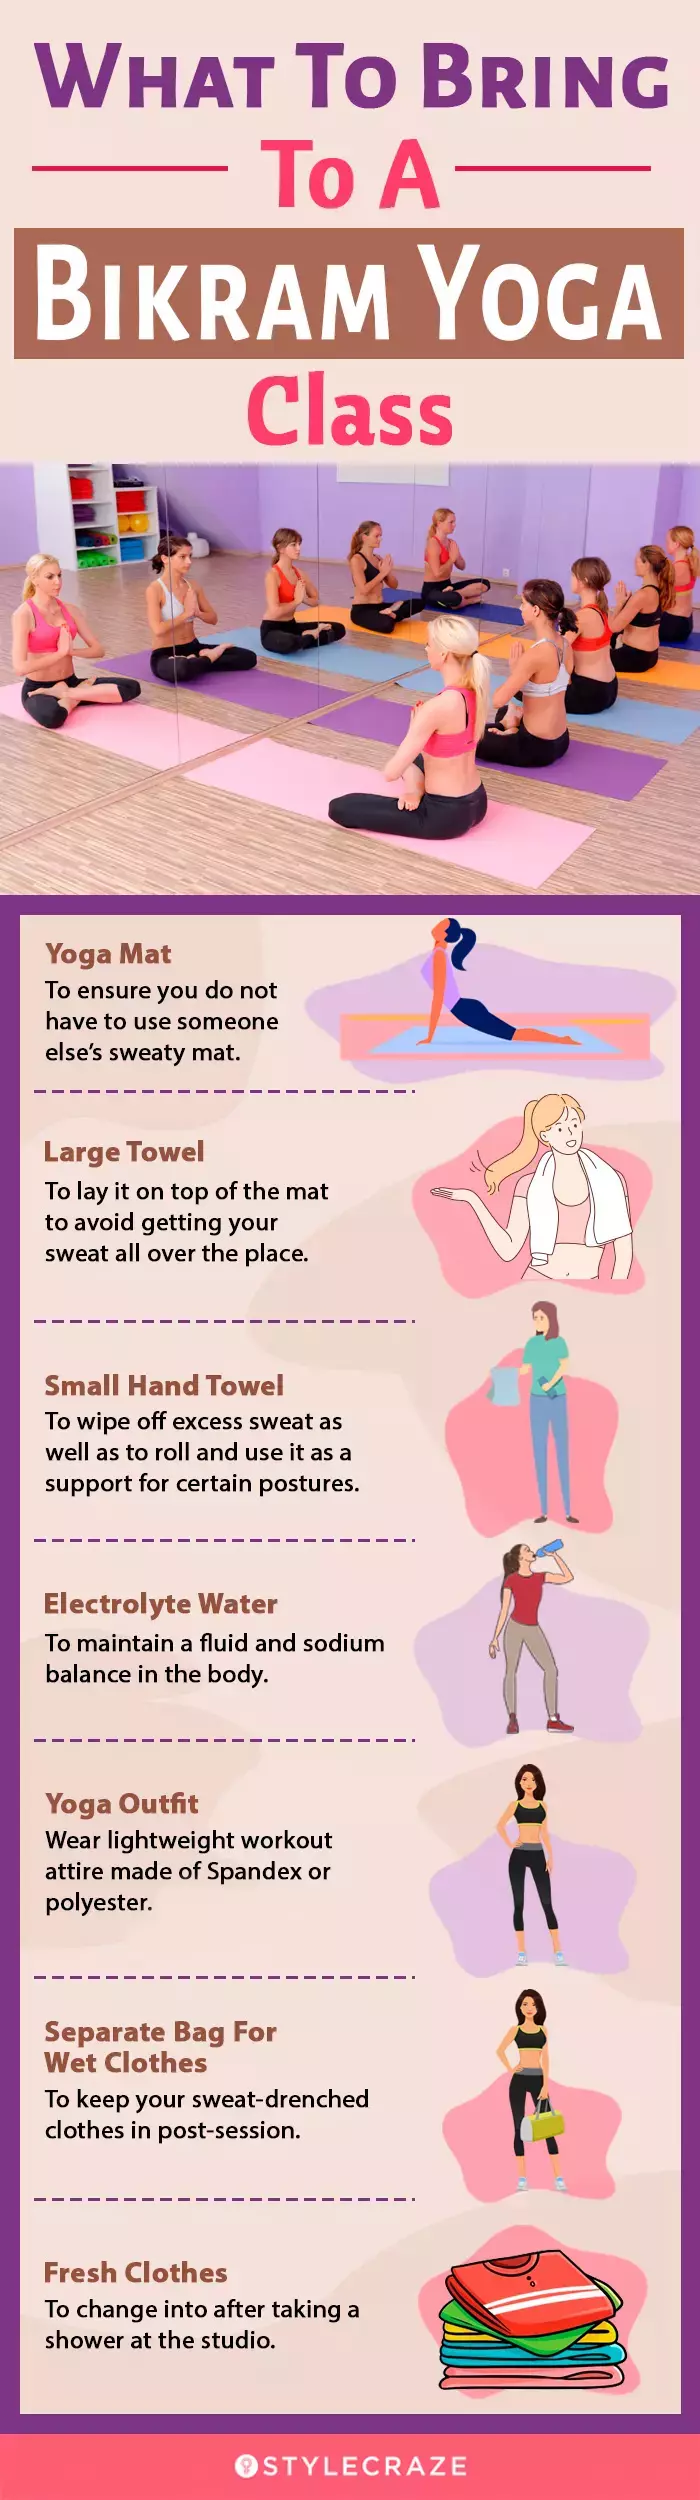
 Quick Tip
Bikram yoga asanas are performed in a controlled atmosphere. This yogic method is quite popular in the United States, and it is believed to be a life-changing experience for those who practice it. The method comprises performing a series of predesigned exercises derived from the classic Hatha Yoga asanas, in a studio with a temperature of around 40°C and humidity of 40%. The 90-minute program covers the practice of 26 asanas. Practicing hot yoga or Bikram yoga is a high-intensity activity that can be a great way to build endurance and improve fitness, while also promoting relaxation and mindfulness. These yoga practices also draw on Eastern philosophy and spirituality, which enhances the overall wellness benefits of regular exercise and offers numerous health advantages. Check it out to see if you like it.
Frequently Asked Questions
Is it necessary to learn Bikram Yoga from a certified instructor?
It is important to learn the Bikram Yoga style from a certified teacher as simply practicing the list of asanas in a heated room is not adequate.
How many times a week can I practice Bikram Yoga?
Initially, you need to attend the classes every day for at least two months. Later, you can reduce the number of days as per your convenience.
Can I practice Bikram Yoga when pregnant?
It is best to consult your doctor if you are pregnant.
Is prior practice of yoga necessary to practice Bikram Yoga?
No, it is not required as all Bikram Yoga classes are designed for beginners.
Can I practice Bikram Yoga with an injury?
Yes, you can, after consulting your doctor. Bikram Yoga will help your wound(s) to heal faster.
How should I prepare for a Bikram Yoga session?
Eat two hours before your class commences and be well hydrated.
What should I wear and bring to a Bikram Yoga class?
Wear breathable and stretchable yoga wear and carry a bottle of water, a yoga mat, and some towels to your class.
Is Bikram Yoga harder than Vinyasa Yoga?
Both Bikram Yoga and Vinyasa Yoga (power yoga) have levels ranging from beginner to advanced, and both can be practiced by yoga enthusiasts at different levels of preparedness.
Can you do Bikram Yoga without heat?
Yes, you can do Bikram Yoga without heat as it is essentially a set of yoga postures and breathing techniques that are practiced in a flow. According to a recent study, you do not need to practice Bikram Yoga in a hot room to gain its benefits for heart and health (1).
Key Takeaways
- Bikram yoga is practiced in a controlled environment with a temperature of 40 degree celsius and 40% humidity and involves a set of predesigned exercises done for 90 minutes.
- The session involves 26 asanas, which are done while focusing on breathing.
- Bikram yoga helps improve circulation, posture, flexibility and relieves mental stress.
- Some of the popular poses from Bikram yoga are triangle, half moon, eagle, bow, and locust poses.

Image: Stable Diffusion/StyleCraze Design Team
Unleash the power of Bikram yoga. Explore this invigorating video that showcases various poses and highlights the numerous benefits of this popular yoga style for your mind and body.
References
Articles on StyleCraze are backed by verified information from peer-reviewed and academic research papers, reputed organizations, research institutions, and medical associations to ensure accuracy and relevance. Read our editorial policy to learn more.
- Effects of yoga interventions practised in heated and thermoneutral conditions on endothelium-dependent vasodilatation: The Bikram yoga heart study
https://physoc.onlinelibrary.wiley.com/doi/full/10.1113/EP086725


")


