How To Contour Your Face – 5 Simple Ways And Tips
Tips that help you master the art of effortless contouring in no time.
 Ketrena KirklandMakeup Artist
 Ketrena Kirkland has over 10 years experience in makeup artistry and aims to provide the best services to her clients. She started her makeup journey at the College of Charleston and later became a freelance artist with Estée Lauder. In 20... more
 shreya mukherjeeMA (English)
 Shreya is a beauty and lifestyle writer with two years of experience. After graduating from Christ University, Bengaluru, she started as a writer for a non-profit organization, Bhumi, as an intern. Sh... more
 subhrojyoti mukherjeeMA (English) Experience: 4 years
Subhrojyoti is an associate editor at StyleCraze with four years of experience. He has a master’s degree in English from Presidency University, Kolkata, and has also done a post-graduate certificate c... more
 anu pallaviBA
 Anu is a beauty and lifestyle writer and a graduate of Amity University, Noida, where she refined her writing skills and cultivated her deep passion for the field. She pursued the Beauty Technician Tr... more

Image: Shutterstock
If you’re a fan of contouring, you’ll know that it takes some real skill to master the technique. It’s not just makeup professionals who can contour the right way and could rival Kim Kardashian’s glam squad – you can do it too and to help you out, we’ve gathered some handy tips and simple tutorials on how to contour your face within three minutes.
For all the amateurs reading this, what is contouring anyway?
It’s a technique that was previously reserved for runway models and theater artists, but it has now become a part of many people’s daily makeup routines. It’s the art of enhancing your facial structure through makeup and giving shape to specific areas of the face.
 Keep In Mind
- Technique: Contouring is done by using makeup shades that are slightly lighter or darker than your original skin tone to sculpt and add dimension to your facial features.
- Formula: Contours are usually powders or matte creams as they need to create a shadow effect that is not possible with glitter or glossy formulas.
- Skin Tones: For cool undertones, opt for gray-brown shades. For warm undertones, opt for red-brown shades.
- Skin Type: Use cream contours for a hydrating application on dry skin. Use powder contour for a dry finish on oily skin.
- Pacing The Application: After your skin care, primer, foundation, and concealer, you can start shadowing your face with your contouring products.
In This Article
How To Contour Your Face – 5 Simple Ways
Now, let’s answer your question ‘How to contour my face?’ There are a bunch of steps involved to help you get those chiseled cheekbones and to help create that subtle definition. Here’s what you need to know to get a perfect contour face.
1. Create Your Base
Prep your face, apply foundation and concealer, and brush on a light layer of translucent powder to create the perfect base. This will help your contour go on smoothly.
2. Choose Your Product And Brushes
You can choose between powders and creams – powders give you a more matte finish while creams leave you with a dewy one. If you’re a beginner, it’s best to start with creamy products as these are easier to build and blend.
For your brushes, use smaller, fluffy brushes for more precision. You need one brush for contouring and one for highlighting. You can try the e.l.f Contour Brush and MAC Large Angled Contour Brush.
3. Map Out Your Face
The main spots for contouring include the area under your jawline, the sides of your temples, the sides of your nose, and the hollows of your cheekbones. The trick is to use your bone structure as a guide and build pigment as you go.
4. Building And Buffing
The more natural your contouring looks, the better it is! Always make sure that you don’t have obvious, sharp lines on your face from the color. Use a damp egg sponge or a foundation brush to blend out the product. You can add a peachy-pink blush on the apples of your cheeks for a flush of color.
5. Highlighting
Highlight only the areas that the light would naturally hit like your cheekbones, brow bones, the bridge of your nose, the top of your cupid’s bow, and the center of your chin. This enhances the effect of contouring.
 Trivia
The technique of contouring is believed to date back to Elizabethan England where stage actors would contour their faces with chalk and soot to allow spectators to see their facial expressions from afar.
Let’s move onto some simple face contouring tutorials. The number one step is to identify your face shape. We have different tutorials lined up for each face shape.
Contouring For Heart-Shaped Face
What You Need
- Contouring palette
- Brushes
Steps
1. Prep Your Skin

The first step is to prep your skin and apply a light foundation for your base.
2. Highlight

Using a cream highlighter, start by highlighting the jaw, the bridge of the nose, the undereye area, the top of the cheeks, the corners of the mouth, and the center of the forehead.
3. Contour

Now that you’ve mapped out your highlighting, the next step is to move on to contouring. Make sure the color you use is appropriate for a shadow and not one that’s too warm or orangey. Use a brush and do your contour down the hairline, coming into the temple slightly to narrow down the forehead. For your cheek contouring, follow your natural bone structure and contour from the top of the ear toward the corner of the mouth. Apply a little bit on the sides of the nose for a more chiseled look.
4. Blending

Once everything is mapped out, it’s time to blend it out, and this is where it can get tricky. Use a small, fluffy contouring brush. Start with small little strokes on your forehead to blend out the highlighter and repeat this step on other areas as well. Use a big contouring brush for the contoured areas – start with your forehead and slightly push down the product, while blending it in properly. When you’re blending through your cheeks, use an upward movement for a softer look. The idea is for it to look really soft and smooth so make sure you blend everything out extremely well.
5. Set It

Using a translucent powder and a brush, gently press and roll the brush on your skin. This will make your product last longer. You can go in with some blush or bronzer to add a little bit of warmth to your look.
Voila! That’s the end result! Doesn’t it look super natural?

Contouring For Round Face
Steps
1. Highlight

Prep your skin and use foundation before you begin. Start by highlighting right at the center of your forehead, the bridge of your nose, followed by the center of your chin. Create long, inverted triangles under the eye area. Pop a bit of highlighter on your cheekbones as well.
2. Contour

Use a taupe, cool undertone shade for your contour and steer clear of shimmer. Start contouring down from the ear as this helps slim down your face instantly. Next, contour your temples by creating a C-shape. To slim down your nose, go over the sides of it with your contour shade.
3. Blend

Use a small, fluffy brush and blend out the highlighted area by gently pressing and rolling the brush over. Blend the contour with a big contouring brush until you can’t see any harsh lines on your face.
4. Set It

Use a setting powder or a translucent one and gently pat it all over using a powder brush to set your makeup.
Here’s the final result!

Brianna Fox, a YouTuber, demonstrates how to highlight and contour a round face using cream and powder products in a video. She states, “Normally when you see people contour, you see them bring this here and under and almost like cup the cheek and make it look that way, but I feel like my cheeks are already big enough– I don’t need to be doing that. I’m actually gonna go the opposite direction. So, I’m gonna find the line that I want. I’m kind of looking down into my mirror so that I can create the angle that I’m trying to achieve (i).”
Contouring For Square Face
Steps
1. Highlight

Once you’re done with prepping your face and applying foundation, it’s time to map out your highlighter. Start at the center of your forehead and move towards the center of your chin. To connect the two, draw a small line at the center of your nose. Starting right in the tear duct, highlight the under eye area and create two Vs. Also, highlight the outer corners of your mouth.
2. Contour

When choosing your contour shade, it’s best to pick cool greys and taupes for mimicking natural shadows. Drag the product along the jawline, underneath the cheekbones, and the sides of the nose.
3. Blending

The trick is to start blending your highlighter first and then blending the contour into the highlight. Gently press your brush against the product and blend the dark with the light.
4. Finish

To set your cream contour product, use a little bit of powder to ensure it lasts all day. Use a big brush to roll and pat the powder onto the areas. You can add some blush and bronzer for warmth.
And you see the difference?

Contouring For Oval And Oblong Face
Steps
1. Highlight

Prep your skin with moisturizer and foundation. Highlight upward in an arch or half-circle on the forehead, and slide it right down your nose. Also highlight your chin, the outside corners of your mouth, your undereye area, and your cheekbones.
2. Contour

Choose a neutral shade for your contour. Use the angled side or the tip of the brush to contour underneath the cheekbones. Then contour the outside of your forehead, the sides of your nose, and your jawline.
3. Blend

Starting from the inside corner of your eye – blend the highlight from the center outward, and the contour from the outside inward.
4. Set It!

Use a translucent powder to set the product. Starting from the center of your face, use a brush and lightly press and roll the powder on the areas, without disturbing the makeup underneath.
And (drumroll) – this is the final outcome!

Contouring For Diamond-Shaped Face

For a diamond-shaped face, contour in the area below your cheekbones, starting from your ears and ending in the middle of your cheeks.
Highlight your undereye area, the middle of your forehead, and the middle of your chin to broaden these naturally narrow areas.
Contouring For Rectangle Face

If you have a rectangular face, focus on contouring the sides of your forehead to make your hairline appear more narrow. Also, go along your hairline, under your jawbone and the area below your cheekbones – starting from your ears and ending in the middle of your cheeks.
Highlight your undereye area, and along your brow bone, and the middle of your chin.
 Did You Know?
Tips: Contouring Hacks, Tips, And Tricks
Contouring may seem a tad bit intimidating initially, but as you keep doing it, you’ll eventually get the hang of it. Here are a bunch of contouring hacks, dos and don’ts, so you aren’t left feeling dazed and confused.
- Firstly, it’s important to contour for your face shape to ensure that it looks natural.
- For your contour product, avoid using anything that’s too orangey or shimmery.
- To contour your nose, you can use a strip of cardboard paper for a straight line. Draw two lines down the sides of your nose, starting from the inner corner of your brow bone, and create a U-shape at the tip of the nose.
- Use the right brushes and tools! We recommend trying the brushes from Real Techniques.
Infographic: All About Contouring
Contouring is a technique that needs a bit of practice, but once you get the hang of it, it makes for a useful skill, especially if there are flashy but formal events to attend.
Click on the infographic to know more about this beauty technique.
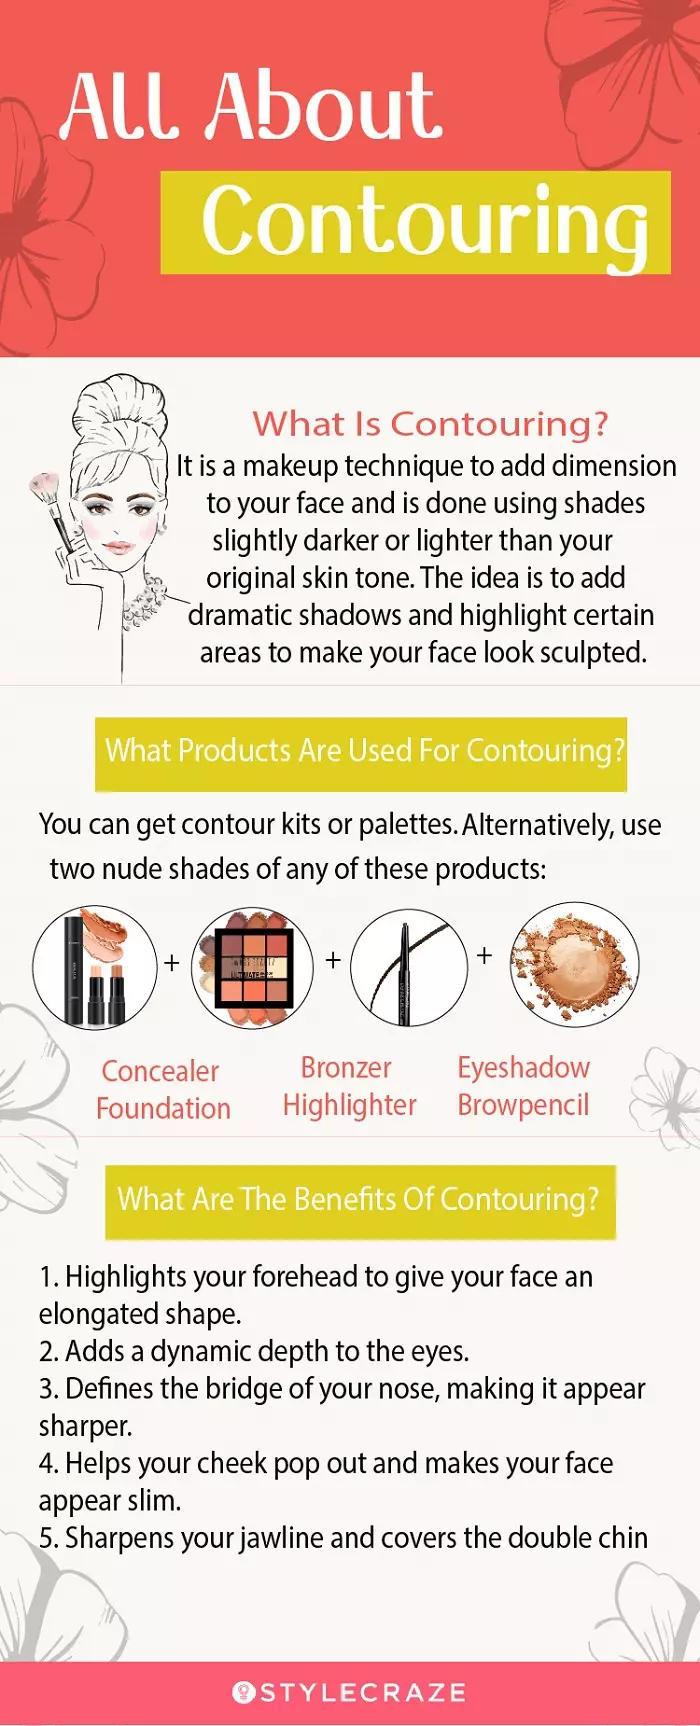
Illustration: StyleCraze Design Team
With this guide on how to contour your face in place, you are very close to getting your desired chiseled look. From teaching you how to create your base to mapping out your face and showing you how to blend the product for a natural-looking finish, I am sure this article has answered all of your questions. So, now that you have it all figured out, what are you waiting for? Go ahead, get your products, and start with your makeup sessions. With a couple of trials, you will surely get the perfect look!
Frequently Asked Questions
Is bronzer and contour the same thing?
No, a bronzer is usually used to add warmth to your face, whereas a contouring kit helps you sculpt your face, highlighting your best features.
Can you use concealer as contour?
Yes, you can use a long lasting, creamy stick concealer to contour your face as well.
Is a contour stick or powder better?
It depends on your skin type and the amount of contouring you desire. While creamy contour sticks are convenient and handy while travelling, powder contour palettes can give you a more dramatic effect and are mostly suitable for oily skin.
Can you use eyeshadow as contour?
Yes, you can use neutral eyeshadow palettes for contouring as well.
Key Takeaways
- Finding the right contour shade that suits your skin tone is essential for a good-looking contour.
- The placement of contour helps define different parts of the face
- Blending helps achieve a seamless natural look.
- Highlighter is used to balance the contour and bring out features
- Avoid choosing very shimmery contouring products.

Image: Stable Diffusion/StyleCraze Design Team
Check out this amazing makeup video that shows you the effective ways to contour, spotlight, bronze, and blush your manner to a slimmer-searching face in no time!
Personal Experience: Source
StyleCraze's articles are interwoven with authentic personal narratives that provide depth and resonance to our content. Below are the sources of the personal accounts referenced in this article.
i. HOW TO CONTOUR ROUND FACEhttps://www.youtube.com/watch?v=bwuVuDzH3hY


