31 3D Nail Art Designs To Take Your Nails To The Next Dimension
Practice and master intricate designs, from the ombre effect to floral works of art.
 Gabrielle RichensSkin Therapist
 Gabrielle Richens spent 20 years as a model with Elite Model Management. She is now a skin therapist, clean beauty blogger, and founder of The Rich Skin Club, an online anti-aging coaching service. She helps women understand the aging proce... more
 esha saxenaMA (Mass Communication & Media Studies) Experience: 3 years
Esha Saxena is a writer and journalist with over 3 years of experience. She holds a master’s degree in media and mass communication from St. Francis College for Women, Hyderabad, and firmly believes t... more
 subhrojyoti mukherjeeMA (English) Experience: 4 years
Subhrojyoti is an associate editor at StyleCraze with four years of experience. He has a master’s degree in English from Presidency University, Kolkata, and has also done a post-graduate certificate c... more
 shreya mukherjeeMA (English)
 Shreya is a beauty and lifestyle writer with two years of experience. After graduating from Christ University, Bengaluru, she started as a writer for a non-profit organization, Bhumi, as an intern. Sh... more

Image: Shutterstock
3D nail art designs may look complicated, but we can assure you that they will make your nails pop like never before. There is no harm in walking that extra mile to pamper your nails and give them an aesthetic look. So, forget about the difficulties of the process and trust our fresh designs to transform your regular manicure. You can use flowers, hearts, bows, rhinestones, petals, gems, and many such pretty items to create these simple yet elegant designs. And the good news is you do not always need acrylic nails for 3D designs. They can be done on natural nails, too. Keep reading for the deets!
 Keep In Mind
- Best Nail Shapes: Opt for oval- and almond-shaped nails in case of plump fingers. Stiletto- or coffin-shaped nails go better with slender fingers.
- How To Choose: Nail art design should fit the outfit and makeup you’re planning to wear on the occasion.
- Aftercare: Avoid constant exposure to heat and wear rubber gloves when working with water to ensure longevity.
In This Article
Beautiful 3D Nail Art Designs
We’ve compiled a list of the 31 chicest designs that you can recreate without having to pay a visit to the nearest nail salon or call over a nail technician. So if you’re looking for ideas for DIYs, keep reading!
- Emerald-Toned 3D Nails
- 3D Sea Blue Nail Art For Summer
- 3D Cable Knit Sweater Nail Art
- 3D Beige Nails
- Pink And Gold 3D Nail Art
- 3D Black And Gold Checkered Nail Art
- Colorful 3D Sequin Nail Art
- Silver Winter Nails
- Dark Blue Jewel-Studded 3D Nails
- 3D Vanilla And Strawberry Nail Art
- 3D Jewels And Soft Pink Nail Art
- 3D Black Beauty Nail Art
- Acrylic 3D Oreo Flower Nails
- 3D Violet Acrylics Nail Art
- 3D Sunflower Nail Art
- 3D French Flower Nail Art
- White Flowers And Shimmer
- 3D Rose Nail Art Design
- Christmas 3D Nail Art
- 3D Snowflakes Nail Art
- Pink And Silver Glitter Bow
- Lavender And Silver Bow
- Black And Beige Bow 3D Nail Art
- 3D Purple And Green Bow Tie Nails
- 3D Embossed Spring Nail Art For Short Nails
- Minimal Summer 3D Nail Art For Short Nails
- Minimal Beaded Blue Acrylic Nails
- 3D Daisies Summer Nail Art
- 3D Plum Plus Rhinestones Nails
- 3D Fuschia And Grey Rhinestones Nail Art
- 3D Butterfly Nail Art
1. Emerald-Toned 3D Nails
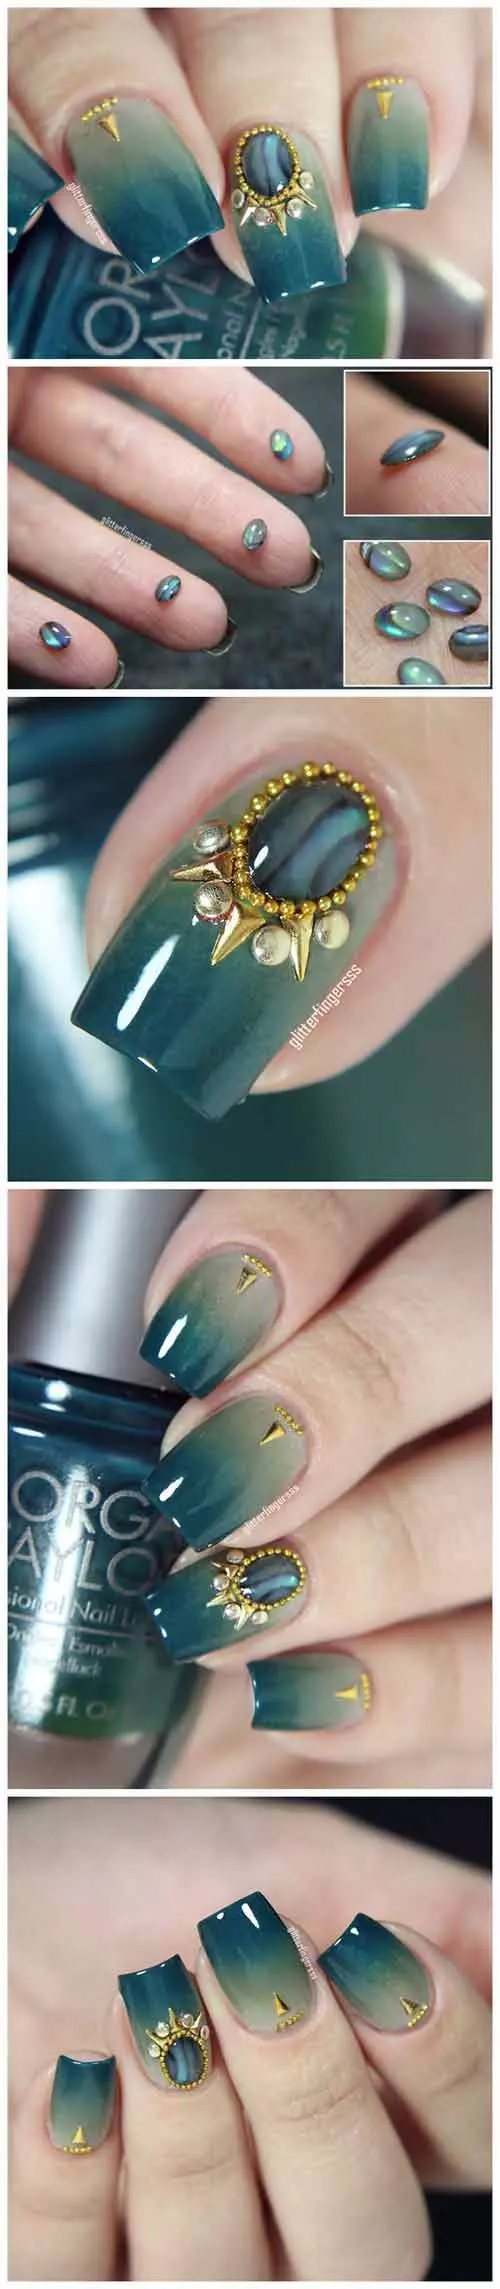
This royal design uses a dual-toned nail polish and some jewels to create this exclusive look. If you are looking for a sophisticated nail art idea, you must try to recreate this look.
What You Will Need
- A dual-toned nail polish
- Nail art jewels
- Studs
- Clear polish
How To Do Emerald-Toned 3D Nail Art Design?
- Start by choosing a proper dual-toned nail polish. You can also use a dark color with some shimmer instead. Apply two coats of the base.
- For the decor of the ring fingernail, apply a coat of clear polish and use a nail art tweezer to place the jewels. Make sure you start with the bigger jewels.
- Use the small studs to do the outline and the decoration of the other fingernails.
- Apply a layer of top coat to secure the nail art.
2. 3D Sea Blue Nail Art For Summer
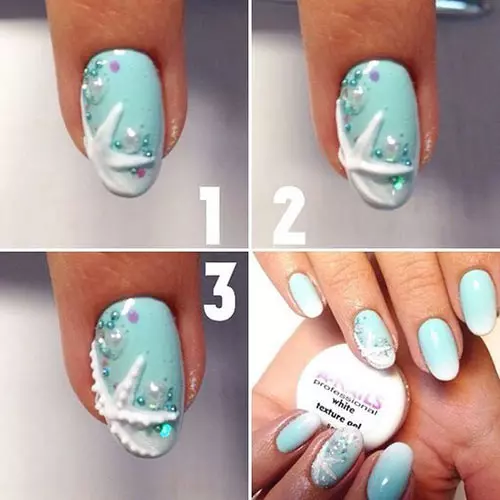
This coral blue look is oh-so-refreshing and cool and will ensure you stay abreast with the latest trends! It’s perfect for the summer or for when you’re away on vacation. The star fish is done intricately, but it’s a rather simple decoration to recreate.
What You Will Need
- Coral blue nail polish
- White nail polish
- A sponge
- Acrylic mixture
- Clear polish
How To Recreate This 3D Sea Blue Nail Art Design?
- Choose a coral blue nail polish and apply it to the bottom-half of your nails.
- Apply a coat of white polish to your tips. Using a small sponge, gently blend out where the two shades meet to create the effect in the picture.
- Use the white acrylic mixture to create the star fish layer by layer on your nail.
- Take tiny white acrylic beads and place them over the starfish.
- Use a coat of clear polish or glue to fix the studs and gems to decorate the ring fingernail.
- Secure the nail art with a layer of top coat.
3. 3D Cable Knit Sweater Nail Art
This nail art brilliantly gives an embossed 3D effect to your nails. It’s very minimal and classy. Also, girls with both short or long nails can rock this design.
What You Will Need
- Nude nail polish
- Acrylic mixture
- Clear polish
- Nail art tweezer
How To Recreate This 3D Cable Knit Sweater Nail Design?
- Paint your nails using a nude nail polish. Maybelline Super Stay in the shade ‘Beige Touch’ is a good option.
- To create the acrylic designs, use a white acrylic mixture, and dip the pieces in the same nail polish that you used for the base.
- Apply a coat of clear polish, and while it is still wet, start placing the tiny design pieces over your nail with the help of a nail art tweezer.
- For the final step, apply a layer of top coat (use a matte top coat for the effect in the photo).
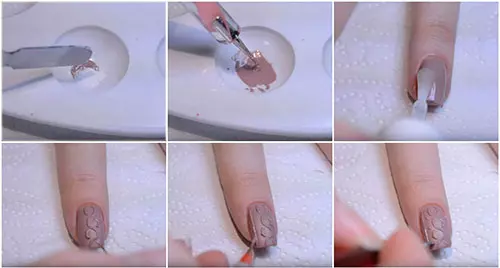
4. 3D Beige Nails
If you want to opt for a rather modest manicure, this 3D beige mani is the way to go. It primarily decorates the ring finger with silver embellishments and a cute acrylic white flower. Besides, beige is such a versatile shade!
What You Will Need
- Beige nail polish
- Acrylic mixture
- Nail art tweezers
- Clear polish
How To Recreate This
- The first step is to find the right beige for your nails. The beige used in the design ranges between a light pink and a nude shade. Start by painting your nails with 2 coats of the polish.
- To create the flower, use white acrylic mixture. Start with the center and work your way to the petals by creating vertical dents on the acrylic.
- With the help of nail art tweezers, add silver rhinestones or gems on and around the flower. You can use either a top coat or glue in order to hold the pieces together.
- Make sure you apply a layer of clear nail polish to achieve the glossy look and also to secure the décor.
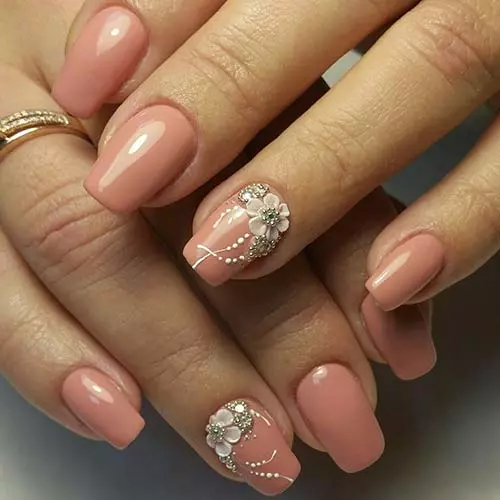
5. Pink And Gold 3D Nail Art
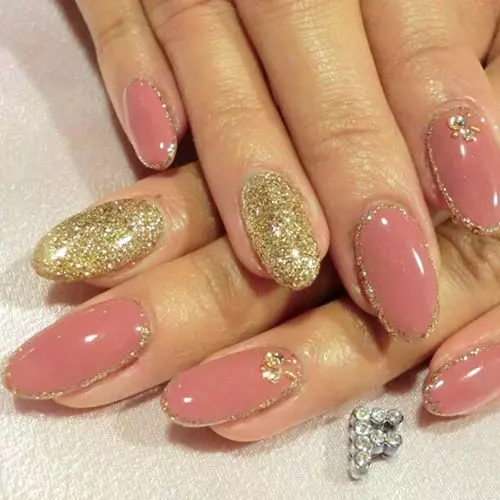
Gold and pink, anyone? Just look at how delightful the combination looks. It’s chic, classy, and a very versatile design. If you like to keep it low-key fancy, then this one is perfect for you.
What You Will Need
- Rose nail polish
- Gold nail polish
- Silver studs
- Clear nail polish
How To Recreate This Pink And Gold 3D Nail Art?
- Start by painting your nails (except the ring fingernail) in a light rose-pink shade. The Colorbar Nail Polish in the shade ‘Rose Quartz’ is a similar shade.
- Use a gold nail polish with a thin brush to create the outline at the edges.
- Paint the ring fingernail in gold.
- Apply a coat of clear polish and place the silver studs over it.
- Finish the look with a top coat.
Fab! You’ve created highly irresistible, almond-shaped pink and gold nails!
6. 3D Black And Gold Checkered Nail Art
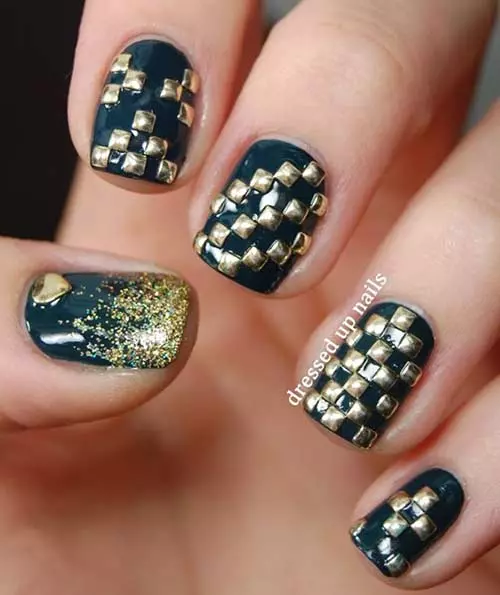
Level up your fashion game with this bold black and gold nail art that is utterly gorgeous and will surely make you stand out from the crowd. It looks great on short nails as well and is low-maintenance. It’s also simple to do.
What You Will Need
- Black nail polish
- Gold studs
- Nail art tweezers
- Glitter
- Clear polish
How To Recreate This 3D Black And Gold Checkered Nail Design?
- Apply two coats of black nail polish for your base.
- Apply a coat of clear polish.
- While the clear polish is still wet, start placing the gold studs (using nail art tweezers) from the tip of your nail to form a checkered pattern.
- For the thumb, add a bit of sparkle and glitter at the tip and stick a heart-shaped stud at the base.
- Top it up with clear polish! BAM! Say hello to spunky nails.
7. Colorful 3D Sequin Nail Art
This sequin inspired nail art is so darn simple and colorful and can easily increase your style quotient! Also, the plain base complements the sequins beautifully. You can also choose to go with a single sequin color like silver or gold if you prefer it that way.
What You Will Need
- Nude nail polish
- Sequins
- Silver studs
- Clear nail polish
How To Recreate This Colorful 3D Sequin Nail Art?
- For the base, apply two coats of a nude shade of nail polish. The Maybelline Color Show Nail Polish in the shade ‘Nude Skin’ is a great option.
- Apply a coat of clear nail polish and then place the sequins and silver studs over it while it is still wet.
- Seal the look with a layer of top coat nail polish.
You achieve fabulous nails in only 3 steps!
 Quick Tip
8. Silver Winter Nails
A bit of glitter polish and silver studs can go a long way in transforming an ordinary manicure into something special. It’s like winter on your nails. To recreate this look, follow the steps.
What You Will Need
- Grey nail polish
- Silver glitter polish
- Silver studs
- Clear polish
How To Recreate This Silver Winter Nail Art?
- Start with the base nail polish, which is white with a gray undertone.
- For the index and the pinky finger, use a silvery glitter nail polish.
- Apply a coat of clear nail polish.
- Place the silver studs on top of the nail, while the clear polish is still wet.
- Finally, apply a layer of top coat.
9. Dark Blue Jewel-Studded 3D Nails
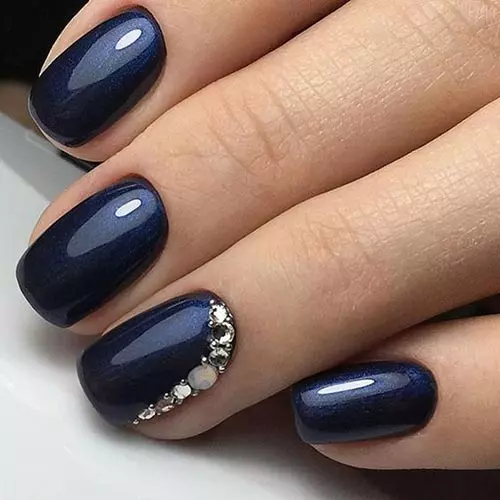
There’s something so calming about this shade of blue. It’s dark and hauntingly beautiful. To top that, the silver jewels are creating such a wholesome design – this one is a must-try!
What You Will Need
- Dark blue nail polish
- Clear nail polish
- Silver studs
How To Recreate This Dark Blue Jewel-Studded 3D Nail Design?
- Start by painting your nails in a dark shade of blue as shown in the picture. The Colorbar Nail Lacquer in the shade ‘Blue Lagoon’ is what you can use.
- Apply a layer of clear nail polish.
- Line the right corner with the silver studs.
- You can add smaller studs in and around the big studs for added charm.
- Finish with a good layer of top coat!
10. 3D Vanilla And Strawberry Nail Art
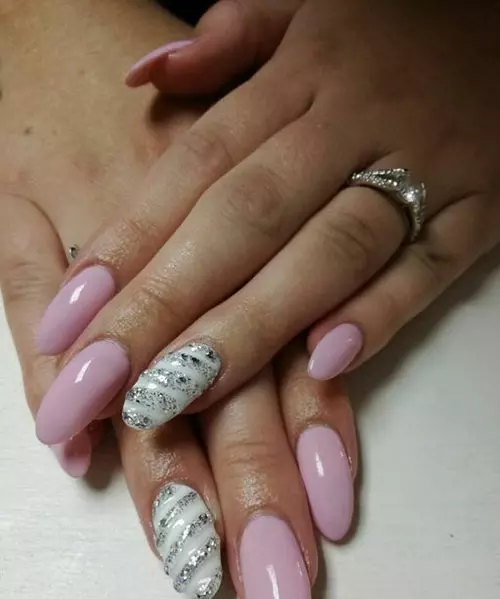
This design reminds me of strawberry sorbet. It’s a very subtle combination of light pink, white, and a little bit of glitter. Also, it’s very easy to recreate.
What You Will Need
- Pink nail polish
- Thin brush
- Glitter polish
- Clear polish
How To Recreate This 3D Vanilla And Strawberry Nail Art?
- Start by painting your nails with two coats of the base nail polish –O.P.I in the shade ‘Princess Rule’ for the pink and white for your ring fingernail.
- Use a thin brush to create stripes on the ring fingernail with a glitter polish.
- Apply a top coat over your nails!
Wasn’t that a simple 3-step process?
11. 3D Jewels And Soft Pink Nail Art
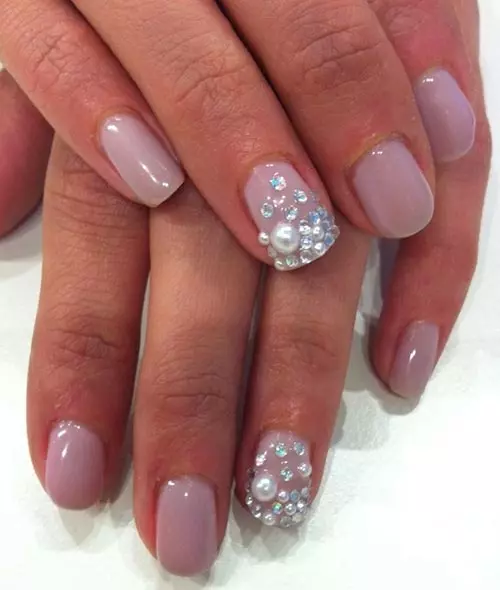
The minimal design is light and super pretty. The silver rhinestones complement the light-pink beautifully. If you prefer lighter shades for your nails with an added touch of bling, then knock yourself out.
What You Will Need
- Pink nail polish
- Rhinestones
- Pearls
- Clear nail polish
How To Recreate This 3D Jewels And Soft Pink Nail Design?
- Apply two coats of the base nail polish. The O.P.I Nail Lacquer in the shade ‘In the Spotlight Pink’ is a great option.
- Choose the fingernail you want to put your focus on (while you can also do it on every fingernailif you want!).
- Apply a coat of clear nail polish.
- Arrange the rhinestones and pearls aesthetically over the nail.
- Apply a layer of top coat to finish.
Quick Tip3D Acrylic Nail Designs
12. 3D Black Beauty Nail Art
This look is so bewitching! The matte black chalky base makes the design all the more unique. It’s very easy to recreate. You can even choose a black glossy nail polish instead of the one that is used. The design has you covered this Fall!
What You Will Need
- Black nail polish
- Acrylic nails
- Acrylic mixture
- Gold glitter
- Green nail polish
- Clear Polish
How To Recreate This 3D Black Beauty Nail Art Design?
- Start by painting the acrylic nails black.
- To create the flower, place a tiny ball of orange acrylic mixture on top of the nail, as shown in the image. (Note: You can also use gold or another shade of your choiceinstead of the orange.)
- Create a small hole at the center of the ball using a pin or needle.
- Use a brush to slightly spread the ring to form a thin layer of petals.
- Repeat the process until you have the desired number of petals.
- You can use gold glitter at the center of the flower to make it pop.
- Apply the green nail polish with a nail art brush to create the leaves.
- Finally, use a top coat to secure the flower.
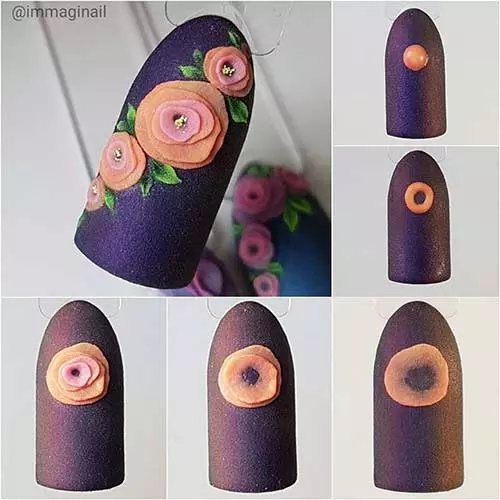
13. Acrylic 3D Oreo Flower Nails
This trendy design is a lot of fun to create. It’s got the classic black and white combo paired with polka and acrylic flowers. You can choose to recreate this look on just your ring fingernail if you would rather opt for a more uncluttered look. You can leave the other fingernails alone (or put a few polka dots).
What You Will Need
- Black nail polish
- White nail polish
- Acrylic mixture
- A thin brush
- Clear polish
How To Recreate This Acrylic 3D Oreo Flower Nail Design?
- For the base, apply two coats of black nail polish.
- To create the acrylic flowers, spread an aluminum foil sheet and place some white acrylic mixture on the sheet.
- Create circles and layer them one upon the other until it’s a full flower, as you can see in the picture.
- For the smaller flowers, repeat the same process, only with smaller circular molds.
- Using a thin brush, create white stripes and polka dots on the nail.
- Apply a coat of clear polish and place the flower that you created over the white stripes.
- Let it set.
14. 3D Violet Acrylics Nail Art

This enchanting nail art is great for any season. The light-pink flower on top is rather subtle. You can choose to recreate this look on just your ring finger nail instead of all your nails.
What You Will Need
- Violet nail polish
- Acrylic mixture
- Aluminum foil
- Needle or pin
- Clear polish
How To Recreate This 3D Violet Acrylics Nail Art?
- Start by painting your nails violet. As per your preference, you can choose either a matte or gel finish nail polish.
- To create the petals, use the specific shade of pink acrylic mixture. Take a small ball of the mixture and lay it on a sheet of aluminum foil.
- The thin petals must be layered delicately, one on top of the other.
- To create the center of the flower, take the ball of the pink acrylic mixture and place it on the nail in the middle of the flower.
- Gently press the center to achieve the specific look.
- Use a needle or a pin to create the swirls.
- 7.You’ve mastered the design!
3D Flower Nail Art Designs
15. 3D Sunflower Nail Art
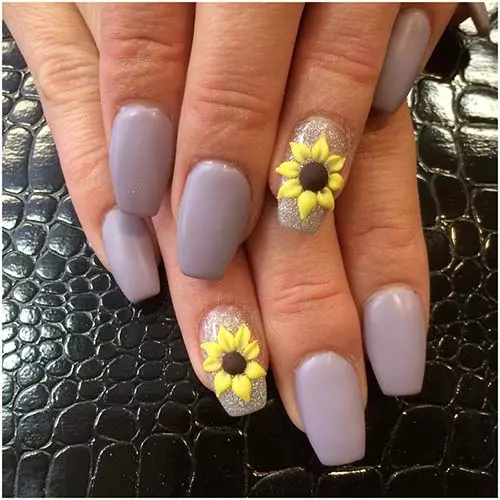
This look comprises a lovely lavender shade in matte, some silver glitter, and sunflowers. It’s a very pretty and summery pastel shade. You can even use it to brighten up your rainy/winter days.
What You Will Need
- Lavender nail polish
- Glitter polish
- Acrylic mixture
- Clear polish
How To Recreate This 3D Sunflower Nail Art?
- Start by painting your nails using a pastel shade of lavender nail polish. The Maybelline Color Show polish in the shade Blackcurrent Pop is quite similar to this one.
- The 3D art is minimalistic and is only done on the ring finger, so paint only the ring finger with the glitter polish.
- To create the sunflower, start at the center by taking a small ball of brown acrylic mixture and placing it on the nail.
- In order to work on the petals, pick a small ball of yellow acrylic mixture, place it on the nail and create a vertical dent to each petal.
- Finally, seal the deal with clear polish!
16. 3D French Flower Nail Art
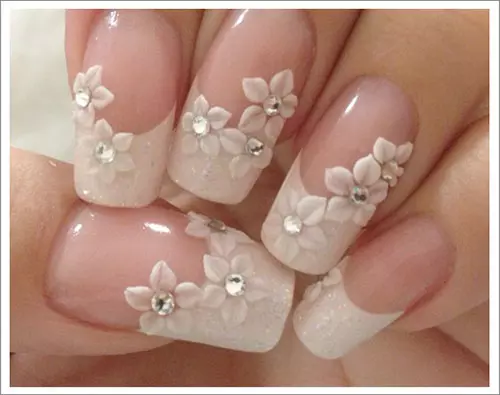
This versatile 3D French mani looks super feminine and elegant. If you want to add an edge to your regular French manicure, this look would be a treat! The pretty white flowers and the silver studs gracefully complete the chic look.
What You Will Need
- Pale pink or nude nail polish
- Shimmer
- Acrylic mixture
- Clear polish
How To Recreate This 3D French Flower Nail Art?
- Choose a clear or pale pink or a nude toned nail polish for your base and apply 2 coats.
- For the tips, use a white polish and create a crescent to make the tips pop.
- You can also use a little shimmer at the edges.
- For the flower petals, use white acrylic mixture. Place a small ball of the mixture on the nail and create vertical dents to elongate the edges.
- Once the petals are complete, apply clear polish or use glue to stick the silver studs at the center of the flowers.
- Finish the look by applying a layer of top coat and let it dry.
17. White Flowers And Shimmer
This look uses glitter polish and white flowers along with some silver embellishments. If you’re looking to give your nails a magical, feminine touch, this design would be perfect!
What You Will Need
- Opaque nail polish
- Silver glitter polish
- Acrylic mixture
- Studs
- Clear polish
How To Recreate This
- Apply 1-2 coats of an opaque base coat and let it dry.
- Next, apply a coat of silver glitter nail polish to create the pearl-like sheen.
- Use either a layer of top coat or glue to apply the acrylic flowers and stones. Using a top coat is what most girls opt for, but you can choose whatever suits you better.
- Apply another layer of top coat over the nail and the embellishments so as to make the design stay firm.
- Flaunt your gorgeous nails!
18. 3D Rose Nail Art Design
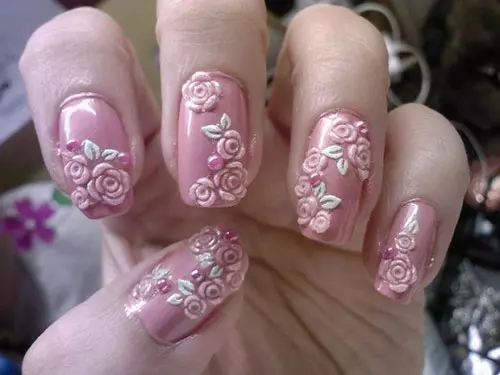
Undoubtedly high on creativity this stunning rose nail art is bound to be everyone’s favorite. The rose-pink 3D flower art uses the basic emboss technique. Unlike the 3D nail art that is made separately from the nail, embossing is a raised design created on the nail itself.
What You Will Need
- Rose-pink nail polish
- Acrylic mixture
- Brush
- Pink rhinestones
- Clear polish
How To Recreate This 3D Rose Nail Art?
- Start by painting your nails a rose-pink shade. The Maybelline Super Strong Gel nail polish in the shade 130 Rose Poudre is a beautiful rosy shade.
- Pick a tiny ball of light-pink acrylic mixture and place it on the nail. Create a dent at the center. Create the rose petals by making small Cs around the circular dent.
- Create the leaves using white acrylic mixture and add the pink rhinestones to nail the look.
- Don’t forget to apply clear polish on the top to set the look.
3D Christmas Nail Art Designs
19. Christmas 3D Nail Art
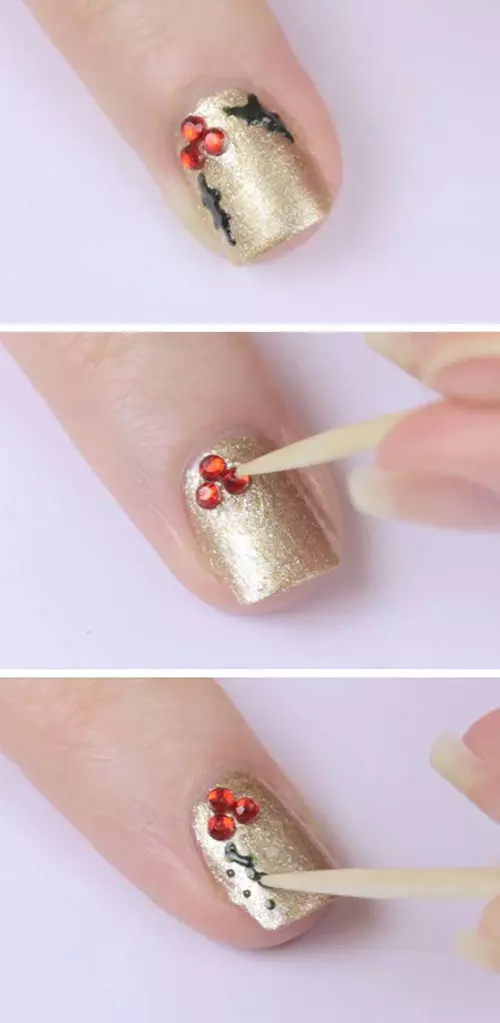
Or are you in the holiday mood? Then, this X-mas 3D nail art is a quick and easy way to decorate your nails and welcome the holiday season. We all love good old gold nails from time to time. This design uses a gold base and some fancy decor to take your nails to another level.
What You Will Need
- Gold nail polish
- Red studs
- Green nail polish
- Clear polish
- Nail art tweezer
- Thin brush
How To Recreate This Christmas 3D Nail Art Design?
- Start by painting your nails in a pretty gold shade.
- Apply clear polish or use glue to stick the red studs to your nails.
- Next, you can use green nail polish with a thin brush to create the leaves. A glossy nail polish will give a 3D effect to the leaves.
- To create the leaves, start by making dots, and then,join them.
- Apply a layer of top coat to set everything securely.
20. 3D Snowflakes Nail Art

This design is another great look for the holiday season. Nothing screams Christmas like red and snowflakes and this is a combo of everything sweet and merry. It also only involves a few steps and can be done on short nails too!
What You Will Need
- Red nail polish
- White nail polish
- Thin brush
- Silver studs
How To Recreate This 3D Snowflakes Nail Art?
- Paint your nails in a bright shade of red.
- Use a thin nail brush to create the snow flakes and dots over your nails.
- You can use either glue or clear polish to fix the silver studs at the center of each snowflake.
- Apply a layer of top coat over your new designer nails and get in the holiday mood!
3D Nail Bows
21. Pink And Silver Glitter Bow
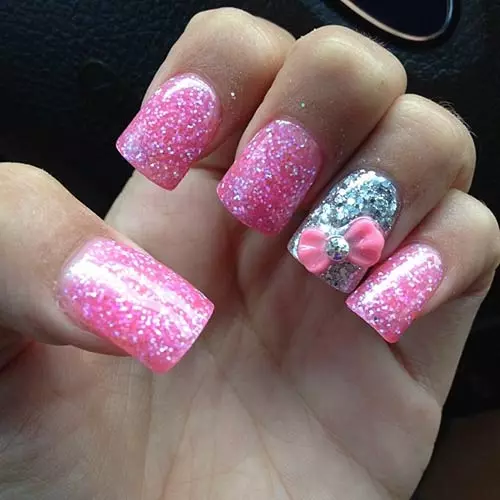
Do you love bling and glitter? This combo of pink and silver shimmer with work on the ring finger nail is effortlessly cute besides being a piece of cake. It looks just as great on short nails as it does on long, manicured ones. If you want to add some glitz and glamor to a dull day, this is your go-to.
What You Will Need
- Pink glitter nail polish
- Silver glitter nail polish
- Acrylic mixture
- Clear polish
How To Recreate This Pink And Silver Glitter Bow 3D Nail Design?
- Use a pink glitter nail polish for all your nails except for your ring finger nail. The Maybelline Color Show Glitter Mania Nail Lacquer in the shade ‘Pink Champagne’ or ‘Red Carpet’ are great options.
- For the ring finger nail, use a silver glitter polish. The shade ‘Dazzling Diva’ by Maybelline is a really pretty 3D sort of silver.
- To create the bow, use pink acrylic mixture. Place a medium sized ball of the mixture on your nail, and use a thin brush to create dents to give the bow some precision.
- Apply a layer of clear nail polish and then place the silver stud at the center of the bow to make it pop.
- Apply a top coat over your glitter polish to keep the look intact for longer.
Voila! Wasn’t that as simple as ABC?
22. Lavender And Silver Bow
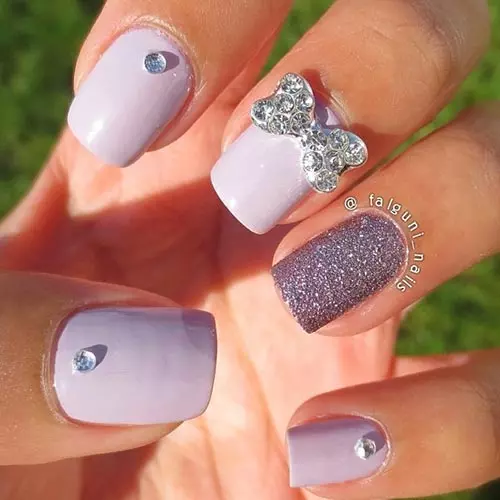
The soft pastel lavender shade is pleasing to the eyes. Pastel shades are very in at the moment and this simplistic 3D nail art is something anyone can do.
What You Will Need
- Light purple nail polish
- Silver studs
- Clear nail polish
- Metallic bow
How To Recreate This Lavender And Silver Bow 3D Nail Design?
- Paint your nails with a light purple/lavender shade of nail polish.
- For the ring finger nail, use a glitter nail polish. The Maybelline Color Show nail polish in the shade ‘Paparazzi Purple’ is what you can use.
- Apply a coat of clear polish or use glue to stick the silver studs on top of the finger nails.
- You can use a metallic bow for this design as the look plays with silver and lavender and nothing else. (You will find nail art material in abundance in the market and also online.)
- Apply a top coat over the nails.
23. Black And Beige Bow 3D Nail Art
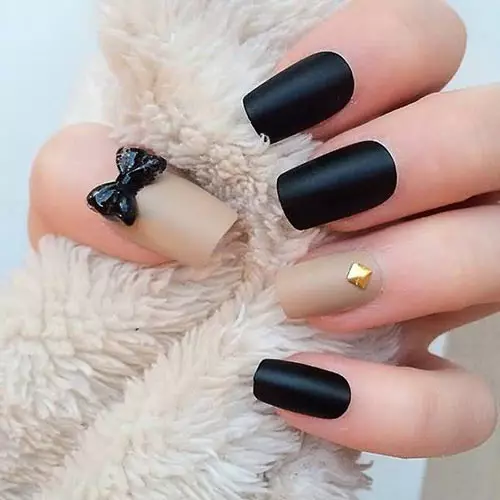
This look uses a classy matte finished black and sand-beiged nail polish with gold studs and a tiny bow on the thumb. As you can see, it’s rather easy to recreate and isn’t very high maintenance. So, if you’re looking for something that is achievable and looks right out of Vogue magazine, read on.
What You Will Need
- Matte black nail polish
- Gold studs
- Acrylic mixture
- Clear matte nail polish
How To Recreate This Black and Beige Bow 3D Nail Art?
- Paint your nails using a matte-finish black nail polish. Paint your thumb nail and ring finger nail using a matte sand-beige polish.
- Fix a gold stud on the ring finger nail using glue.
- You can create the acrylic bow separately on an aluminum foil sheet by using acrylic bow mixture or you can purchase a ready-made bow from the market.
- Use a matte top coat to finish the look. The Revlon Nail Enamel Matte Top Coat does a great job at mattifying the nails further.
24. 3D Purple And Green Bow Tie Nails
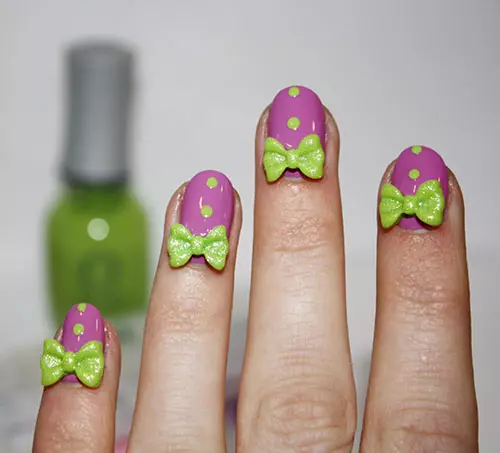
If you like to keep it unconventional and funky, then you will probably like this cute bow tie nail art. It clubs purple and light green and uses a few polka dots here and there for an enhanced funky effect.
What You Will Need
- Purple nail polish
- Acrylic mixture
- Green nail polish
- Clear polish
How To Recreate This
- Apply two coats of purple nail polish. You can use Colorbar’s ‘Slassy Orchid’ for the purple.
- To create the bow ties, use acrylic mixture and create them separately on an aluminum foil sheet (you will also find such materials in the market).
- Paint the bows with the light green nail polish.
- Apply clear polish in order to stick the bows or use glue.
- Add dots as per your preference.
- Apply a layer of top coat and you’re done!
Gemma, nail technician in training, nail art hobbyist and blogger, shares her unexpected discovery while attempting to use chrome paint on a peel off base of clear dots, “But I did not realise until I did one coat the the peel off base had not dried smooth at all, as the colour chrome dried it shrank and clung to every crease and line. Although it was not what I wanted for the mani I had in mind, it gave me an amazing idea about creating some 3D nail art (i).”
3D Nail Designs For Short Nails
25. 3D Embossed Spring Nail Art For Short Nails
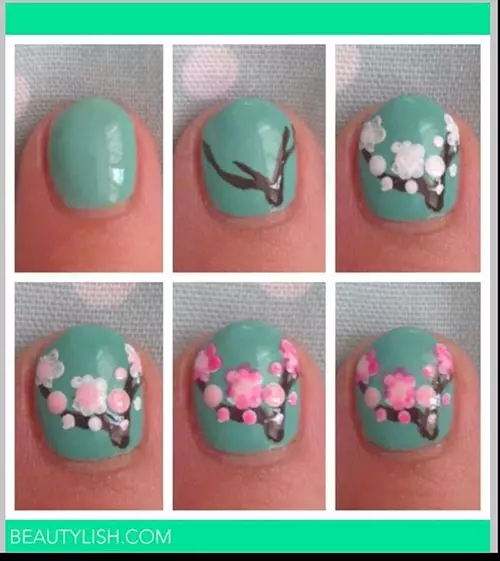
This aqua-green nail art has a very beautiful embossed effect. If you have recently honed your artistry skills, then definitely give these a try. Girls who prefer natural nails can recreate this look with much ease. The embossed effect is created using different shades of nail polish. If you want to achieve this look, follow the steps.
What You Will Need
- Aqua-green nail polish
- Brown nail polish
- Light pink nail polish
- A thin brush
- Clear polish
How To Recreate This 3D Embossed Spring Nail Art?
- For the base, apply two coats of a similar aqua-green shade. You can use the Nykaa Pastel Nail Enamel in the shade ‘Mint Meringue’.
- Now, using a thin brush and brown nail polish,create the branches of the tree.
- Using the white nail polish,make some dots over the branches.
- Use a baby-pink nail polish (Maybelline Color Show Nail Enamel in the shade ‘Pinklicious’) for another round of dots over the white dots.
- To pop the flowers, use a darker shade of pink nail polish over the white and light-pink dots.
- Apply a layer of top coat.
You’ve got spring in full bloom right on your fingertips!
26. Minimal Summer 3D Nail Art For Short Nails

This straightforward design is great for everyone – shoutout to the girls with short nails!
If you are someone who is low-maintenance but likes pretty nails, then this is for you.
Note: You can opt for a color combination of your choice.
What You Will Need
- Blue lavender nail polish
- Orange nail polish
- Silver studs
- Clear polish
How To Recreate This
- Paint your nails with the blue-lavender nail polish, leaving the middle finger for the orange-beige shade.
- To create the flowers, you can use white nail polishand a thin brush for making the dots.
- Apply a layer of clear nail polish.
- Add the silver studs before your polish dries up.
- Apply a layer of top coat.
Now, wasn’t that super quick and easy?
3D Rhinestone Nail Art Designs
27. Minimal Beaded Blue Acrylic Nails
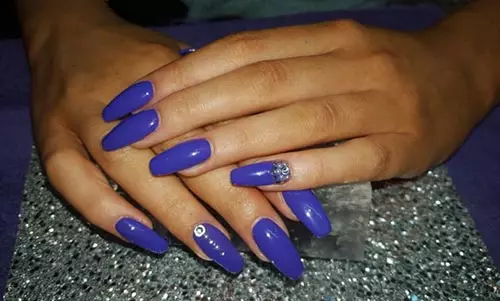
This minimal purple-blue design is gorgeous and is superb for occasions of all sorts. It has a few embellishments here and there, which make it simple and classy.
What You Will Need
- Purple-blue nail polish
- Clear polish
- Rhinestones
- Glitter polish
How To Recreate This Minimal Beaded Blue Acrylic Nail Design?
- Start by painting your nails with two coats of the purple-blue shade. The Maybelline Super Stay Gel nail polish in the shade ‘Surreal’ is what you can use to recreate the look.
- Apply a layer of clear nail polish.
- While the clear polish is wet, place the stones gently on the top of the nail.
- You can line it up with glitter or white nail polish using a thin brush for some added bling.
- Apply a layer of top coat for the ultimate finish!
28. 3D Daisies Summer Nail Art
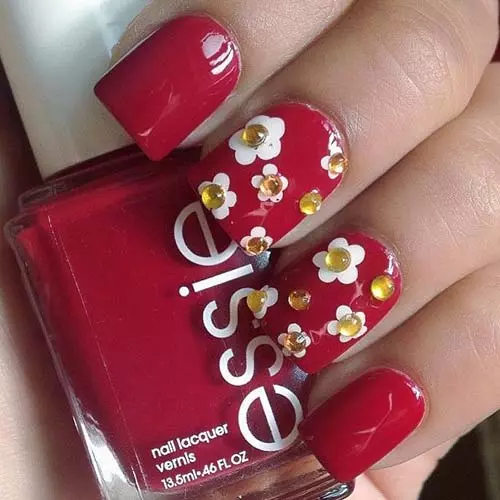
This cute nail art can be done in a few simple steps. The design is bright and goofy with a cherry red base and white studded flowers. If you like to keep your nails short, you can still pull off this floral nail art with elan.
What You Will Need
- Red nail polish
- Thin brush
- Yellow rhinestones
- Clear polish
How To Recreate This 3D Daisies Summer Nail Art?
- Start with the red base. Apply two coats of a cherry red nail polish. The Maybelline Color Show nail lacquer in the color ‘Downtown Red’ is an ideal choice.
- Using a thin nail art brush, make dots with white nail polish for the flowers and then fill them in. This is the easiest way to create those daisies.
- Apply a coat of clear polish or use glue to stick the yellow rhinestones at the center.
- Once it’s all good and dry, apply a layer of top coat.
You’re all set with your new daisy nails!
29. 3D Plum Plus Rhinestones Nails
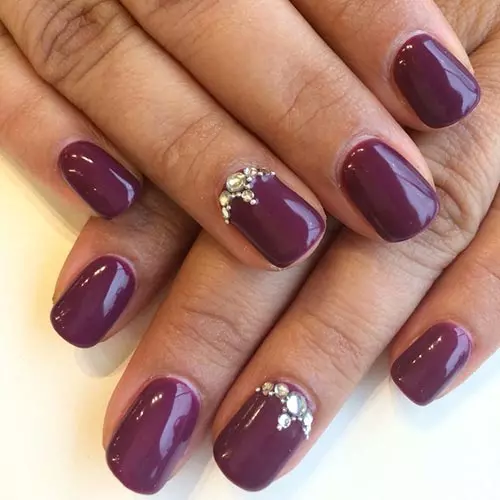
This gorgeous looking plush plum color topped with a few silver rhinestones makes this design a total knockout. Don’t you love how simple it is and how the silver and plum look like they’re just meant to be?
What You Will Need
- Plum nail polish
- Silver rhinestones
- Clear nail polish
How To Recreate This 3D Plum Plus Rhinestones Nail Art?
- Apply two coats of a gel-based plum nail polish (O.P.I Nail Lacquer – In The Cable Car-Pool Lane).
- Apply a coat of clear nail polish.
- While the polish is still wet, arrange the silver rhinestones at the top of the ring fingernail.
- Add a layer of top coat for added gloss.
30. 3D Fuschia And Grey Rhinestones Nail Art
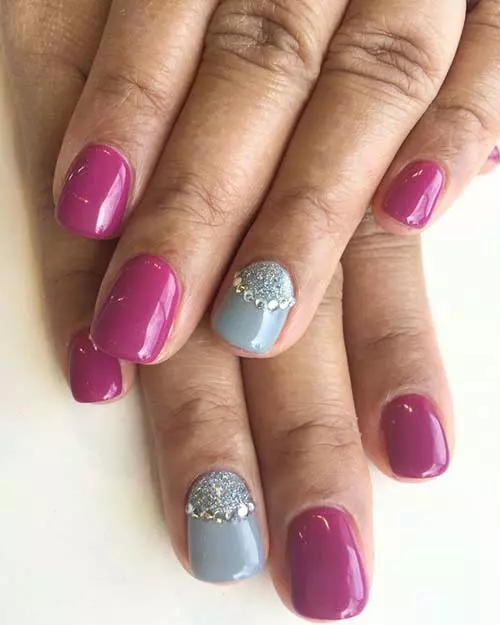
The fuschia and gray combo is delightful. Don’t you love how plain and simple it is, yet the colors are so popping? The rhinestones are a cherry on top!
What You Will Need
- Fuschia nail polish
- Grey nail polish
- Glitter
- Brush
- Clear polish
How To Recreate This 3D Fuschia And Grey Rhinestones Nail Design?
- Apply two coats of the base nail polish. You can use the shade ‘Flashbulb Fuschia’ and the light gray shade from O.P.I.
- Apply a coat of clear polish.
- While it’s wet, use a brush to add some glitter on the top of the ring fingernail, creating a semi-circle.
- Arrange rhinestones in a semi-circle around the glitter.
- Top it with a clear polish.
31. 3D Butterfly Nail Art

Butterflies symbolize hope, transformation, rebirth, and freedom. This DIY 3D butterfly nail art combines simplicity with elegance, allowing you to showcase a flutter of creativity and your carefree nature at your fingertips effortlessly.
What You Will Need
- Orange/peach nail polish
- Nail art brushes
- Butterfly nail stickers or decals
- Clear topcoat
How To Recreate This 3D Butterfly Nail Art?
- Start with a base color and allow it to dry.
- Apply butterfly stickers or decals strategically on each nail or the nails you would want to highlight.
- Use nail art brushes if you want to add intricate details or accent colors.
- Seal the design with a clear topcoat for a glossy finish.
Infographic: 5 Stunning 3D Nail Art Designs You Should Try
While minimalist nail art is a crowd-favorite, 3D nail art designs have caught everyone’s attention due to their creative and funky designs. If you are looking for simple and creative designs that can be done at home, you are in luck! Check out the infographic below for 5 stunning nail art designs you can recreate in no time.
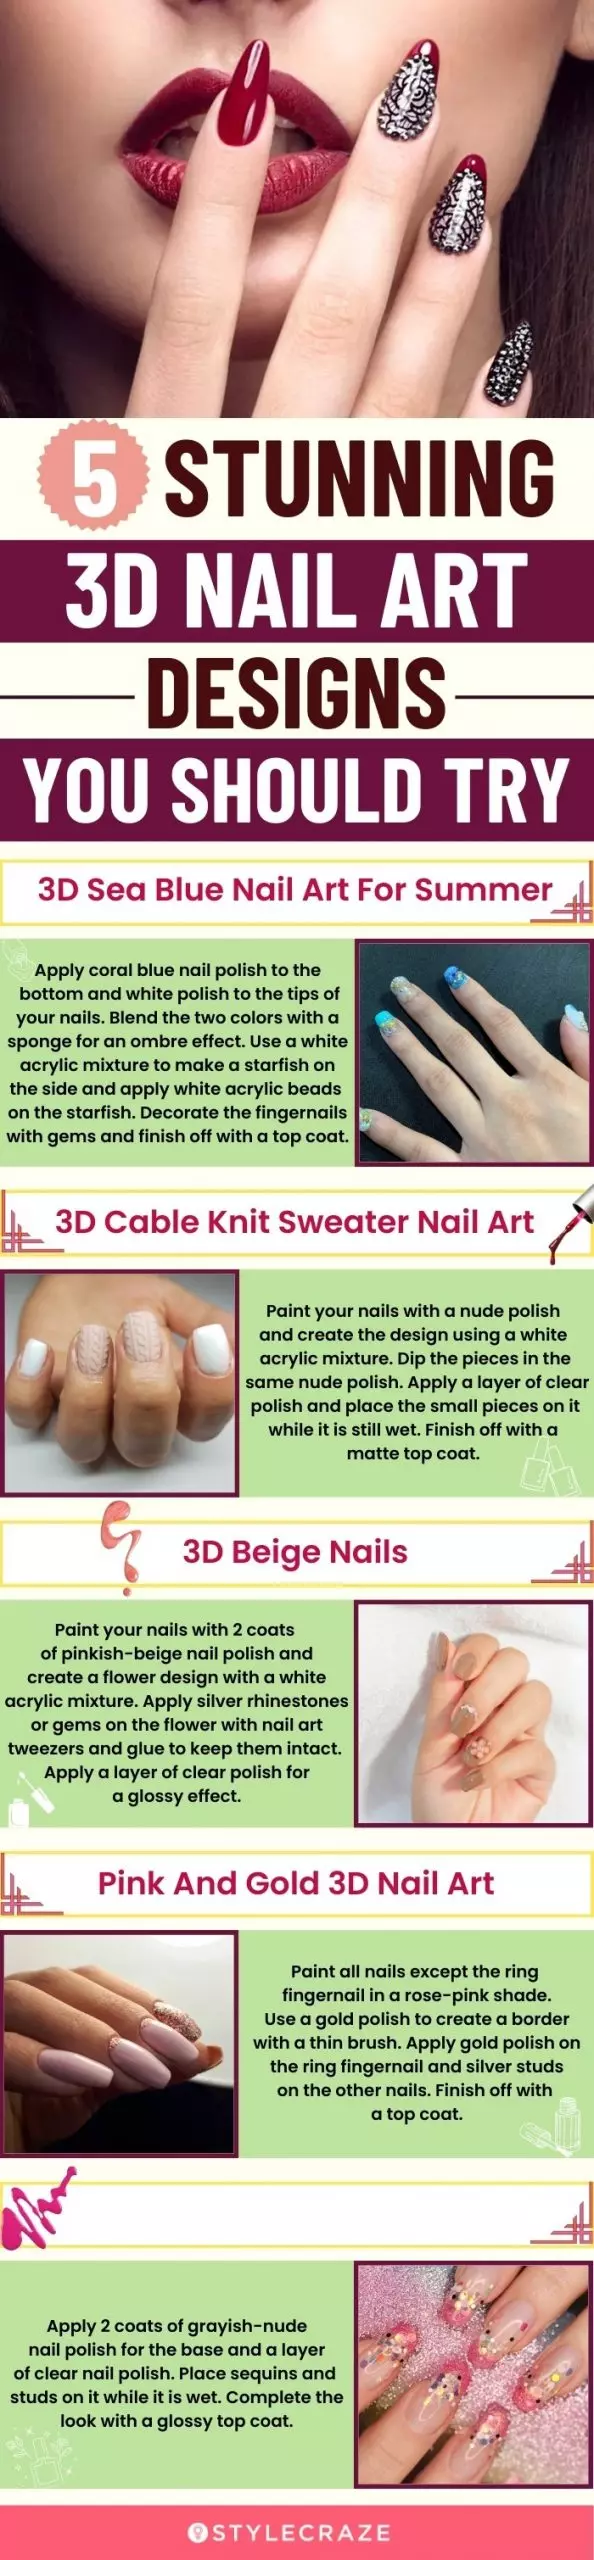
Illustration: StyleCraze Design Team
3D nail art designs may seem tough to do, but with the right nail colors and accessories, they can offer a complete makeover to your nails. You can always play around with different textures, shapes, and use various adornments to create appealing designs. They may seem a little tough to do initially, but you can ace the art of these nail art designs with practice. You can also try these nail art designs on short nails. Thanks to the latest technology and innovation that provides us with various equipment, you can easily master nail art patterns in no time. And with the help of the step-by-step tutorial mentioned above, you can effortlessly recreate these nail art designs. Try experimenting with colors of your choice to add your own spin to the look.
Frequently Asked Questions
How long does a 3D nail design last?
A 3d nail design, if done by a professional, lasts approximately 2-3 weeks.
What is 3D nail polish?
A 3D nail polish gives a multifaceted and sparkling finish when applied. It is especially used to make funky patterns or nail arts. Most of the variants available are sparkly and can give a unique look to nails.
How do you remove 3D nail art?
Acetone nail polish removers can help remove 3D nail art. Place a cotton ball soaked in the nail polish remover on the nail art. Then, wrap a small piece of aluminum foil around the nail and leave it on for 10-15 minutes to dissolve the 3D nail art. Wash your hands to remove any traces of the nail art and acetone.
Are there any risks or safety concerns associated with 3D nail art designs?
Some people may be allergic to the materials used in 3D nail art designs, like acrylic powders or gels. If you experience itching, redness, or swelling after getting 3D nail art, you may have an allergic reaction. 3D nail art can damage, weaken, or break the nails when applied or removed improperly. Hence, practicing caution is necessary. Also, the tools used in 3D nail art can lead to infections or the spread of germs if not sanitized properly.
How can I maintain and care for my 3D nail art designs?
3D nail art is delicate and demands gentle care. Avoid excessive hand washing, wear gloves while doing chores, apply a clear top coat, moisturize the nails regularly, avoid heat exposure, and be gentle with the nails to maintain and care for the 3D nail art designs and keep them looking their best for as long as possible.
What are some tips or tricks for creating the best 3D nail art designs?
Some tips and tricks for creating the best 3D nail art designs include using high quality 3D nail art tools and products to create intricate designs, practicing daily, being patient while working on your nails, experimenting with textures and elements like glitters, rhinestones and beads, and trying new techniques and designs frequently to create something unique and memorable.
Key Takeaways
- Choose oval or almond-shaped nails for plump fingers and stiletto or coffin shapes for slender fingers.
- Pick nail art designs that match your outfit and makeup for a cohesive look.
- Protect your nail art from excessive heat exposure and use rubber gloves when working with water.
- Add elements like flowers, beads, and glitter to enhance the 3D effects.
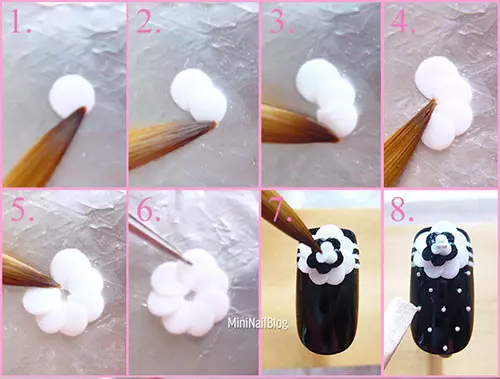
Learn to make an alluring 3D floral nail art design. If you are a beginner, you will find this easy tutorial video really helpful. Let’s get started!
Personal Experience: Source
StyleCraze's articles are interwoven with authentic personal narratives that provide depth and resonance to our content. Below are the sources of the personal accounts referenced in this article.
(i) 3D DOT NAIL ARThttps://polishedinka.wordpress.com/2015/03/19/3d-dot-nail-art/


