DIY Manicure: A Foolproof Guide To Getting A Manicure Done At Home
Discover how to achieve strong and healthy nails before painting them in vibrant hues.
 Katherine LugoCelebrity Makeup Artist
 Katherine is a beauty expert, celebrity makeup artist, and formulator with over 14 years of experience. She is much sought after by women worldwide and helps them transform their makeup routines to bring out their best selves.Katherin... more
 ramona sinhaEditor Experience: 11 years
Ramona is an editor at StyleCraze with 11 years of experience in writing and editing. She has authored over 200 articles on skin and hair care. She graduated from the University of Calcutta, West Beng... more
 eshna dasAssociate Editor Experience: 3 years
Eshna is an associate editor and a certified skin care coach. She has over three years of experience, a triple main bachelor’s degree in psychology, English, and journalism from Mount Carmel College, ... more
 shiboli chakrabortiCommerce Editor Experience: 4 years
Shiboli has a master’s degree in English literature from The English and Foreign Languages University, Hyderabad, and is a certified skincare coach with four years of experience. As a commerce editor,... more

Image: Shutterstock
A well-groomed nail speaks a lot about you. However, not everyone has the time and money to visit a salon whenever they go out. So, it will be a great benefit if you know how to do manicures at home. Manicure is an elaborate ritual that involves clipping your nails and coating them with nail polish. You need to take care of your nails just the way you pamper your face. Here, you can find a complete guide that will help you give a manicure to yourself.
 Trivia
In This Article
Easy Manicure At Home: A Step By Step Guide
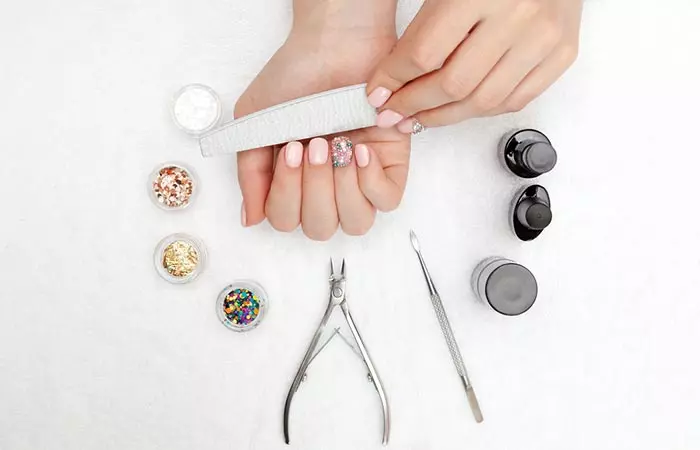
Step 1: Gather All The Essential Tools
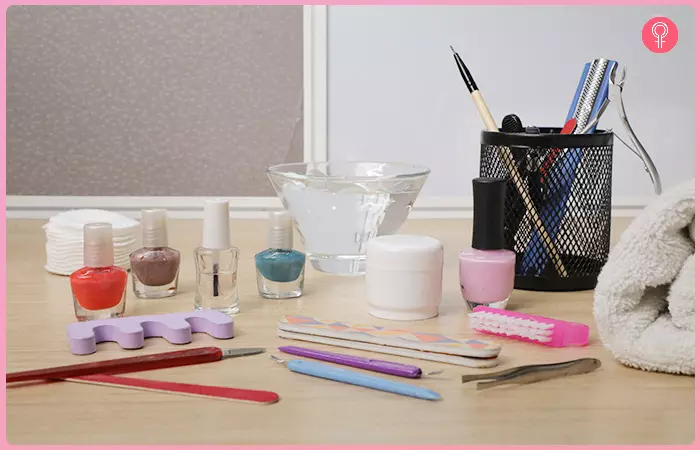
Before you start, gather all the manicure tools you will need to give yourself the perfect manicure. Here are the things that you will need:
- Nail polish remover
- Nail clipper
- Cotton pads
- Nail buffer
- Cuticle pusher and nipper
- Cuticle remover or cuticle cream
- Hand moisturizer
- A base coat for the nails
- Your favorite nail polish
- A clear top coat
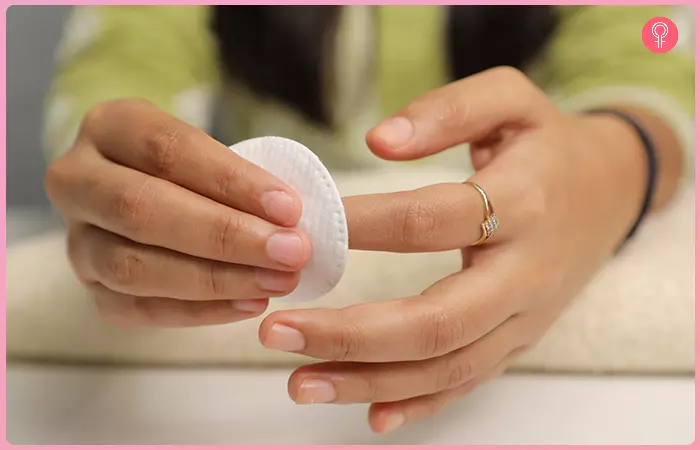
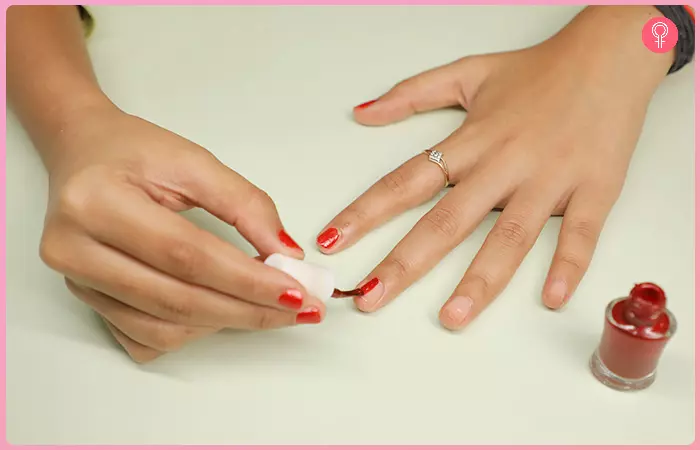
Step 2: Remove Any Traces Of Nail Polish
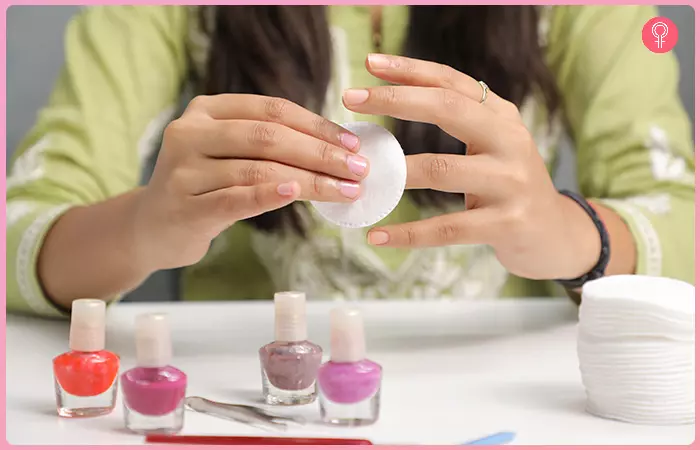
To start off, remove the nail polish that you are wearing. Use a non-acetone nail polish remover and cotton pads to remove your old nail polish gently.
Non-acetone nail polish removers do not dry out the skin around your nails. Acetonei XA harmful solvent added to nail polish removers that is capable of causing nose, eye, or throat irritation when inhaled. -based nail polish removers work much faster, but they can damage your nails. If you use a nail polish remover more than once a month, it is better to use a non-acetone nail polish remover.
Step 3: Clip And File Your Nails
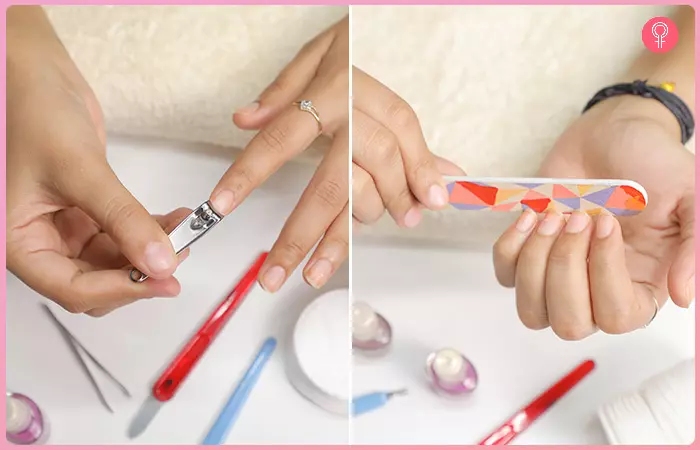
Use the nail clippers to trim your nails. Avoid cutting them too short. Then, use the nail file to shape them. If you want to keep it simple, square-shaped nails with rounded edges or simple rounded nails are best.
While filing your nails, be gentle and avoid dragging the file back and forth with excessive force. Avoid filing them too short. Just smoothen the lines and rough edges left behind by the nail clipper. Use a slightly abrasive nail buffer to smoothen the top of your nails. However, do not buff the nails too smooth because, otherwise, the nail polish won’t stick to your nails.
Step 4: Soak Your Nails (And Hands)
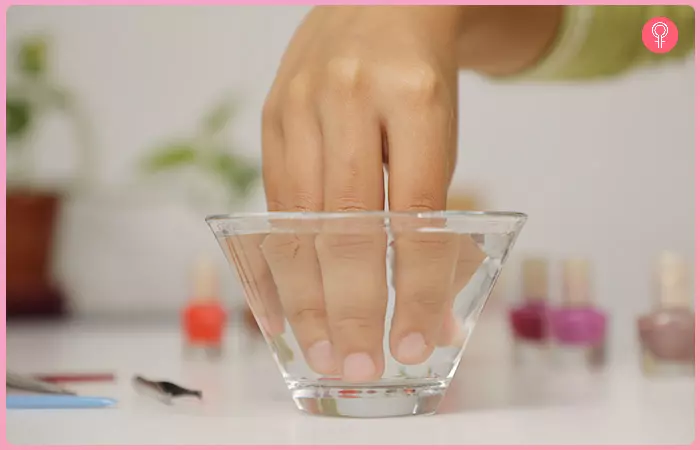
Here’s the most relaxing part of the process. Take a big glass bowl (big enough to hold your palms) and fill it with warm water. Add baby shampoo or a gentle cleanser and soak your hands in it for a few minutes (maximum 3 minutes).
Soaking the cuticles helps soften them. It loosens up the dirt and dead skin cells. Use a gentle nail brush to clean the nails and the skin around them to remove any traces of dirt. Don’t forget to scrape under the nails. Avoid over-soaking your nails and hands as it can damage them.
Step 5: Apply Cuticle Cream And Prepare The Cuticles
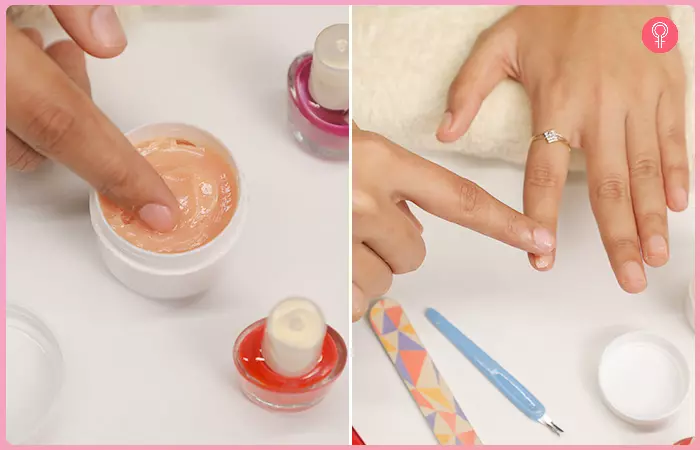
Once the cuticles are clear, wipe off the excess cream from your nails. If you are not using a cuticle cream, you can also apply a bit of cuticle remover to clear up the cuticles.
Step 6: Apply A Hand Moisturizer
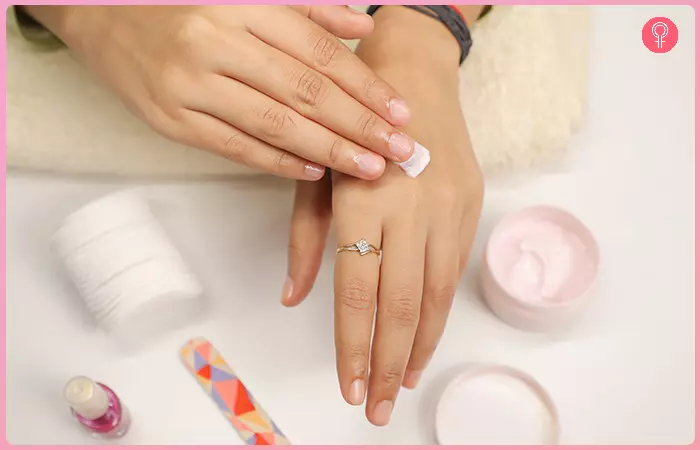
Massage your hands with a hand moisturizer. Use a rich and thick cream for intense moisturization. Focus especially on your fingers and the area around your nails. If you want, you can even soak your hands in warm water for 30 seconds before applying moisturizer.
Step 7: Prep Your Nails For Polish
Nail polish will not stick to your nails if there’s too much moisturizer on them. So, you need to wipe it off. Take a cotton pad or a Q-tip and apply a bit of nail polish remover to it and wipe your nails with it.
Step 8: Apply A Thin Base Coat
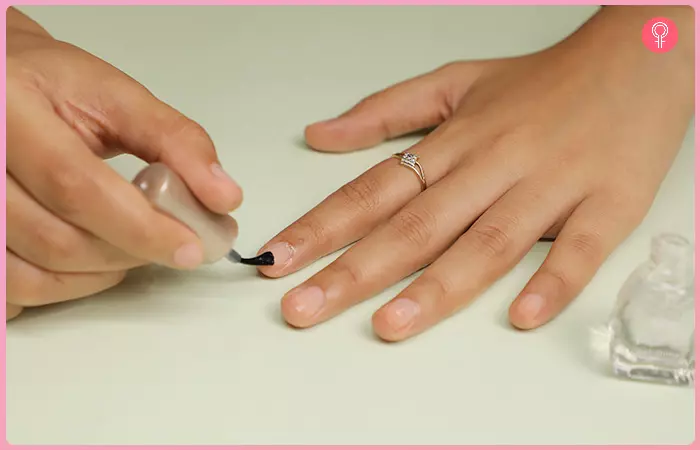
Use clear nail polish as a base coat. You can even use white nail polish as a base coat to make the color of your nail polish pop. This prevents your nails from getting stained (especially if you are wearing shades of red or blue). Also, a base coat helps the nail polish last longer.
Step 9: Apply A Top Coat
Once the base coat is dry, apply a thin coat of your favorite nail polish on top of it. Before applying the nail polish, roll the bottle between your hands. Avoid shaking it because that will create air bubbles in it and make it difficult for it to stick to your nails.
Paint vertical stripes, starting from the base of your nail toward the tip. Before applying another layer, let the previous layer dry for 10-20 minutes
Tip: You can also experiment with different types of nail polish, such as acrylic or gel.
Step 10: Finish It Off With A Clear Nail Polish
Once your nail polish is dry, if you want your nails to have a glossy shine, finish it off by applying another layer of clear nail polish on top of it. This shields the nail polish from chipping or flaking. Moreover, if you have done any nail art, the clear top coat will protect that too.
To finish off your manicure, reapply the moisturizer or cuticle oil on your hands and nails. Keeping them moisturized is essential to keep them looking healthy.
Ashley Brooke, a blogger, shares her DIY manicure to get flawless nails at home. She follows a 6-step process starting from trimming and filing nails to applying nail polish. One of the tips shared is, “If I’m not doing my manicure straight out of the bath or shower, soaking your nails in warm soapy water is a MUST! You don’t have to soak them long like, just 3-5 minutes, long enough to soften your cuticles (i)!”
How To Do Gel Manicures At Home
Step 1: Gather All The Essential Tools
- LED or UV Lamp
- A nail file
- Nail buffer
- Cuticle oil
- An orangewood stick (optional)
- Rubbing alcohol
- Base coat
- Top coat
- Gel polish colors
Step 2: Prep Your Nails
Trim your nails and file them to your preferred shape.
Step 3: Apply Cuticle Oil
Apply cuticle oil to soften your nails. Push back your cuticles gently with a file or an orangewood stick. Wash your hands to remove any oil, as it may affect the gel’s adhesion.
Step 4: Buff Your Nails
Gently buff the nail surface, making it slightly rough. Avoid over-buffing, as it can thin out your nails.
Step 5: Wipe Your Nails with Rubbing Alcohol
Pour rubbing alcohol on a cotton pad and wipe each nail gently to clean them.
Step 6: Apply Base Coat
Apply a thin layer of base coat and cure it for around 30 seconds.
Step 7: Apply Gel Polish
Apply a thin layer of gel polish without touching your cuticles. Cure your nails for around 30 seconds.
Step 8: Apply the Top Coat
Finish it off by sealing your manicure with a light layer of top coat followed by curing.
If you want to jazz up your nails a bit, you can look into some simple nail-art designs as well.
TriviaSounds super easy, right? But, there are certain things you need to avoid when you are doing a manicure at home.
Mistakes To Avoid When Doing Manicure At Home
1. Cutting Your Nails
Avoid cutting your nails if they are already short. Just file them. If your nails are very long, just cut them halfway through and then file them down to your desired length. Cutting your nails too short will ruin the look.
2. Avoid Trimming The Cuticles
We all have cuticle skin. You don’t need to cut them off completely. Just push them back. If you think you have too much cuticle skin, try pushing them back every day when you take a shower. This is because your cuticles soften when you take a shower, which makes it easier for you to push them back.
3. Avoid Filing Your Nails In A To And Fro Motion
This will fray your nails and make them peel. File only in one direction. It’s best to start from one corner and work your way to the other end.
4. Clean Your Nails Completely
Before applying nail polish, make sure that your nails are free of any traces of moisturizer, water, or dirt. Use a lint-freei XA cleansing wipe considered free of lint when it does not leave behind any residue of textile fiber. wipe and non-acetone nail polish remover to clean them thoroughly.
5. Don’t Forget to Paint the Tips
If your polish isn’t sealed properly, it will start to chip in a few days. The best way to avoid this is by sealing the tips with the top coat. When applying the top coat of clear nail polish, turn your fingers so that you can see the edges. Take the tip of the brush and go over the tips of your nails.
Infographic: Simple Steps To Get A DIY Manicure
Taking good care of your hands not only adds to your beauty but also is relaxing; and a wholesome manicure is the best way to go about it. However, going to the salon may not always be possible. So, the solution? A DIY manicure! In the infographic below, we have listed down a few easy steps to get a manicure done at home on your own. Take a look.
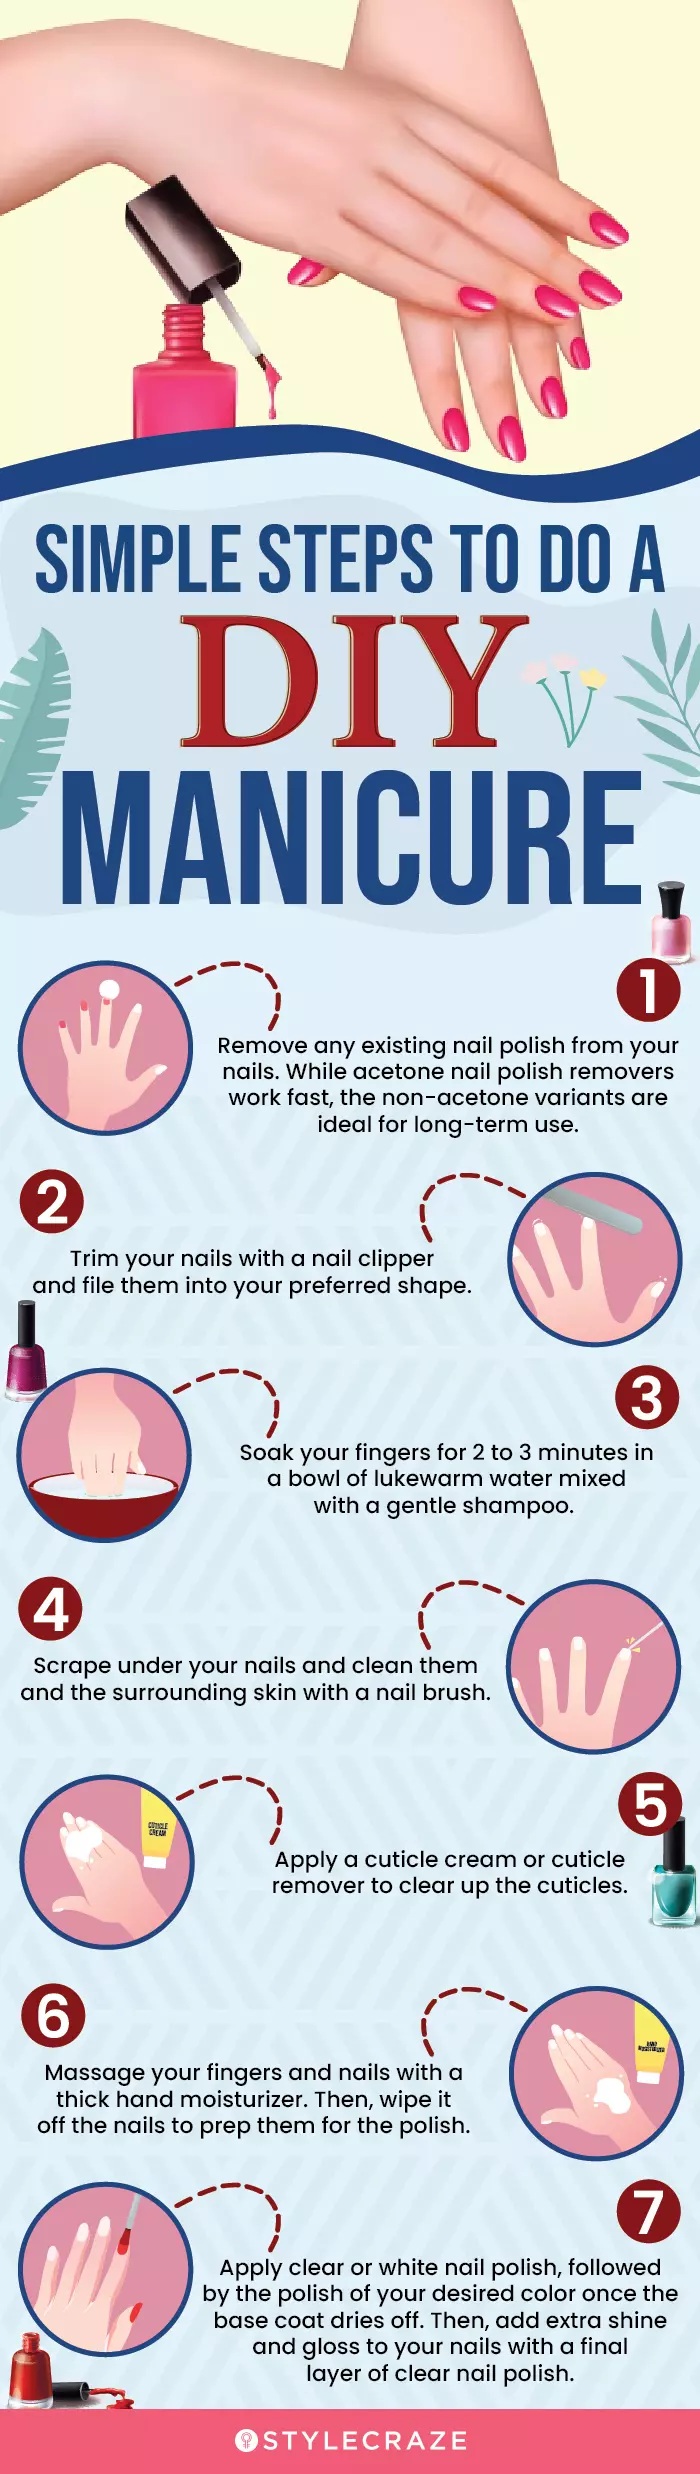
Illustration: StyleCraze Design Team


A manicure is an essential beauty treatment that may help you look and feel your best. While a trip to the spa for a professional manicure can be a luxurious treat, you can also achieve great results at home with a few simple steps. And when you have the suitable technique and the right manicure kit, doing a manicure at home is a breeze. It saves a significant amount of money and time. Try this DIY manicure to give yourself a salon-like experience at home. Grooming your nails regularly by filing and shaping them can help keep them healthy and strong. Apply cuticle oil once a day to keep them soft and prevent hangnails. Remember, no matter how costly your nail polish is, you cannot have beautiful nails until you groom them. However, if you’re not confident in your skills, you can always visit a manicurist.
Frequently Asked Questions
What is the difference between pedicure and manicure?
A pedicure involves cleaning and styling the feet, while a manicure is to clean and beautify the hands.
How often should you get a manicure?
If your nails grow quickly, it is best to get a manicure once every two weeks. Otherwise, you may leave 2-3 weeks between each manicure.
What are some tips for achieving a long-lasting manicure?
Some tips for achieving a long-lasting manicure include applying two coats of basecoat to the tips that are more prone to breakage, reapplying clear topcoat between manicure sessions to prevent chipping, and wearing gloves while doing the dishes.
Are there any special techniques for French manicures or nail art?
Yes, there are numerous special techniques for French manicures or nail art. Some of them include using a band-aid or clear tape to achieve the perfect white tip or using nail stickers. You may also apply white nail paint to your silicon stamping tool and press the nail tip against it for a French manicure.
Can I use natural or organic products for a manicure?
Yes, you can use natural or organic products for a manicure. Start with replacing your polish remover with an organic acetone-free remover. You may even use a DIY cuticle oil made from natural ingredients like olive oil and essential oils. The same can be used for moisturizing your hands. You may also look for organic nail paint brands to make the manicure completely natural.
Key Takeaways
- Start by cleaning the nails using a non-acetone nail polish remover. Clip, file, and buff the nails to prepare them for nail polish application.
- Apply cuticle cream and hand moisturizer. Wipe the nails before applying the base coat.
- Always use your nail paint on the base coat and then cover it up with the top coat.
- Do not trim the cuticles. You can push them back.
Get ready to have beautiful nails in no time! Watch this video to learn how to get a perfect manicure with these easy steps!
Personal Experience: Source
StyleCraze's articles are interwoven with authentic personal narratives that provide depth and resonance to our content. Below are the sources of the personal accounts referenced in this article.
i How to DIY Your Manicure
https://ashleybrooke.com/how-to-diy-your-manicure/


