How To Get Hot Ombre Lips
Perfecting the globally trending, desirable ombre lips is a cakewalk with our easy guide.
 Ada HsiehMakeup Artist
 Ada Hsieh is a highly experienced makeup artist specializing in high fashion editorial and special effects makeup. She has learned directly from the masters in the industry like Danessa Myricks, Mimi Choi, and Lan-Nguyen Grealis. She is als... more
 jyotsana raoBE
 Jyotsana Rao is an engineering graduate from NIT, Nagpur, who discovered her love for writing during her undergraduate days. She is passionate about writing about everything related to beauty - makeup... more
 shatabdi bhattacharyaBSc Experience: 2.5 years
Shatabdi is an associate editor and an alumnus of Lady Brabourne College, Kolkata, where she honed her skills and developed a deep understanding of the world of literature and expression. She has work... more
 anu pallaviBA
 Anu is a beauty and lifestyle writer and a graduate of Amity University, Noida, where she refined her writing skills and cultivated her deep passion for the field. She pursued the Beauty Technician Tr... more

Image: Shutterstock
Ombre style has been trending in nail art and hair coloring. And now, we have ombre lips, too. What is an ombre? It simply means having two distinct colors that are monochromatic.
If not done in the right way, it may look very tacky. But getting ombre lips is not that difficult, too. The secret lies in choosing colors that merge well and experimenting with them. Keep reading this article to know how to do ombre lips and more. Scroll down!
 Keep In Mind
- Lip Trends: Lip Trends The ombre effect can be added to various other lip styles like cherry cola lips, metallic lips, two-toned lips, and glossy lips.
- Skin Tone: Lip Trends Opt for lipstick shades that best suit your skin tone. Dusky skin tones can wear a combination of black and red lipstick whereas light skin tones can go for soft pinks.
- Makeup Looks: Lip Trends Ombre lips pair well with minimalist beauty looks, made with monochromatic or nude makeup, to ensure the attention remains on the lips.
In This Article
What Are Ombre Lips?
Ombre lips are part of a growing makeup trend that involve seamlessly blending two or more lip colors to create a stunning gradient effect. Typically, darker shades outline the lip edges, gracefully transitioning to lighter or contrasting hues towards the center. This technique adds dimension with an artistic flair, enhancing lips of any size for a distinctive appearance. Achieved with lip liners, multiple lipsticks, or liquid lip colors, ombre lips allow for creative color combinations. The outcome is visually striking, as it creates an illusion of fuller lips for a stylish and dynamic makeup style. It is a versatile and trendy way to elevate your lip look and make it the star of the show.
To create this beautiful gradient lip, you need to follow a few simple steps listed below. Scroll down to know more.
For Ombre Lips
Following are the important steps included in Ombre lip makeup tutorial.
1. Color Selection
The first step is to understand which two colors can look good together to create the effect.
To decide the colors, pick one color that is your main lip color. Then choose a color that is either lighter than your base color or darker than your base color. But make sure it is similar in hue for a smooth lip color transition. The best look for ombre lips is achieved if you use a red lipstick and pair it up with the darkest brown you have. But for starters you should opt for a pink or a dark brown with your red. If you are opting for a pink as your base then use an orange lipstick or a brown one for the ombre effect. The secret is to use two colors that can be used to create a gradient of color on your lips.

2. Technique
The next step is choosing your technique. There are various ways in which you can create the color gradient of a DIY ombre lips. You can choose a subtle lip ombré or a dramatic one. Having one lip in a darker shade than the other, using the gradient from outer most edge to the inner most part of the lips, or even going horizontally across such that one corner of your mouth is lighter in color than the other corner.

3. Two-Tone Effect
The simplest form of ombre lips is to use the lighter shade on one lip and the darker shade on the other lip and then blending them in at inner side of the lips.

4. Outer Devil
The next technique of using the colors is to line your lips with a lipliner that is one shade darker than you’re base lipstick color. Keep the line thicker on the corners and taper off as you move to the curve of the lips. Then apply the base lipstick to the lips leaving out the inner most part of the lips. In the inner most part, use the lighter lipstick and top off with clear gloss to even it all out.

5. Inner Devil
This technique is a simple reversal of the previous one. Reverse the use of colors such that inner most part of the lip is darker and the colors get lighter as you move out. This technique looks best if the difference in gradient is not stark. The best is with a pink inner most color and a neutral outermost color.

6. Oomph Effect
I call this technique the oomph effect because if you do this using a bright red and deep brown or black, it gives you absolutely sexy looking red ombre lips. A good lip shading style is needed to pull this off. The technique involves using a black/brown lipstick or liner. You need to trace a line of black/brown on the inner corners of your mouth and line the lower lip with this as well. Now trace over this line of black or brown with a deep colored lipstick (preferably a wine shade). Finally, apply a red lipstick all over your lips (you can skip the wine colored lipstick if you are using a deep shade of red).

7. Other Gradients
Many other variants of the basic techniques exist. You can even play with more than two colors once you are comfortable with the basic concept. Here are some more pictures of beautifully done gradients to create the perfect ombre lips. Ada Hsieh, a highly experienced makeup artist says, “You can even use a cream concealer to fade out one lipstick color instead of using 2 different colors.”

 Did You Know?
Are you getting more impressed with these Ombre Lips? Then, try the following ombre lip tutorial step by step and get set go with the latest ombre lip makeup look.
Things You Will Need
You do not need anything fancy to get this look right. Create a flawless ombré effect that matches your outfit by altering the way your lip color is shaded and blended. If you are into fashion, I am sure you will find most of these things in your makeup kit!
- Tissue paper
- Red lipliner
- Red lipstick
- Orange lipstick
- Concealer
- Lip brush
- Shimmery pale highlighter eyeshadow
- Lip balm
- Clear Lip gloss
Ombre Lip Makeup Tutorial
Let’s begin the ombre lips tutorial:

Step 1
Start by moisturizing your lip area with a good hydrating lip balm. If you have rough and flaky lips, I recommend applying a lip scrub prior to the use of a lip balm to smoothen and soften the lips. Then, apply a light concealer all over your lips to hide the darkness or any lip pigmentation that you may have. If you have fairly pink lips without any pigmentation then you can skip this step.
 Quick Tip
Step 2
Then, take a vibrant and bright red lip pencil, preferably in a matte formula to define your lips. Start by creating shorter stokes from the top most lip area and complete lining your lips. Then, use the same lip pencil and fill the upper lip area completely.
Step 3
Take a red lipstick and top it over the areas where the liner was applied earlier. Use a thin lip brush to blend the lipliner and the lipstick evenly for a neat finish. Here, I used the Inglot lipstick refill in the shade number 80. Then, use the same concealer, which was used in the first step and start filling only the center lip area to brighten it.
Step 4
Then use a tissue paper and blot your lips softly. This step will remove the harsh edges and excess lipstick from the lips.
Step 5
Then apply a very bright orange lipstick over the center of your lips. This lipstick should be applied directly over the concealer, applied in the previous step. Then, apply a transparent lip gloss to the center of your lips to add volume and plump effect. Use a thin lip brush and blend the orange with the red lipstick slowly to remove any harsh edges.
Step 6
Then, apply a soft champagne or highlighter eyeshadow to the lower centre of the lip. This step is optional and if you are not comfortable in adding more glossiness to the lips, then you can skip it. Applying a shimmery formula to the lips will give a soft highlighted look to the lips. Here, I used the Inglot lipstick eyeshadow refill in the shade 11.
Jarry, a YouTuber, shares her personal experience of creating the best and most flawless red ombre lips. She starts with layering a red lipstick, followed by burgundy lining, and adds over other color products and hacks to get an attractive and bold look. She works on the gradient effect as well for a more dramatic and fuller lip texture. For an added effect, she states, “For a little bit more of a dramatic look line the outer part of your lips with black and don’t even try to blend it (i).”
Infographic: 7 Essential Steps To Achieve Ombre Lips
With celebrities trying different shades and products to make their lips seem animated and colorful, ombre lips are here to stay. However, the wrong technique or tips can mess up your look. The good news is, we have created a simple guide to help you achieve ombre lips the right way in the infographic below. Scroll down to know more!
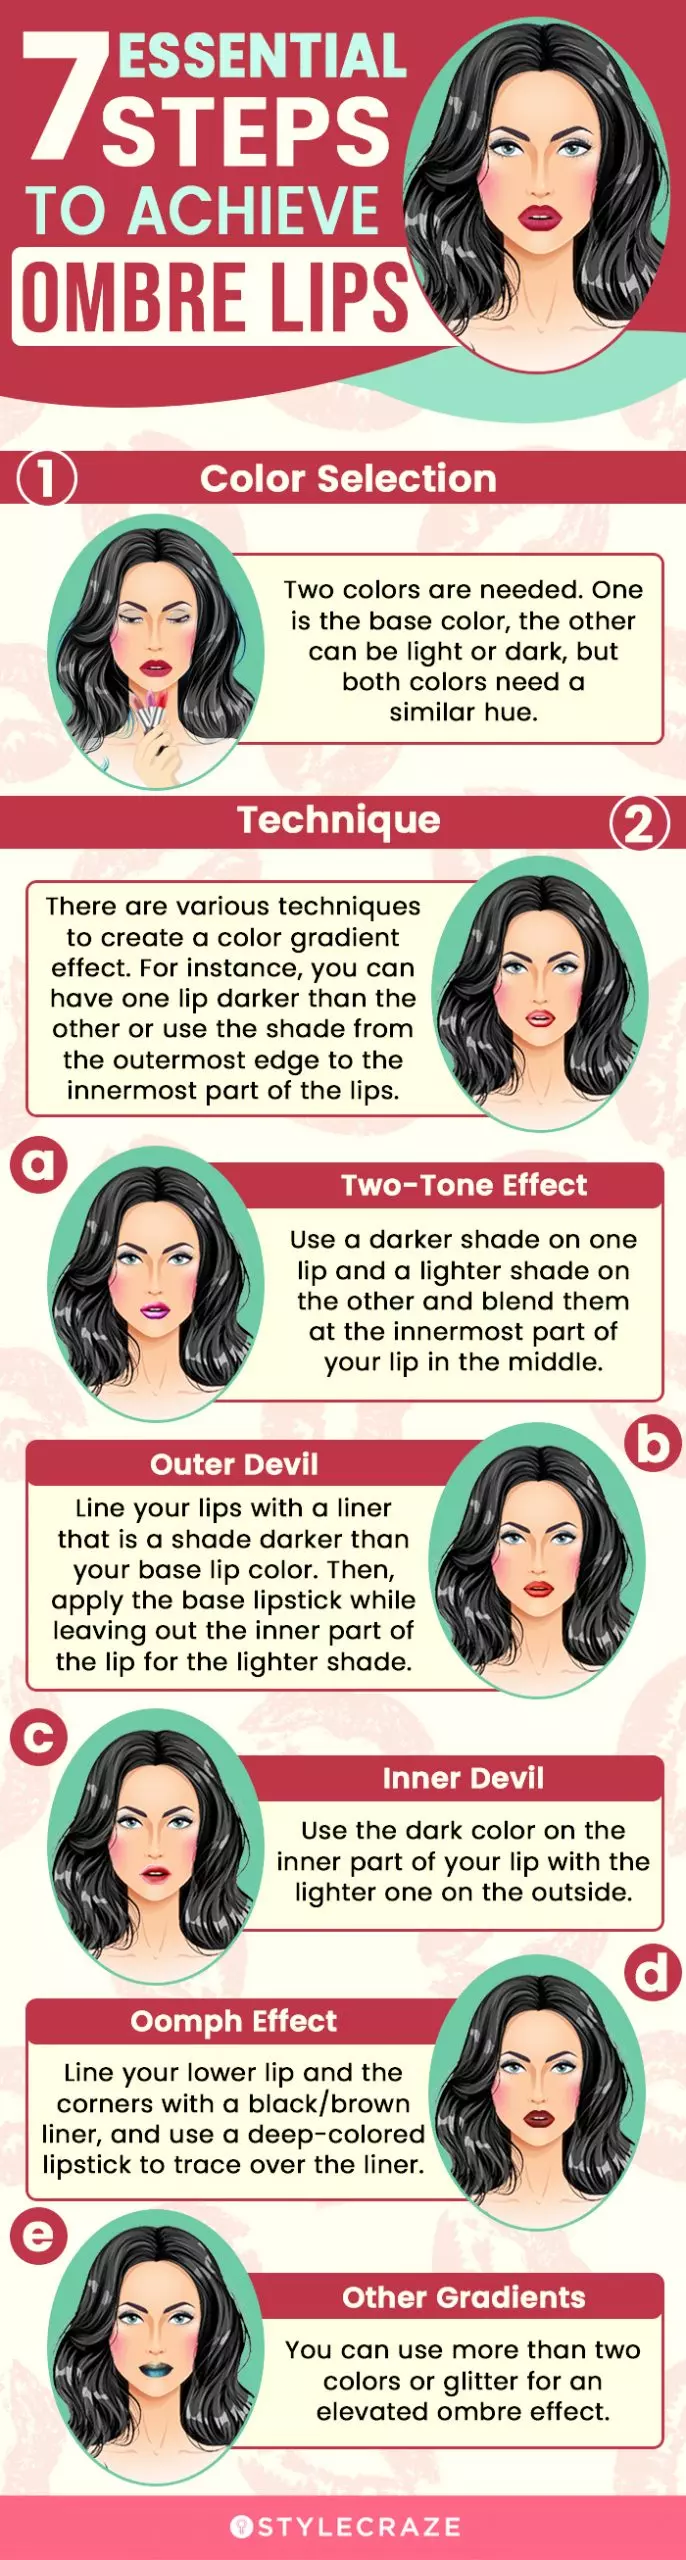
Illustration: StyleCraze Design Team
Getting the perfect ombre look can be daunting, but rest assured that it will be possible easily with a little bit of reference and guidance. Not just your hair, but ombre lips can equally make everyone’s heads turn and let you get the spotlight that you deserve. Experiment with different styles, colors, and lipsticks to achieve the most out of your endeavor. Just focus on getting the tone right to make it vibrant, and you will have a gorgeous ombre look to die for!
Frequently Asked Questions
What is ombre lips permanent makeup?
Permanent lip makeup refers to lip blushing, a new semi-permanent lip tattoo treatment, where a color is tattooed on your lips. Ombre lips permanent makeup implies getting a lip blushing treatment where your inner lips have a lighter shade that gradually darkens towards the edges of the lips.
How do you do ombre nude lips?
You can achieve an ombre nude lips look using two or more lip shades closer to your natural skin tone. Use a lip liner that is a shade or two darker than your skin tone. Gradually lighten it with lighter shades as you reach the inner part of the lips.
How can I make my ombre lips last longer?
Use primer and concealer on your lips before putting on lipstick. After you get your ombre lips, dab some shimmery or matte powder on to set the lipstick and make it last longer.
What type of lipstick works best for ombre lips?
Matte lipstick is your best bet for ombre lips. They stay in place and do not blend together, unlike glossy or satin lipsticks.
Key Takeaways
- Ombre lips are achieved using a lip-coloring method that includes blending two different shades for a gradient effect.
- Use the lighter color on one lip and the darker one on the other, and then blend them at the inner corner of the lips.
- To enhance fullness and create a plump effect, apply clear lip gloss to the center of the lips.
- For the best results, pick a primary color as the base, and then pick the second shade in the same hue, either lighter or darker than the base.
Get ready to rock a bold and beautiful lips and enchant everyone. Watch this video tutorial and learn how to create a fun and easy ombre lips.
Personal Experience: Source
StyleCraze's articles are interwoven with authentic personal narratives that provide depth and resonance to our content. Below are the sources of the personal accounts referenced in this article.
i. Perfect Red Lips! The Ombre Lip Trickhttps://youtu.be/gSH5ixYhNG4?si=-S0T5OwOfQee_nso


