How To Do A Top Knot – 13 Effortless DIY Top Knot Tutorials
From classy to edgy, make a great style statement with these gorgeous and unique hairstyles.
 Casey SimmonsCurly Hair Expert
 Casey Simmons is a curly hair expert with over 20 years of experience in management, operations, and consulting. She has done extensive consumer research and worked directly with chemists and the factory to create curl enhancing products bu... more
 anjali sayeeBTech Experience: 7 years
Anjali is an associate editor at StyleCraze. She specializes in hairstyles and hair and skin care and has written over 200 articles in these domains. She has 7 years of experience, and her philosophy ... more
 madhumati chowdhuryMA (English Literature) Experience: 7 years
Madhumati is an associate editor with seven years of professional experience. She has previously worked as an editor, proofreader, and a writer with various organizations, helping her navigate through... more
 aparna harryMA (English Literature)
 Aparna Harry is a beauty and lifestyle content writer with over three years of experience in writing for different genres. She has a master’s degree in English Literature from The English And Foreign ... more

Image: ShutterStock
The topknot is the poison of choice for many women! You can be a mom, housewife, businesswoman, fitness instructor, chef, or anything else; the topknot is the most convenient and stylish hairstyle. So stick around if you want to learn how to do a topknot.
Thanks to the invention of social media, many trendy hairstyles are getting popular everywhere, like the topknot. But did you know this messy yet chic hairstyle has been around for a long time? Apart from being a sign of spiritual leadership, the top knot can be seen in many eras and cultures. In South China, married women sported a bun to signify their marital status. To ensure uniformity in ballet, dancers had to wear a bun atop their head which is carried on even now. The Regency Era in England, around the 1800s, boasts of a trendsetting high-bun paired with tight curls or braids. During the Victorian era, the loose Gibson Girl bun was a sign of feminine beauty. So how can you achieve a classic updo hairstyle that has captured the hearts of so, over many decades? Scroll down to learn!
 Before You Get Started
- Top knots are suitable for oval and diamond face shapes as they help accentuate the cheekbones.
- Incorporating top knots into your daily routine can block the airing of the scalp. This can result in an itchy and clogged scalp.
- Top knots are not recommended as a daily hairstyle for long hair as the weight of the hair can lead to headaches.
In This Article
13 Easy DIY Top Knot Tutorials
Top knots are quick and easy, but hasty or careless styling can be damaging.
Casey Simmons, curly hair expert and owner of Royal Locks Curl Care gives a pro tip, “If your hair is fine or thinning you will want to be cautious when wearing a top knot. Hair can break and be stressed when wearing any style that tugs your scalp and strands and uses elastics. Wear a top knot for short periods of time (not around the house) and use a hair friendly elastic or better yet, a clip at the bottom.”
Arielle Tschinkel, a blogger, shared that her favorite second-day hairstyle is the easy top knot. As she prefers to go as long as she can without washing her hair, this style is her lifesaver. She said, “There are so many ways to do it, but the easiest is simply piling all that hair on the tippy top of your pretty head, tying it with a hair tie, and heading out the door (i).” She mentioned that using some dry shampoo along with it is best to add grip and remove any greasiness that might occur.
With that word of caution out there, let’s check out these cool top knot hairstyles.
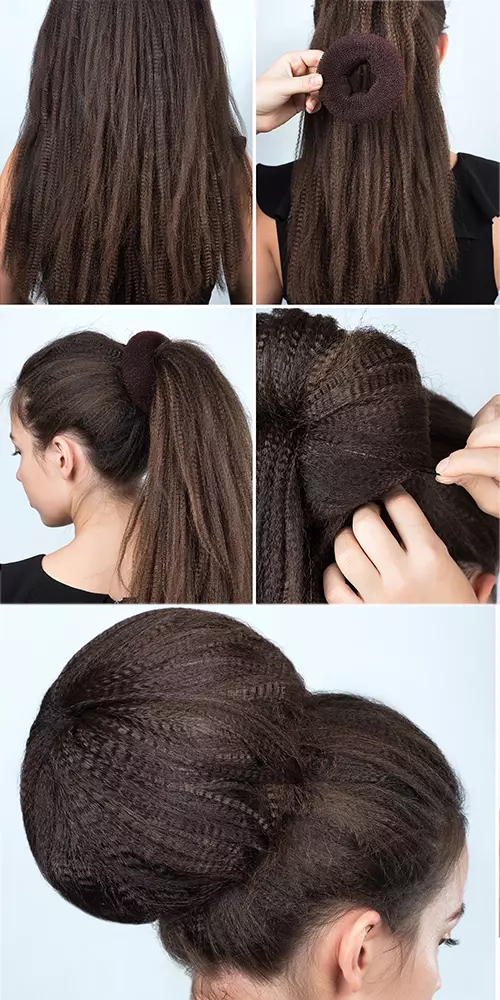
1. Voluminous Crimped Donut Bun
What You Need
- Comb
- Hair donut
- Bobby pins
- Elastic bands
- Crimper
How To Do
- Gently detangle your hair with a comb and crimp your hair from the crown to the ends with a crimper.
- Pull the hair back neatly and groom a high ponytail. Secure it with a voluminous scrunchie.
- Slide the ponytail through the donut and set it at the base.
- Section off the ponytail hair and wrap around the donut.
- Secure the ends at the base of the donut with bobby pins
- Tease your hair with your fingers to give a voluminous look to the bun.
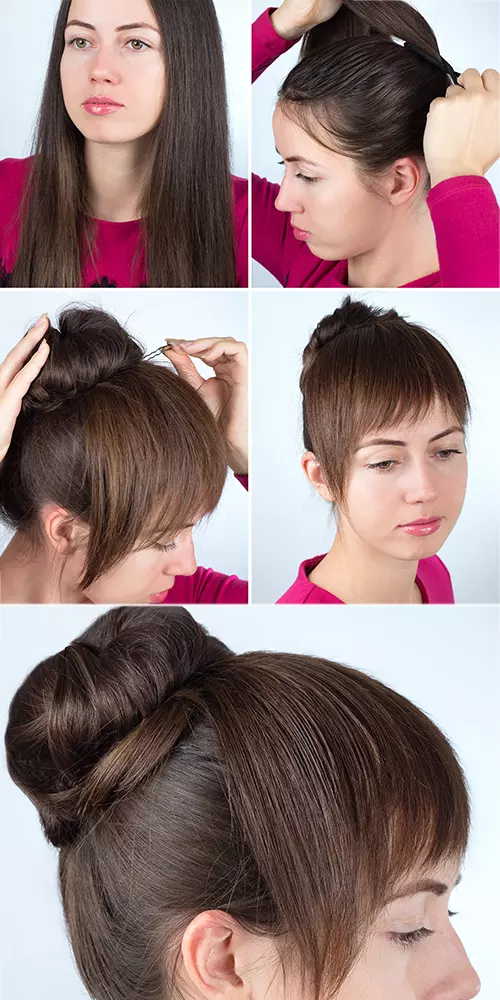
2. Faux Bang Top Knot
What You Need
- Comb
- U-pins
- Elastic bands
- Straightener
How To Do
- Detangle your hair with a comb.
- Gather your hair into a high ponytail and secure it with an elastic band.
- Divide the ponytail into two sections.
- Pull the top section over the crown, so its ends fall over your forehead like bangs. Secure it with bobby pins.
- Twist and wrap the bottom section of the ponytail around its base and tuck all hair in while wrapping. Use U-pins to secure the bun.
- Straighten the bangs with a flat iron and set the hairstyle with hairspray.
3. Loose Messy Top Knot

What You Need
- Dry shampoo
- Brush
- Elastic band
How To Do
- Brush down all your hair and apply some dry shampoo to it. This will give it texture and volume.
- Gather all your hair at the crown to create a high ponytail.
- Take an elastic band and pass it over the ponytail once. Twist it and pass it over your hair again, but this time, pass it only halfway through and leave the ends of your hair out.
- Loosen up your hair everywhere to make the hairstyle a little bit messy. You can also pancake the bun to make it flair out. Pin down any loose strands of hair to finish off the look.
4. Messy Half Top Knot

What You Need
- Dry shampoo
- Brush
- Elastic band
- Bobby pins
How To Do
- Start off with unwashed hair for this hairstyle as it will give your top knot some texture.
- Brush your hair thoroughly to remove all knots and tangles.
- Apply some dry shampoo to hair to give it texture and volume.
- Tease your hair at the crown to make it voluminous.
- Gather the hair at the top and front of your head. Take an elastic band and pass it over the hair once. Twist the band and pass it a little more than halfway over the hair again. Leave only the ends of your hair out of the bun.
- Pancake the bun to give it a messy look.
- Secure the ends with bobby pins.
 Trivia
5. 5-Minute Perfect Bun

What You Need
Two elastic bands
How To Do
- Tie all your hair in a high ponytail.
- Elevate the ponytail and twist it once at the base. Wrap the rest of the hair around the twist.
- Twist the ends of your hair and wrap them around the base of your bun.
- Secure the bun with another elastic band.
6. Easy Top Knot

What You Need
- Hair brush
- Elastic band
- Bobby pins
How To Do
- Gather all your hair in a ponytail and smooth out any bumps with your hair brush.
- Take an elastic band and pass it through your hair once.
- Twist the band, but this time, don’t pass all your hair through. Pass only half of your hair through it.
- This will form a fan bun.
- Stretch the fan bun and wrap the ends of the ponytail around its base. Secure it with bobby pins.
- Loosen up the bun to give it a slightly messy look.
- Pin down the ends of the fan bun to the sides as well to give it a fuller look.
7. Messy Top Knot

What You Need
- Dry shampoo
- Elastic band
How To Do
- Apply some dry shampoo to give your unwashed hair some texture and hold.
- Flip your hair over and run your fingers through it to make sure there are no knots.
- Gather all your hair in a ponytail at the crown. Twist it at the base once, then wrap your hair around the twisted hair.
- Tuck all the loose hair within the bun and tie it with an elastic band.
8. Perfect Top Knot

What You Need
- 2 elastic bands
- Hair brush
How To Do
- Gather all your hair and tie it in a high ponytail.
- Tease the hair in the ponytail to make it more voluminous.
- Twist the ponytail and wrap it around to make a bun.
- Use the second hair tie to secure the bun in place.
9. Bubble Top Knot

What You Need
- Hair brush
- 2 elastic bands
- Hairspray
- Bobby pins
How To Do
- Gather all your hair in a high ponytail and secure it with an elastic band.
- Spritz hairspray on the top and bottom sections of the ponytail to smoothen them out.
- Tie another elastic band a few inches below the first elastic band.
- Pancake the hair between the elastic bands to make it wider.
- Loosen up the hair above the first elastic band and pass the hair from the ponytail through it. Don’t pass the hair completely through, though. Stop at the second elastic band.
- Spread the hair within the elastic bands more to create a bubble bun.
- Wrap the ends of the bun around the base of the ponytail and secure them with bobby pins.
10. Sleek Top Knot

What You Need
- Hair brush
- Mousse
- Hairspray
- Elastic bands
- Bobby pins
How To Do
- Detangle and brush all your hair back.
- Apply some mousse to the front and under-sections parts of your hair. This will give your hair a slick, pulled-back look.
- Gather all your hair and tie it in a high ponytail. The key here is to get your hair as high as possible. Secure it with an elastic band.
- Spritz on some hairspray to slick back any strays and keep your hair in place. You can keep going back and forth with your brush and hairspray to make sure your hair is slicked back perfectly.
- Divide the hair in the ponytail into two sections and twist one section of hair. Wrap the twisted section of hair around the base of the ponytail. Secure the ends with bobby pins.
- Twist the other section of hair and wrap it around the first twisted section. Secure it in place with bobby pins.
Trivia11. Small Elegant Top Knot

What You Need
- Round brush
- Hairspray
- Elastic band
- Bobby Pins
How To Do
- This braided top knot looks great when done with unwashed hair. So, try it on two-day-old hair.
- Using the round brush, gather all of your hair at the crown and tie it in a high ponytail.
- Spritz some hairspray on the top and sides of your hair.
- Tease the ponytail to give it more volume.
- Weave the hair in the ponytail into a regular three-strand braid. Wrap the braid around the base of the ponytail to create a bun. Secure the ‘do in place with bobby pins.
12. Vintage Top Knot

What You Need
- Dry shampoo
- Texturizing spray
- Elastic band
- Bobby pins
How To Do
- Apply some dry shampoo to your unwashed hair to give it body. Apply some to your roots as well to fluff up your locks. Flip your hair over and scrunch it from the ends to the roots to give it more volume.
- Flip your hair over one more time and gather it in a ponytail at the crown. This will help you tie a really high ponytail. Smoothen out any strays and bumps of hair.
- Take the elastic band and pass it over the ponytail once. Twist it and pass it over your hair again, but this time pass your hair only halfway through. This will create a bubble bun.
- Loosen up your hair all around to make the hairstyle loose and messy. You can also pancake the bun to make it flare out a bit.
- Wrap the rest of your hair around the base of the bun and pin it underneath.
13. Half Up Top Knot Short Hair

What You Need
- Texturizing spray
- Hair Ties
- Bobby pins
How To Do
- Create a clean center part, then section the top half of your hair from ear to ear.
- Backcomb the top section slightly for volume.
- Gather the top section into a ponytail at your crown, leaving the sides loose.
- Twist the ponytail into a bun, securing it with a hair tie.
- Gently loosen the bun for volume and secure any loose strands with bobby pins.
- Spray with texturizing spray for added texture and hold.
Infographic: Quick And Neat Formal Hairstyles For Long Hair
It can be tricky to manage long hair spontaneously in a formal setting. But with long hair, you get to do so many hairstyles. Got no ribbon? Make one with your flowy tresses to look elegant. Unlike casual events, appearing neat and presentable is essential in formal occasions. What can you do with your hair when you are not prepared but need to look professional within a few short minutes?
Check out the infographic below for quick formal hairstyle ideas for long hair. Illustration: StyleCraze Design Team
The top knot is the symbol of feminine beauty in ancient times. It offers a versatile look, and this stylish hairstyle is a choice for many women. Some popular top knots include loose messy top knot bun, messy half top knot, 5-minute perfect bun, easy top knot, and messy top knot. It works for every hair length and type. Follow the top knot tutorial discussed in the article and thank us later.
Frequently Asked Questions
How long does your hair have to be for a top knot?
You must have medium-length to long hair to have a big top knot. You can tie short hair in a top knot, but the bun will be small. However, you can use extensions to make your hair look longer.
Does a top knot damage hair?
Tight top knots may cause traction alopecia. Tight hairstyles pull on the roots of your hair, leading to damage and hair loss.
Why are top knots so popular?
Most top knot styles are easily achieved and look chic and cool without putting in too much effort, making them very popular.
Is a top knot appropriate for work?
Yes. Sleek top knots are appropriate for work. You can put ornaments like bobby pins, headbands, and barrettes for a casual yet chic look.
Key Takeaways
- The top knot is a traditional updo hairstyle that has been worn in many different times and civilizations for a very long time.
- Apply dry shampoo on brushed hair, gather your locks in a high ponytail, then twist and wrap your hair into a bun.
- There are various other popular options, such as, loose messy top knot, bubble top knot, sleek top knot, and vintage top knot.

Image: Dall·E/StyleCraze Design Team
Watch this hair tutorial video and learn how to create two quick and easy top knots. The hairstyles are perfect for any occasion and are bound to fetch you endless compliments!
Personal Experience: Source
StyleCraze's articles are interwoven with authentic personal narratives that provide depth and resonance to our content. Below are the sources of the personal accounts referenced in this article.
i. Things I Love: Topknot Edition!https://ariellelikethemermaid.wordpress.com/category/top-knot/


