53 Stunning Bun Hairstyles You Need To Check Out Now!
Flaunt your tresses with these amazing hairstyles that offer you an elegant and stylish look.
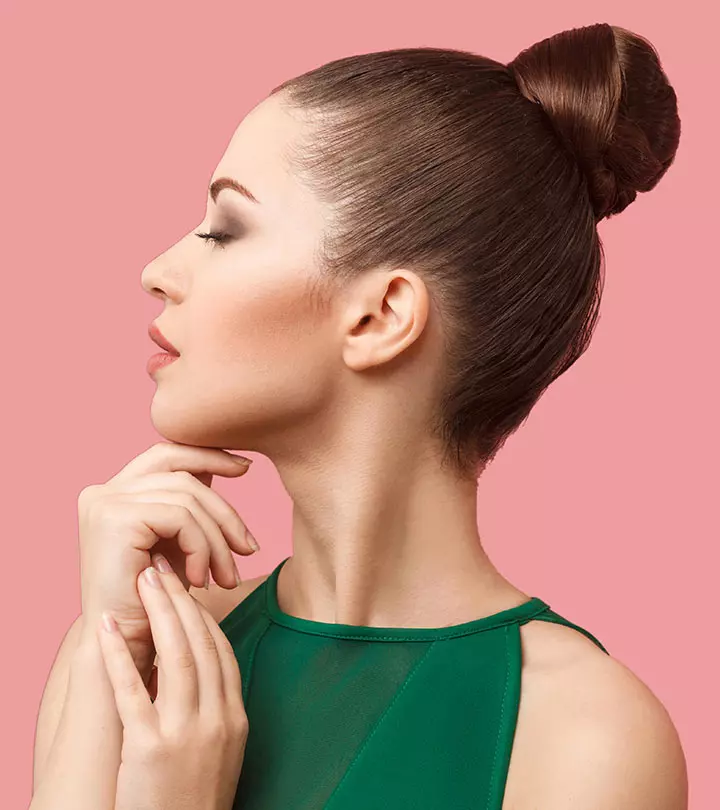
Image: Shutterstock
The hair bun is the most versatile hairstyle ever to transcend time! You can pair a bun with any occasion, event, outfit, mood, season, or personality. And bun hairstyles for long hair are a gift from the heavens above. You can simply tie your long flowy locks in a topknot or low bun and get back to slaying at work or in the house. Keep reading to discover numerous hair bun styles for your topknot or low bun that always looks fresh. Dive right in!

 Before You Get Started
- Regardless of your hair type and texture, ensure your bun isn’t too tight. Tight hairdos pull at the hair and scalp, compromising both their health.
- Common styling tools you would need for a bun hairstyle are bobby pins, elastic bands, styling combs, heat styling tools, and accessories according to the occasion.
- Bun hairstyles will hold better on one-day-old hair as scalp oils will get enough time to coat the hair for a good grip.
- When choosing your bun hairstyle, consider the possibility of wearing hats and scarves. This will give you an idea of how you can style your bun around them.
In This Article
53 Stunning Bun Hairstyles You Need To Check Out Now!
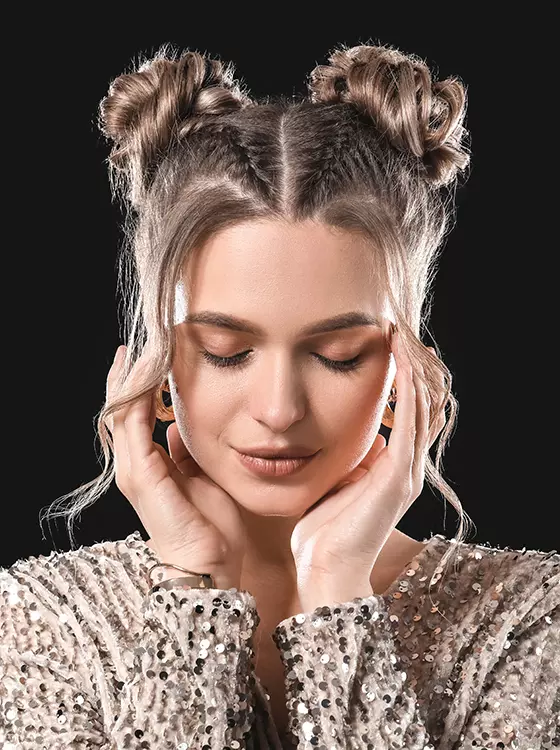
1. Tight Braids With Mini Buns
What You Need
- Comb
- Hair mousse
- Rat-tailed Comb
- Elastic Bands
- Bobby pins
- Curling Iron
- Hairspray
How to Do
- Comb your hair to remove any knots.
- Apply mousse to your hair thoroughly.
- Divide your hair down the middle into two equal sections with the pointed end of the rat-tailed comb.
- Then, from the starting point of the middle parting, take a semi-circle parting on each section that ends near the ears to create small subsections.
- Some hair will be left out from the front. Clip away these small sections of hair.
- Begin weaving these subsections into scalp-tight French braids till you reach the crown.
- Secure the braids with thin bobby pins.
- Gather the hair from each section, including the braided subsections, and tie a ponytail on each side using elastic bands.
- Twist the ponytailed hair and wrap it into small mini buns.
- Tuck the ends of the mini bun inside the elastic tie of the ponytail. You can also use hair pins to secure the buns.
- Unclip the small sections of hair from the front and loosely curl them with the curling iron. Let them fall loosely.
- Spritz on some hairspray to secure the hairstyle.
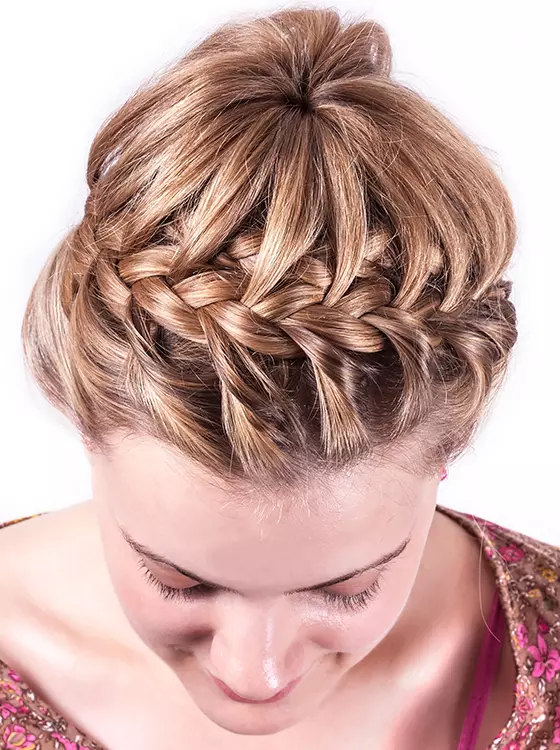
2. Victorian Era Wreath Bun
What You Need
- Comb
- Hair pins
- Hairspray
How To Do
- Take hair only from the crown area and tie it in a half ponytail.
- You should have hair left in the front and the back.
- Side-sweep all the hair in the front to one side.
- Begin weaving a 4-strand braid from the starting point of the side-swept hair.
- A 4-strand braid just like a regular braid but with four sections instead of three. You divide your hair into four sections. Take one of the side sections, pass it over the second section of hair and under the third section of hair. Then, you take the last side section, pass it under the closest section of hair and over the next section of hair.
- However, as you weave this braid, keep adding hair from the front hairline to the corner section of the braid that is closest to the front hairline.
- Similarly, add hair from the high ponytail to the middle sections of the braid.
- As you weave the braid, you’ll notice it begins forming a semi-circle. Make a full circle by adding hair from the back hairline to the corner section of hair. Continue adding hair from the ponytail to the braid.
- Once you reach the starting point of the braid, tuck and pin the ends underneath the first stitch of the braid.
Spritz a generous amount of hairspray to secure the braided bun.
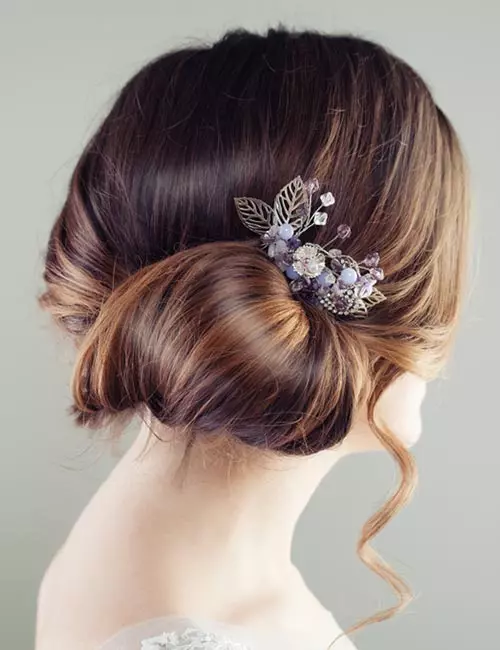
3. Stunning Updo
What You Need
- Comb
- Curling iron
- Barrette
- Hairspray
- Bobby pins
How To Do
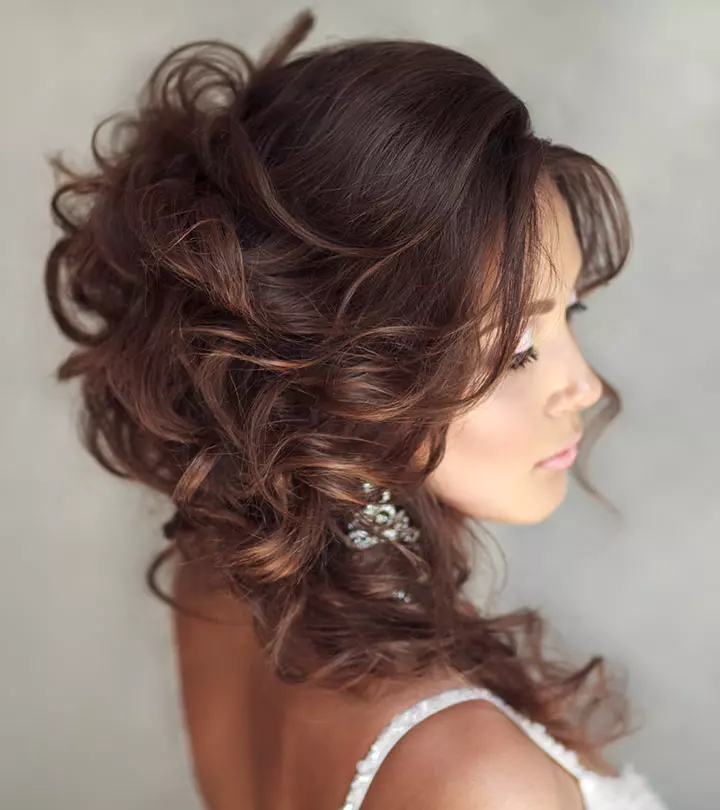
- Style your hair in loose curls.
- Gather all your hair and wrap it in a low side bun.
- If you have thin hair, you can use a bun maker to make it look bigger.
- Use bobby pins to secure the bun in place.
- Allow a few strands of hair to hang loose. Curl these strands to add a romantic touch to your bun with curls hairdo.
- Finish off with some hairspray and a barrette.
 Quick Tip
When styling curly updos like this, here are some words of wisdom from the curly hair expert herself, Casey Simmons owner of Royal Locks Curl Care. She says, “Natural curls can ditch the curling iron when styling this bun. Curly hair is a perfect finish for this simple updo or simple chignon. Reactivate the curls in the pieces of hair that hang loose and frame your face with extra cream or gel, twist around your fingers and gently scrunch upwards. Keep the ends of your curls out of the bun and let them come through upwards creating a cascade of curls around it.”
4. Pouf Bun
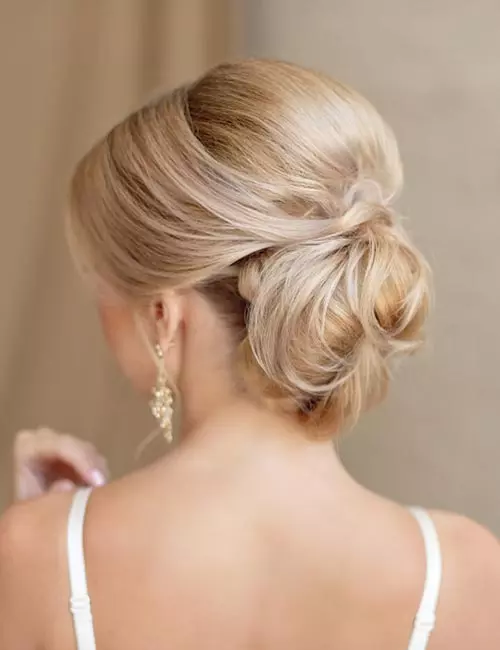
What You Need
- Hair clips
- Brush
- Curling iron
- Elastic band
- Bobby pins
How To Do
- Part your hair horizontally, from ear to ear.
- Clip up the top half of your hair and brush down the lower half to remove any knots.
- Wrap the lower section in a low bun, leaving the ends to hang over the bun.
- Secure it in place with the help of an elastic band and bobby pins. You can curl your hair if you want to make it look more dramatic.
- Unclip the top section.
- Take some hair from the front and leave it out.
- Gather the rest of your hair and backcomb it to create a pouf.
- Use bobby pins to secure the pouf in place.
- Brush back the hair from the front and pin it at the back.
5. Braided Crown
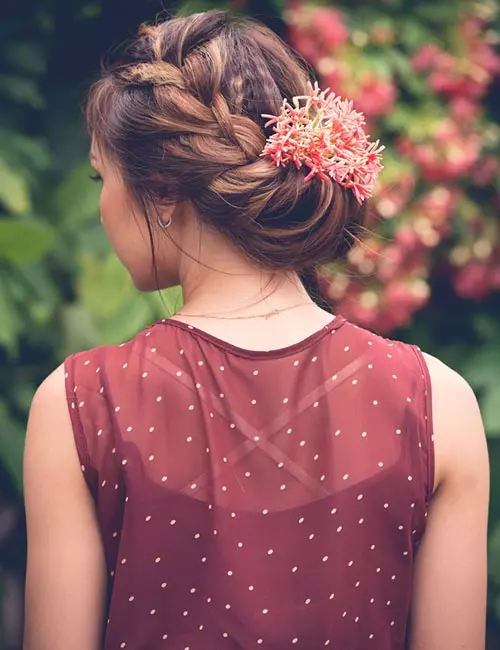
What You Need
- Bobby pins
- Elastic bands
- Accessories
How To Do
- Using the waterfall braiding method, braid your hair at the sides. Secure the braids with elastic bands or bobby pins.
- Wrap all your hair in a messy bun.
- Accessorize with flowers or beads to add a boho charm to the look.
6. Glided Bun
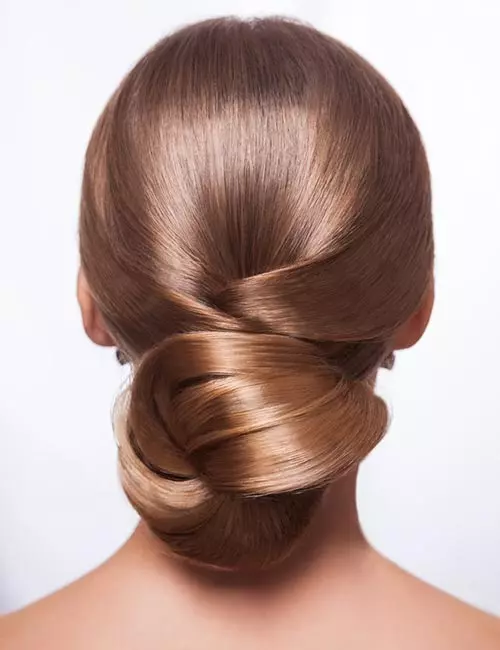
What You Need
- Mousse
- Comb
- Elastic band
- Bobby pins
How To Do
- Take some lightweight mousse on your comb.
- Gather all your hair and brush it down with the moussed comb. This will make it slick and shiny, while also keeping your hairstyle in place for a long time.
- Leave a little hair on both sides and gather the rest of your hair to form a bun. Secure it with an elastic band and bobby pins.
- Overlap the side sections and wrap them around the bun.
- Use bobby pins to secure them in place.
7. Braided Base Bun
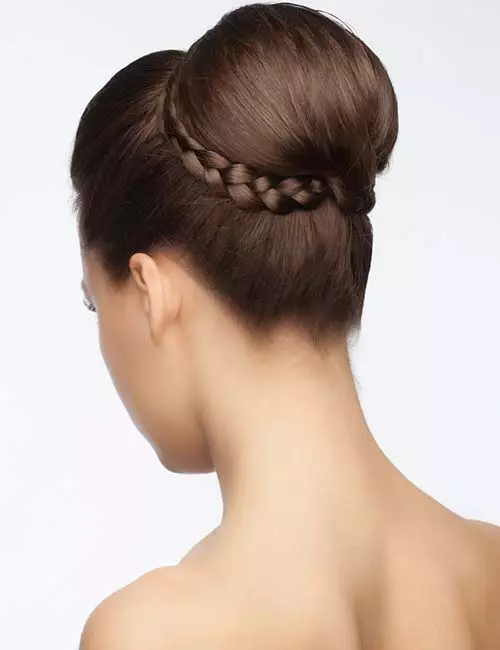
What You Need
- Comb
- Elastic band
- Bobby pins
- Hairspray
How To Do
- Gather hair from the top and create a pouf with it.
- Leaving out a 4-inch section, wrap your hair in a high bun at the crown.
- Secure it with an elastic band.
- Weave the left-out section of hair in a regular braid. Wrap the braid around the base of the bun.
- Pin the braid to the bun with some thin bobby pins.
- Finish off with a hit of hairspray.
8. Voluminous Bun
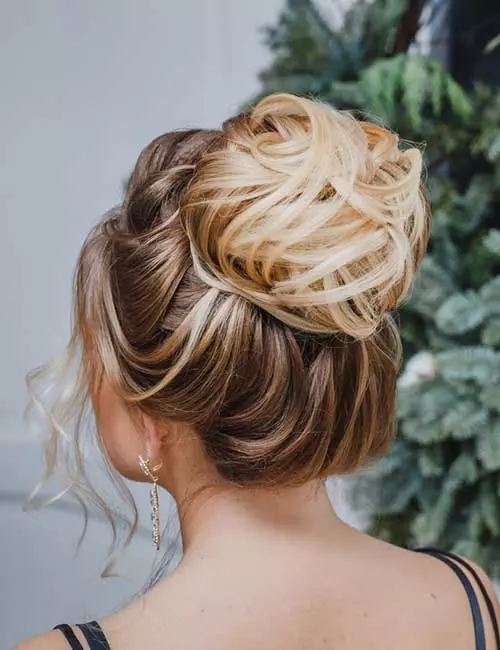
What You Need
- Curling iron
- Elastic band
- Bobby pins
How To Do
- Curl your hair and wrap it in a loose bun with the help of bobby pins and an elastic band.
- Pull out some curls from the front to frame your face and finish off the look.
9. Juliet Updo
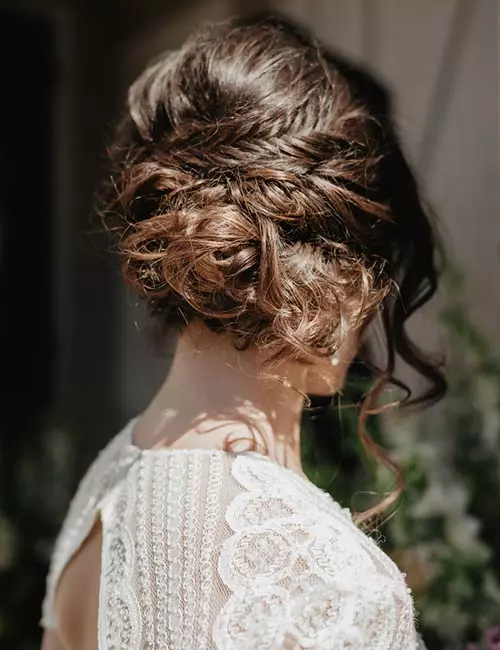
What You Need
- Comb
- Bobby pins
- Elastic bands
How To Do
- Gather a bit of hair from the top and backcomb it. Pin this section of hair in a pouf.
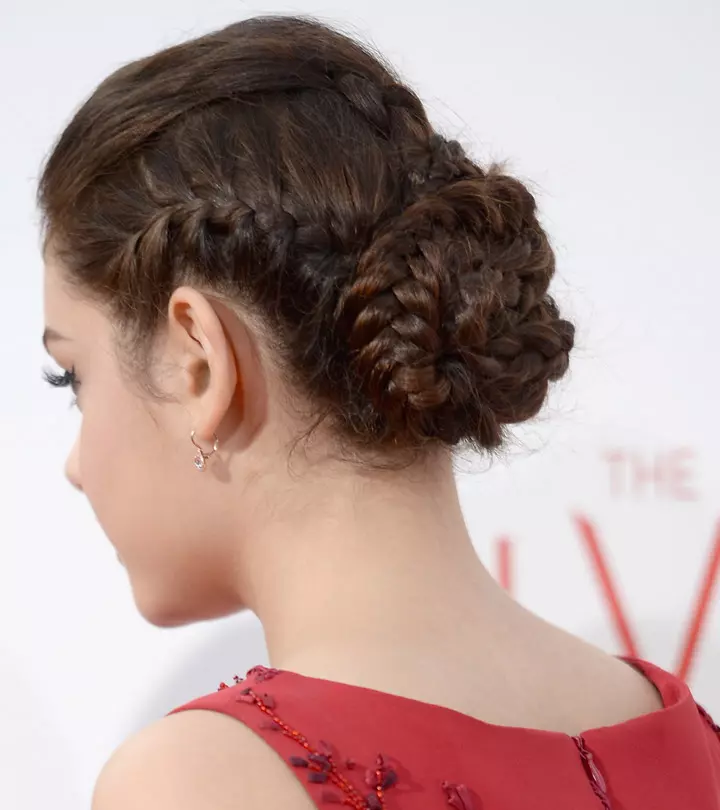
- Pick up some hair from one side and weave it in a fishtail braid. Secure it with an elastic band. Repeat the same on the other side.
- Pick up some more hair from below the braids and twist it.
- Pin the braids and twists at the back, below the pouf.
- Wrap the rest of your hair in a bun.
10. Elegant Updo
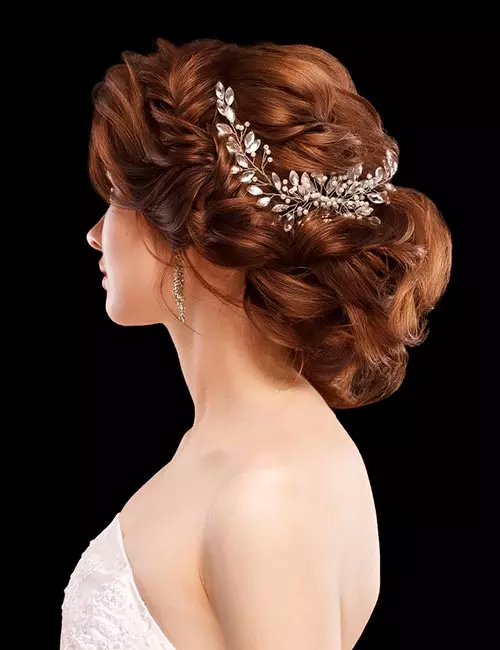
What You Need
- Curling iron
- Elastic bands
- Bobby pins
How To Do
- Curl your hair in medium-sized curls.
- Pick sections of hair from the sides and weave them into braids. Secure them with elastic bands.
- Gather the rest of your hair and wrap it in a bun. Secure it with an elastic band or bobby pins.
- Pin the braids at the top of the bun.
- If your braids are longer, wrap them around the bun before pinning them in place.
11. Modern French Twist
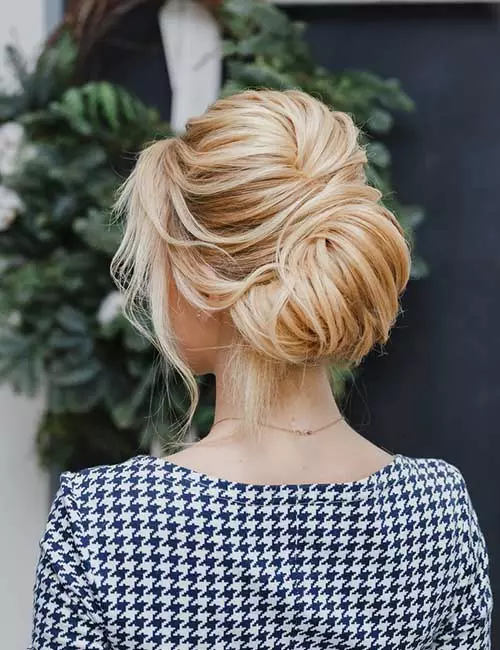
What You Need
- Comb
- Bobby pins
How To Do
- This hairstyle is the modern version of the French twist. Style the front of your hair in a pouf. Secure it with bobby pins.
- Gather the rest of your hair and roll it in a bun. Secure the bun with bobby pins.
- Allow some strands of hair to fall loose to frame your face.
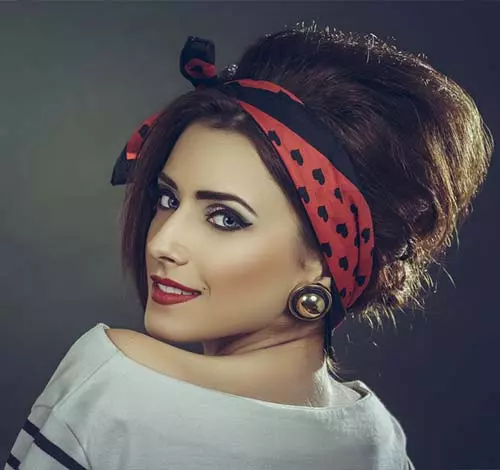
12. Scarfed Bun
What You Need
- Comb
- Bobby pins
- Scarf
How To Do
- Backcomb all your hair to add volume to it.
- Gather all your hair and wrap it in a bun, neatly combing the top of the bun. Keep it secure with bobby pins.
- Wrap and tie the scarf around the bun to finish off the look. It looks easy, vintage, and lovely!
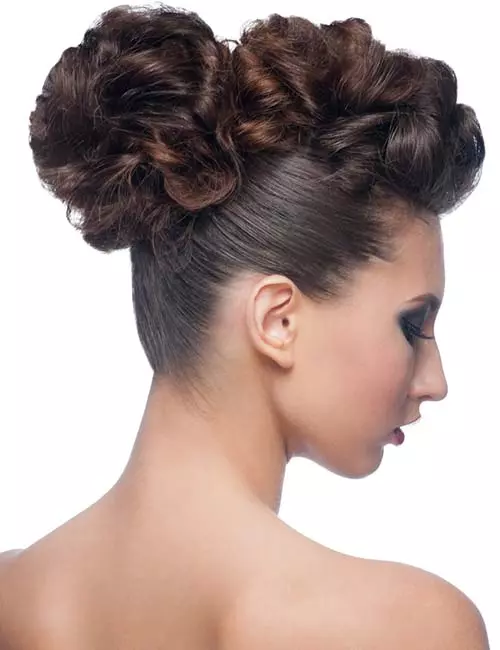
13. Mohawk Bun
What You Need
- Comb
- Mousse
- Curling iron
- Bobby pins
How To Do
- Comb your hair down with mousse. Style it in curls.
- Gather your hair to the top of your head and pin the curls to form the mohawk.
- Do the same to form the bun. If you have longer hair, wrap it in a bun and pin the curled ends at the top.
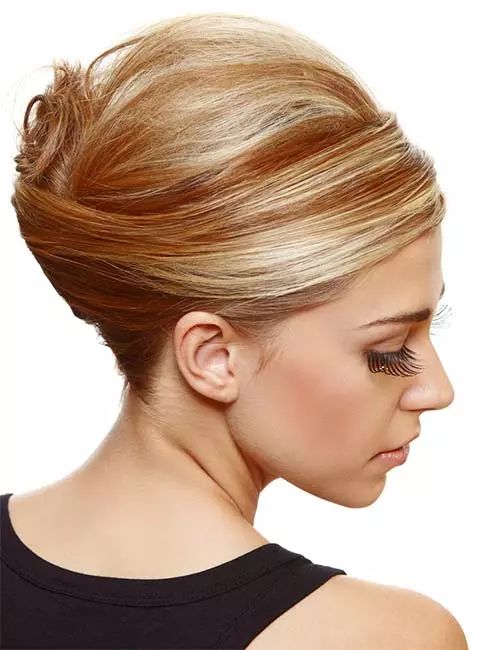
14. Highlighted Beehive
What You Need
- Comb
- Bobby pins
How To Do
- If you have highlights, this is a great hairstyle to showcase them. Backcomb the top of your hair to create a bouffant. Use bobby pins to secure the bouffant.
- Gather the rest of your hair and lean it to one side.
- Roll the hair inwards to create a French twist.
- Allow the ends to stick out just a bit.
- Use bobby pins to keep the hairstyle in place.
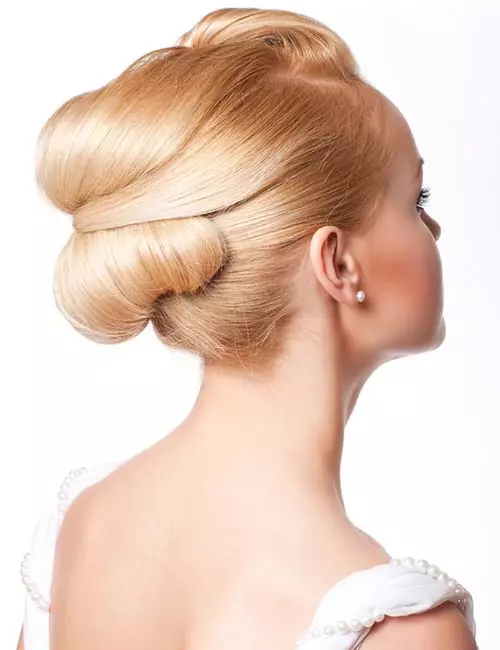
15. Modern Vintage Bun
What You Need
- Mousse
- Comb
- Bobby pins
How To Do
- Apply some mousse to your hair.
- Backcomb your hair at the front to create a slight pouf.
- Leaving two sections of hair from the sides, gather the rest of your hair and tie it in a long bun at the back.
- Pin the side sections across the center of the bun.
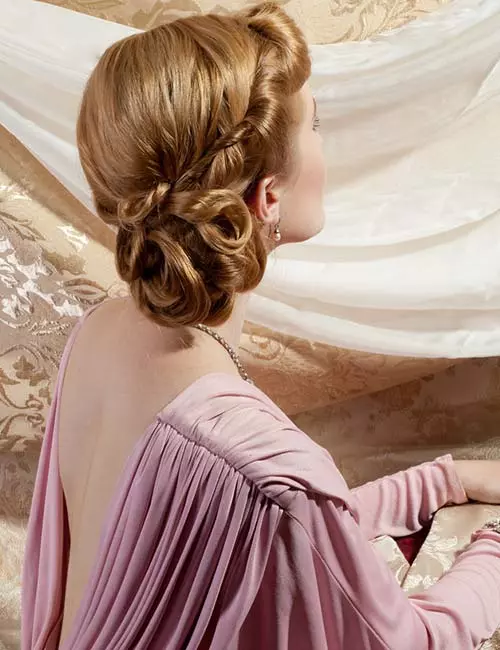
16. Classy Side Bun
What You Need
- Curling iron
- Bobby pins
How To Do
- This side bun takes updos to a whole new level of class! Start by curling your hair.
- Wrap it in a side bun and pin the curled ends at the top.
- Roll your curled bangs and pin them across the front.
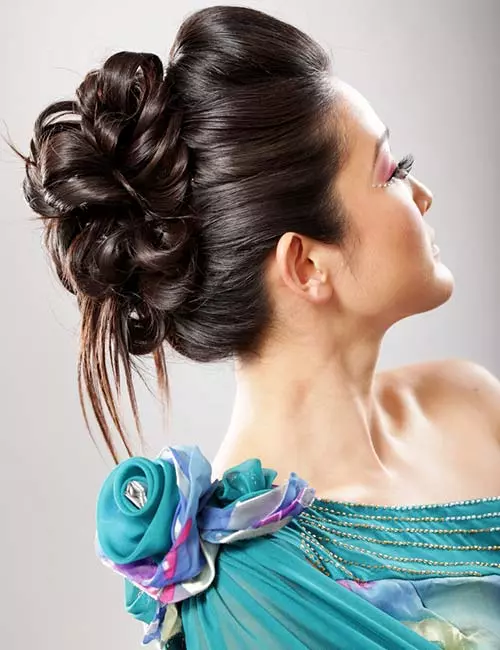
17. Folded Updo
What You Need
- Comb
- Elastic band
- Bobby pins
How To Do
- Use a comb to gather all your hair and tie it in a ponytail.
- Roll small sections of hair from the ponytail and pin them in place to mimic a bun.
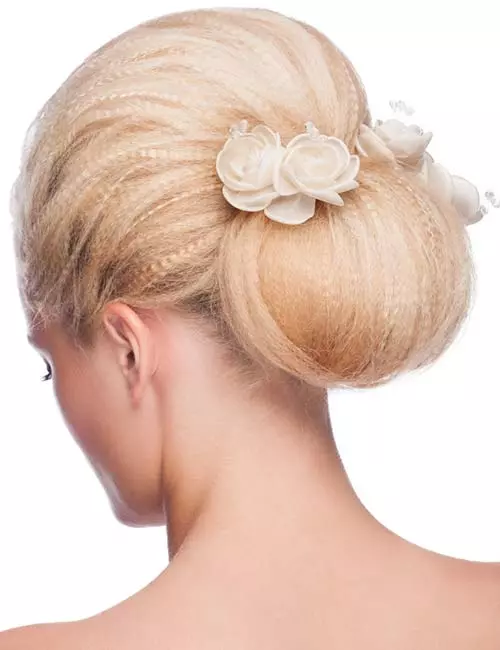
18. Crimped Bun
What You Need
- Crimping iron
- Comb
- Bobby pins
- Flowers (to accessorize)
How To Do
- Crimp your hair with a crimping iron.
- Create a pouf with the front of your hair and wrap the rest of your hair in a bun.
- Secure the pouf and bun with bobby pins.
- Accessorize with some flowers.
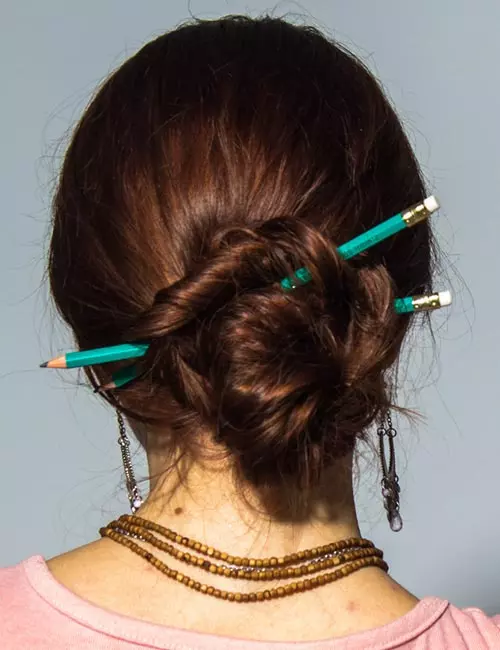
19. Artsy Bun
What You Need
- Hair brush
- Pencils
- Bobby pins
How To Do
- Gather all your hair and divide it into two sections.
- Wrap the first section and secure it with a pencil by passing it through, then over, and then under the bun.
- Wrap the second section of hair around the first bun and use another pencil to secure it. You can also use bobby pins to make sure the bun stays in place.
20. Curly Ends Bun
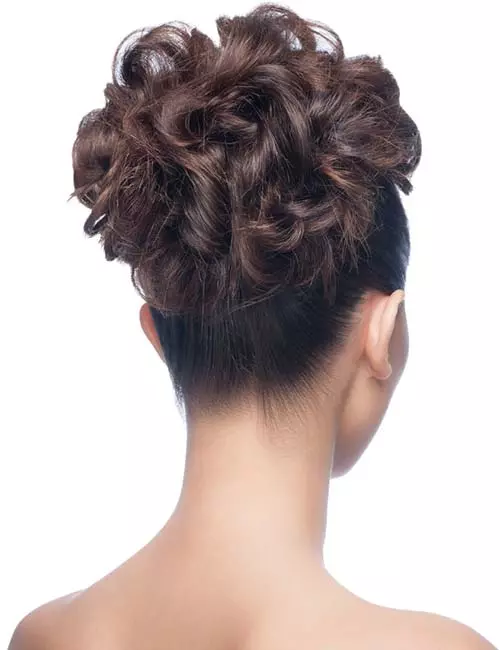
What You Need
- Curling iron or rollers
- Bobby pins
How To Do
- Curl your hair with a curler or rollers. Make sure the ends are curled properly.
- Gather all your hair at the crown and twirl it in a bun, using bobby pins to secure it.
- Leave all the ends out to finish off the look.
21. Top Bun
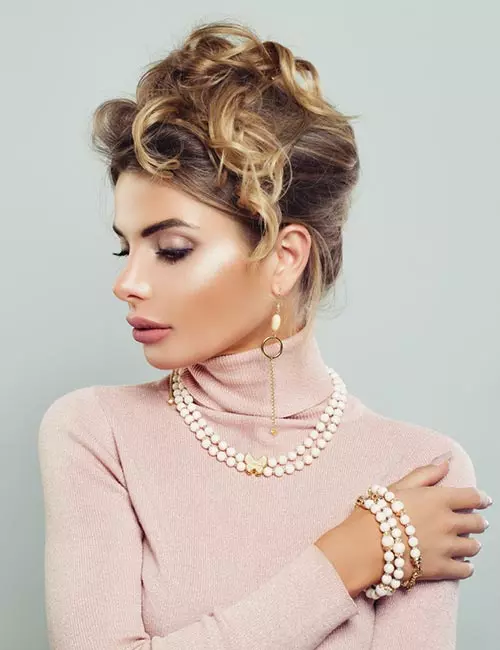
What You Need
- Curling iron
- Bobby pins
How To Do
- Style the ends of your hair in loose curls.
- Gather all your hair at the top and pin the back up, allowing the ends to fall to the front.
- Use pins to arrange the curly ends. Super easy and convenient! Perfect for those rush hour days.
22. Gibson Bun
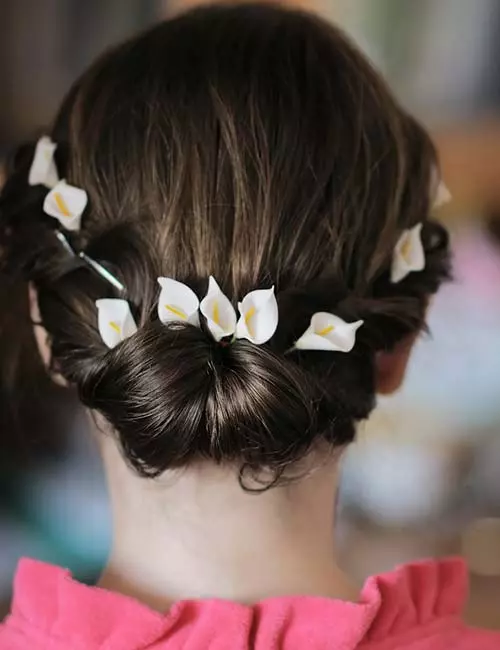
What You Need
- Headband
- Flowers or other accessories
How To Do
- Put a headband around your head and wrap your hair in it to create this look.
- Accessorize it with flowers, beads, or other delicate hair pins. It is a perfect hairstyle for prom and other formal events.
23. Twisted Bun
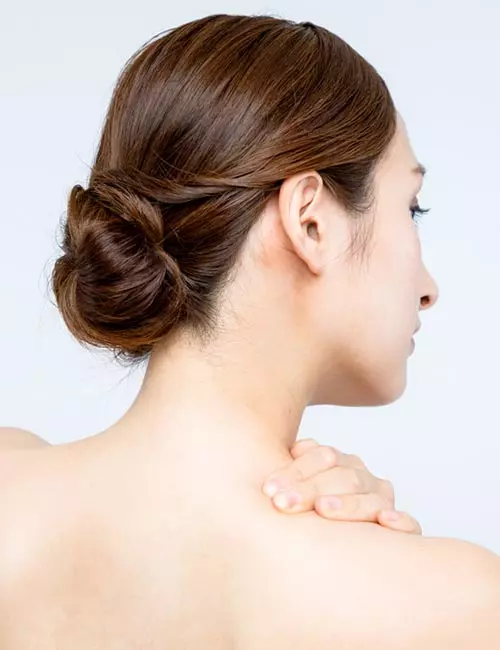
What You Need
- Bobby pins
How To Do
- Leaving two small sections on the sides, gather all your hair and wrap it in a bun. Secure the bun with bobby pins.
- Twist the side sections and pin them over the bun. Quick and easy!
24. Entwined Bun
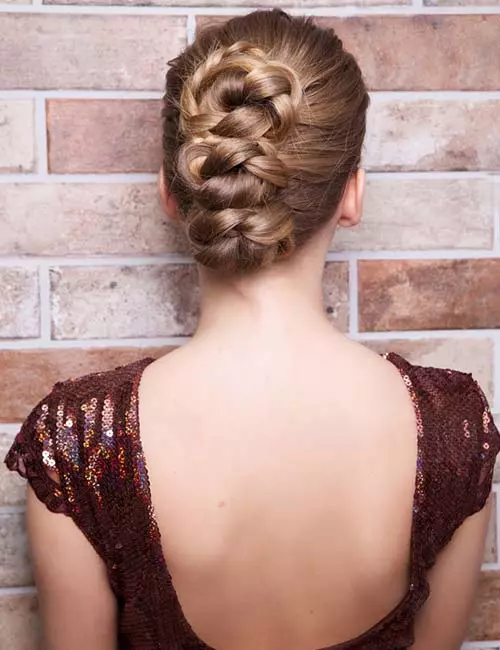
What You Need
- Mousse
- Comb
- Bobby pins
How To Do
- Comb your hair down with some mousse.
- Brush your hair back and divide it into three sections: top, middle, and lower sections.
- Tie each section in a knot to create the buns and pin them together in place.
25. Thin Band Updo
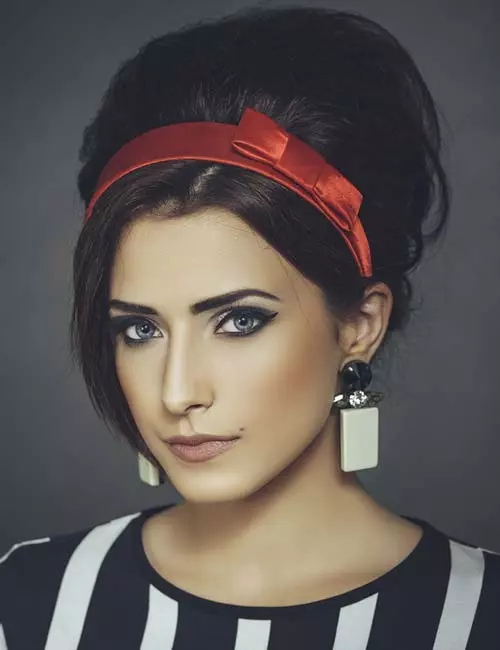
What You Need
- Bun-maker
- Bobby pins
- Headband
How To Do
- Place the bun-maker under your hair.
- Backcomb your hair and then pin it under the bun-maker to secure it.
- Put on the headband to finish off the look.
26. Curly Bridal Updo
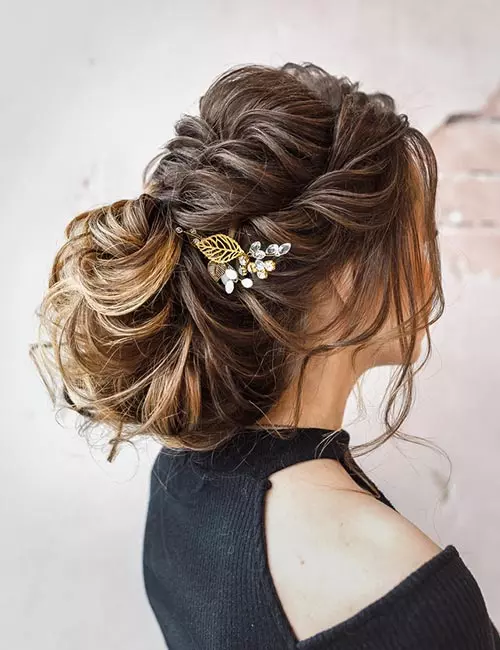
What You Need
- Comb
- Curling iron
- Elastic bands
- Bobby pins
- Accessories
How To Do
- Tease all your hair to make it look more voluminous.
- Style your hair in big curls.
- Pick up some hair from the crown and weave a fishtail braid with it for three inches.
- With some hair from the sides and the fishtail braid, weave a mermaid braid about the same length.
- Secure both braids with elastic bands.
- Take some hair from the sides and twist it. Pin the twists at the back.
- Fold the rest of the hair in sections to form the bun. Secure it in place with bobby pins.
- Finish off with some accessories.
27. Twisted Bun
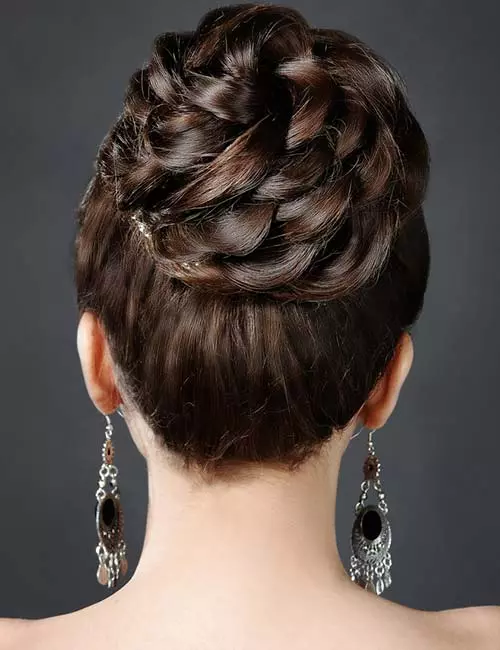
What You Need
- Elastic band
- Bobby pins
How To Do
- Gather all your hair and tie it in a high ponytail with an elastic band.
- Divide the ponytail into smaller sections and twist them individually.
- Wrap the twists around to form the bun and secure it with bobby pins.
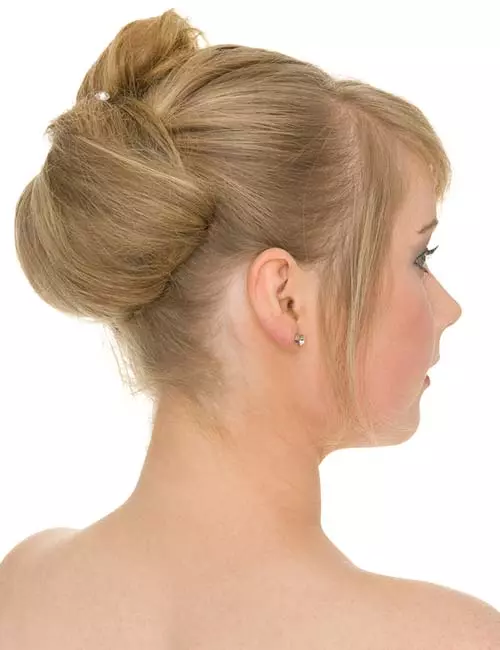
28. Folded Bun
What You Need
- Comb
- Bobby pins
How To Do
- Gather all your hair and divide it into two sections.
- Fold the first section of hair to form a bun. Secure it with bobby pins.
- Fold the next section of hair over the first bun and pin it in place.
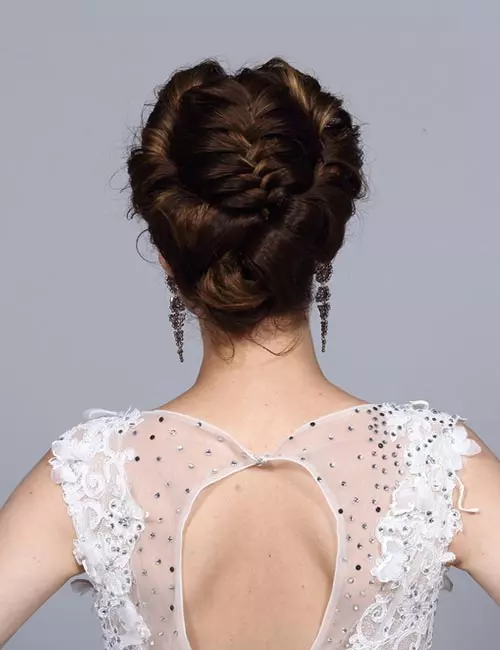
29. Twisted Crown
What You Need
- Brush
- Elastic band
- Bobby pins
How To Do
- Brush down your hair to detangle it.
- Braid your hair in a French braid at the crown. Secure it with an elastic band.
- Divide the rest of your hair into half.
- Twist one section of hair and wrap it around one side of your head. Secure it with bobby pins.
- Repeat the same on the other side.
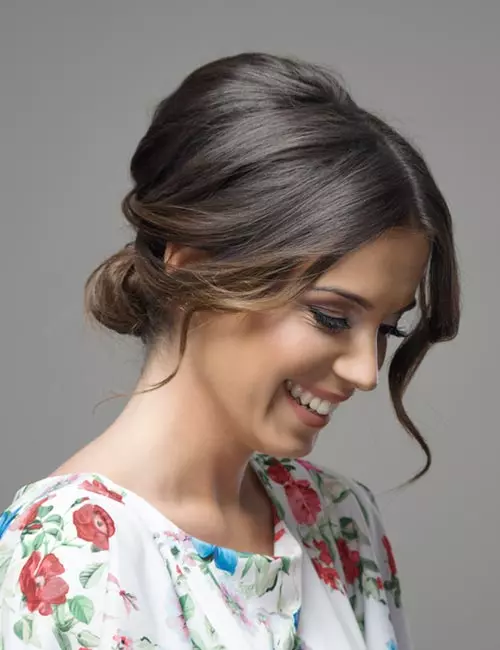
30. Loose Updo
What You Need
- Bobby pins
- Comb
How To Do
- Create a slight pouf at the top and pin it in place.
- Gather the rest of your hair and wrap it in a low bun.
- Spritz on some hairspray to keep the hairstyle in place.
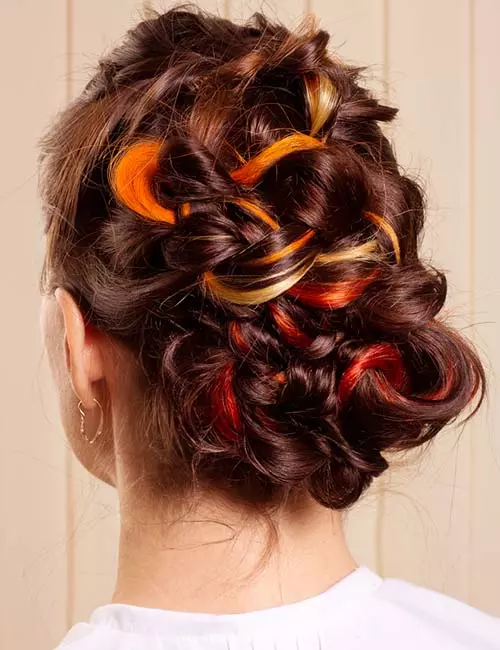
31. Highlights Bun
What You Need
- Bobby pins
- Curling iron
- Bun-maker (optional)
How To Do
- Create a pouf at the front of your head.
- Curl the rest of your hair with a curling iron.
- To create the bun, fold and pin each curl in place. If you want the bun to be big, you can use a bun-maker.
32. Beehive Bun
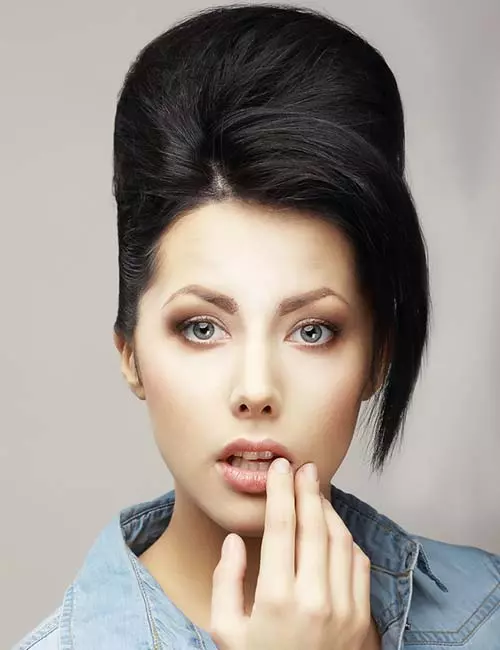
What You Need
- Bun-maker
- Comb
- Bobby pins
How To Do
- Gather all your hair at the back.
- Backcomb your hair to create a pouf at the top.
- Place the bun-maker below your hair and wrap your hair over and under it.
- Pin your hair in place.
 Quick Tip
33. Messy Bun
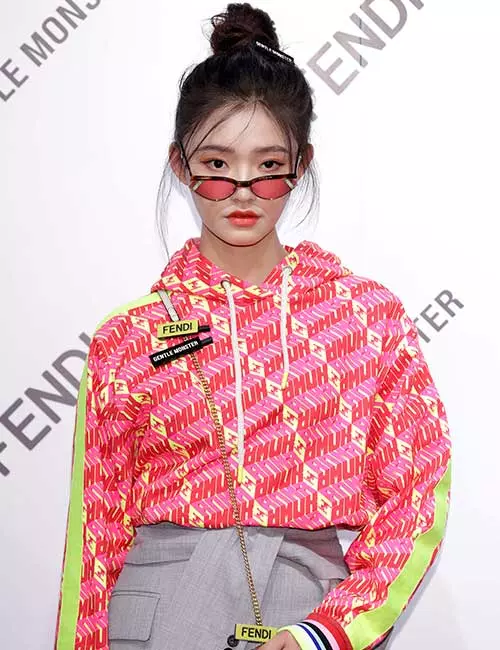
What You Need
- Elastic band
- Bobby pins
- Hairspray
How To Do
- Gather all your hair as you would a high ponytail. Take an elastic band and pass it over the ponytail once. Twist it and pass it over your hair again, but leave the ends out.
- Pin down any loose sections and spritz on some hairspray.
Alexis, a YouTuber, explains how easy it is to create a quick, messy bun in a minute. She uses a dry shampoo and hair spray to add texture to the hair, followed by a hair tie and a few bobby pins to get this messy updo. She said, “They are the best thing ever for when your hair is dirty or greasy, or you just don’t feel like wearing your hair down (i).”
34. Double Knot Top Knot
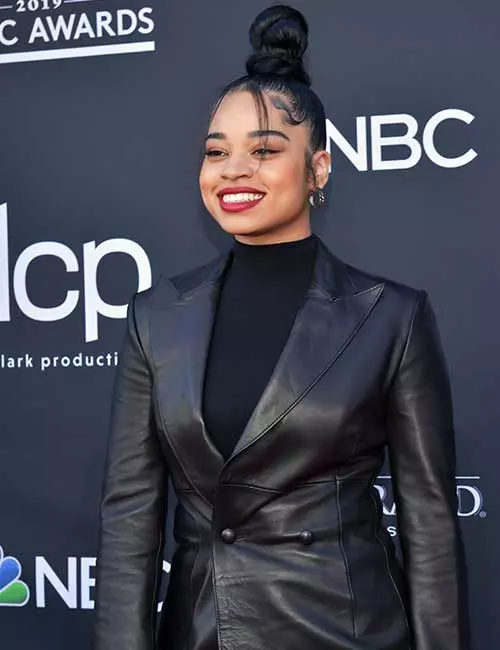
What You Need
- Mousse
- Comb
- Bobby pins
How To Do
- Apply mousse to a comb and comb your hair upwards to the top.
- Wrap all your hair in a bun, leaving a little from the side, and pin it in place.
- Wrap the little section of hair around the base of your bun. Use bobby pins to secure it.
35. Dreaded Bun
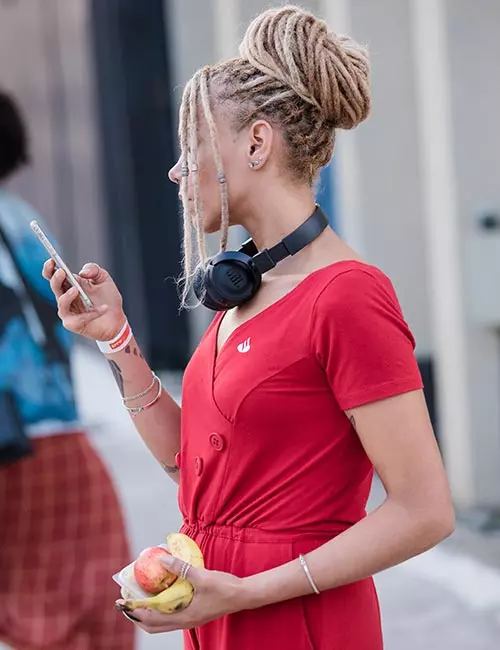
What You Need
- Elastic band
- U pins
How To Do
- Add some style to your dreads with this big bun. Simply gather all your dreads and wrap them around to form a bun.
- Use an elastic band and U pins to keep it in place.
36. Royal Low Side Bun
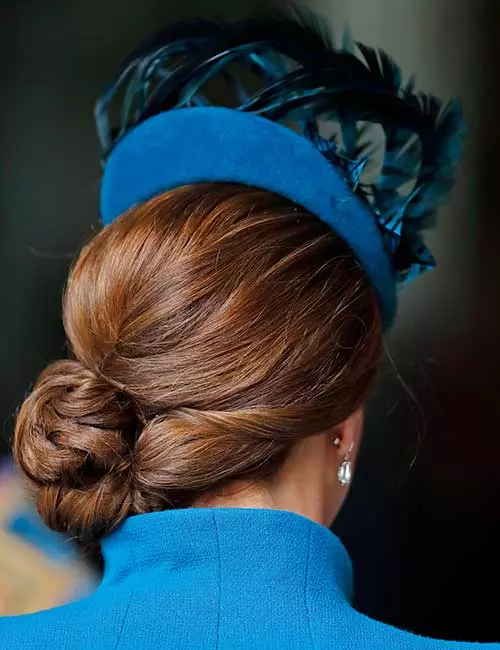
What You Need
- Comb
- U pins
- Bobby pins
How To Do
- Comb your hair to remove all the tangles and knots.
- Gather all your hair to one side and divide it into two sections.
- Wrap each section in a knot and pin the knotted buns in place.
37. Sleek Top Knot
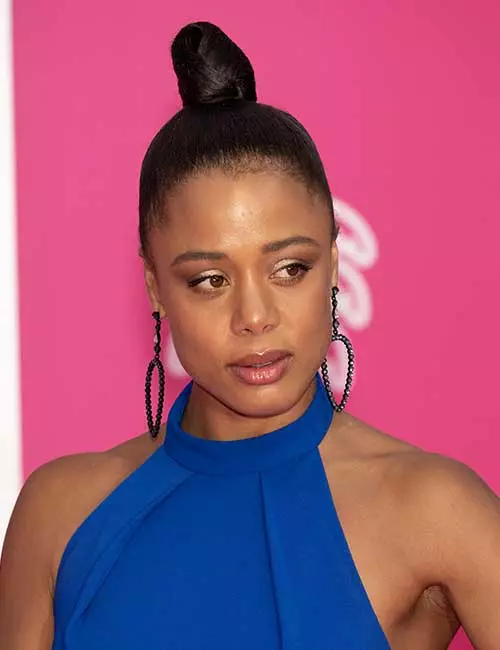
What You Need
- Mousse
- Comb
- Elastic bands
How To
- Apply a generous amount of mousse to your hair.
- Comb your hair back and tie it in a high ponytail with an elastic band.
- Wrap the ponytail in a bun and use another elastic band to secure it.
38. Double Knot Bun
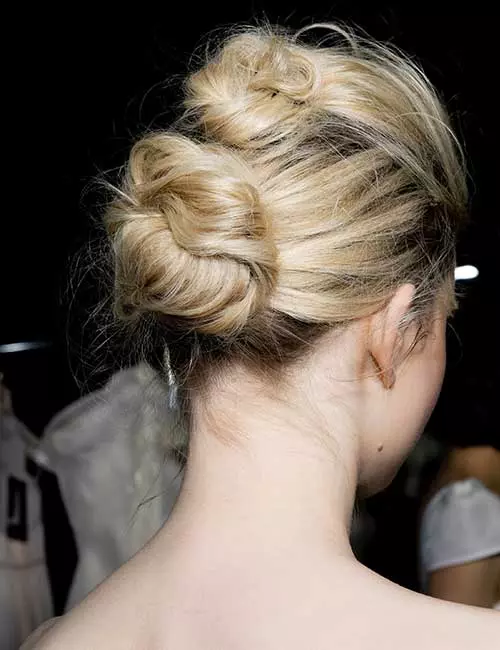
What You Need
- Comb
- Elastic bands
- Bobby pins
How To Do
- Divide your hair into two sections from ear to ear.
- Clip up the bottom section.
- At the top, create a small pouf and then wrap all the hair into a bun.
- Gather all the hair from the bottom and wrap it in a bun.
- Use elastic bands and bobby pins to secure the buns.
39. Pouf Twist And Clip
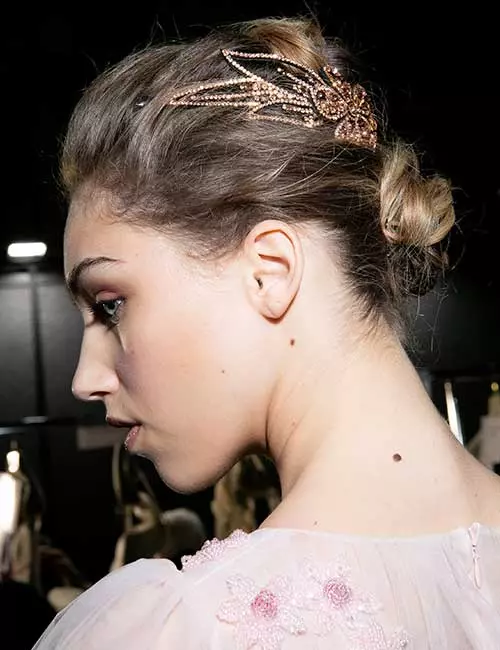
What You Need
- Comb
- Bobby pins
- Designer clip
How To Do
- Gather your hair from the front and pin it back.
- If you have slightly longer hair in the front, twirl it around once and pin it in place.
- Gather your hair from the back and wrap it around, twisting it as you go to form a bun. Use bobby pins to secure the bun.
- Accessorize with a delicate designer clip.
40. The Twist And Clip
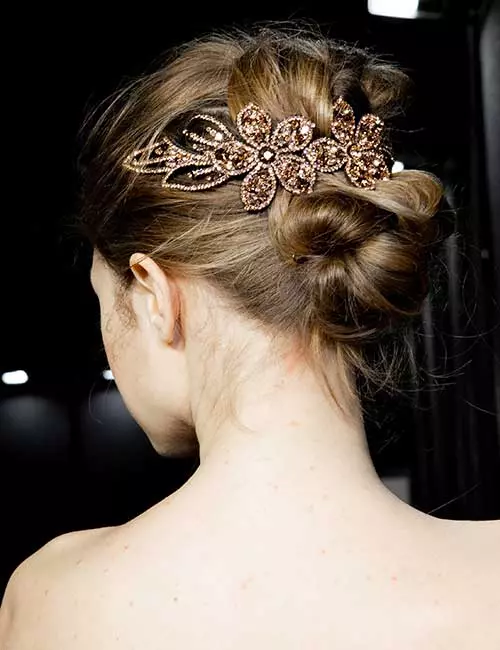
What You Need
- Comb
- Elastic bands
- Bobby pins
How To Do
- Divide your hair horizontally into two sections. Clip up the bottom section.
- Hold up the hair from the top section and twist it tightly.
- Wrap the twisted hair in a bun and push it up to form a slight pouf.
- Use pins to secure it in place.
- Repeat the same with the lower section of hair.
41. One Wrap Bun
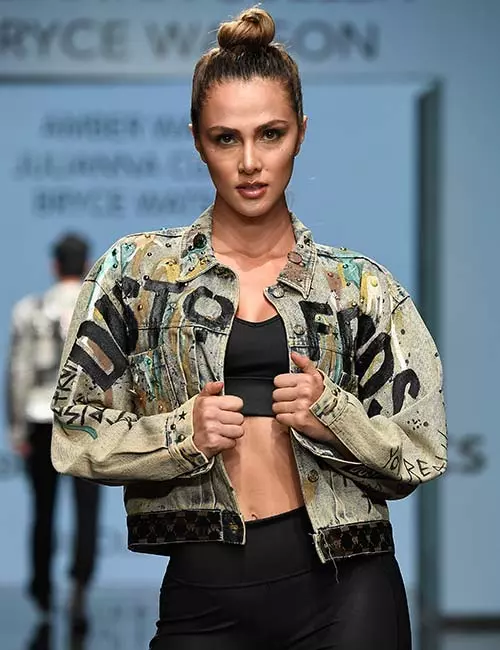
What You Need
- Comb
- Bobby pins
How To Do
- Apply some mousse to your comb and comb your hair down to make it look sleek.
- Gather all your hair at the crown, wrap your hair once, and pin the ends underneath the bun.
42. The Gaga Bun
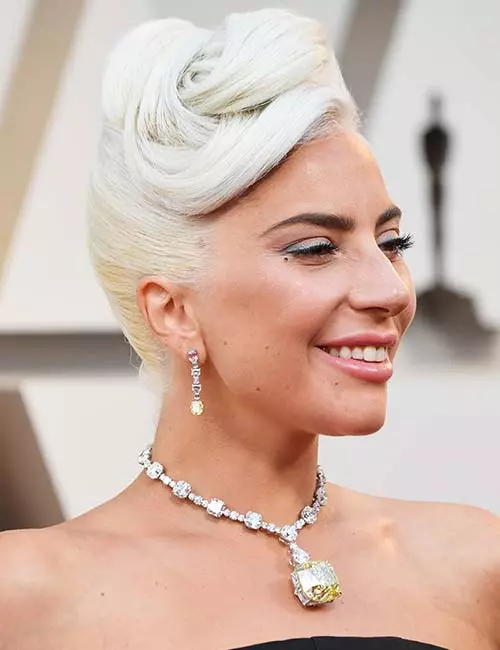
What You Need
- Comb
- Mousse
- Bobby pins
How To Do
- Apply mousse to your hair and comb it back.
- Pick up some hair from the front and clip it up.
- With the rest of your hair, create a French twist bun and pin it at the back.
- Fold the hair from the front in sections and pin it at the top to create the modern wave look.
43. La Vie En Bun
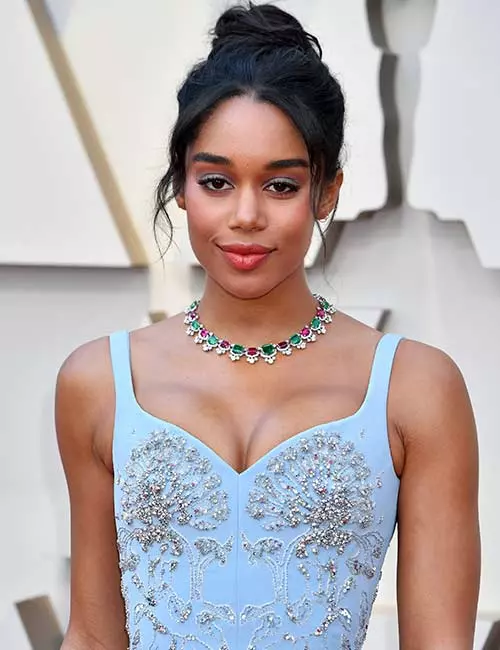
What You Need
- Comb
- Elastic bands
- Bobby pins
How To Do
- Gather all your hair messily and wrap it in a bun. The key is to place the bun just below the crown, not at it.
- Secure the bun with an elastic band and some bobby pins.
- If you don’t want to part your hair down the middle, try a side parting or a slightly messy parting.
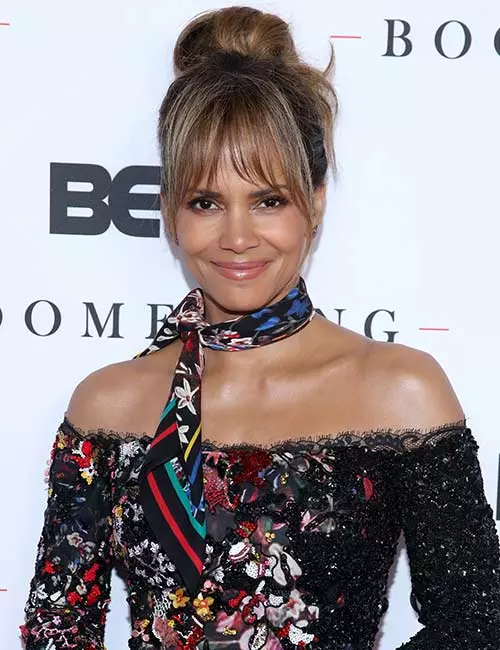
44. Faux Bangs Bun
What You Need
- Comb
- Elastic bands
- Bobby pins
How To Do
- Gather all your hair at the crown.
- Take an elastic band and pass it over your hair once.
- Twist the elastic band and pass it over your hair again, but not completely.
- You can use bobby pins to further secure the bun in place.
- Leave the ends of your hair out and arrange them across the front to create the faux bun with bangs look.
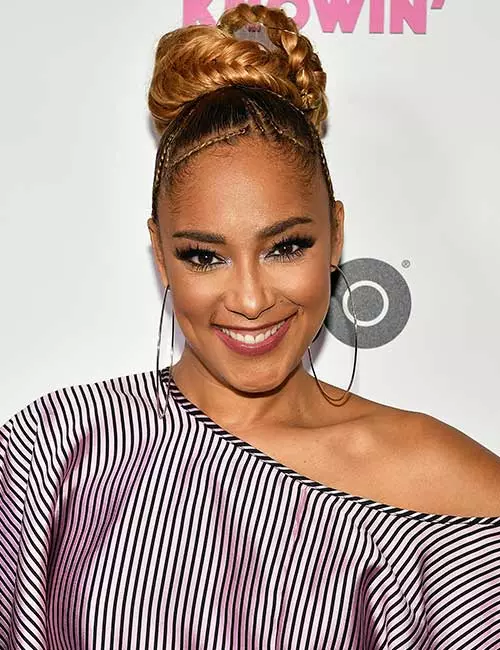
45. Stylish Braided Bun
What You Need
- Comb
- Elastic band
- Thin elastic bands
- Bobby pins
How To Do
- Take really small sections of hair and weave them in scalp-aligned braids. Secure the small braids with thin elastic bands.
- Gather all of your hair and weave it in a braid.
- Wrap the braid into a high bun.
- Secure the high bun with an elastic band and bobby pins and flaunt your bun with braids hairdo.
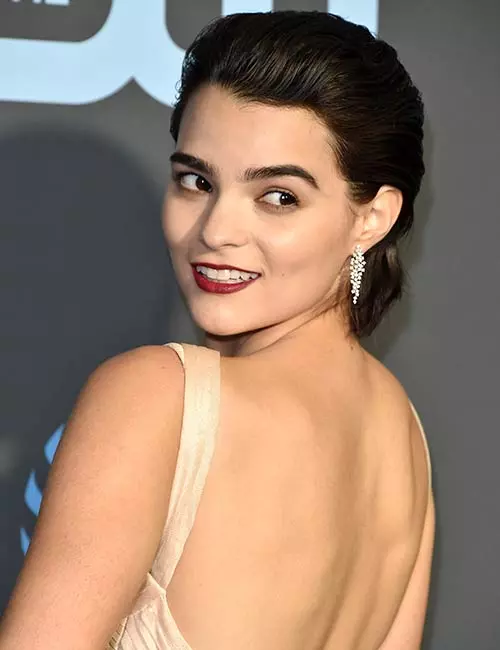
46. Retro Glamour Bun
What You Need
- Comb
- Elastic bands
- Bobby pins
How To Do
- Gather all your hair and wrap it in a low sleek bun.
- Push it higher to create a pouf.
- Apply hairspray to keep your hair in place.
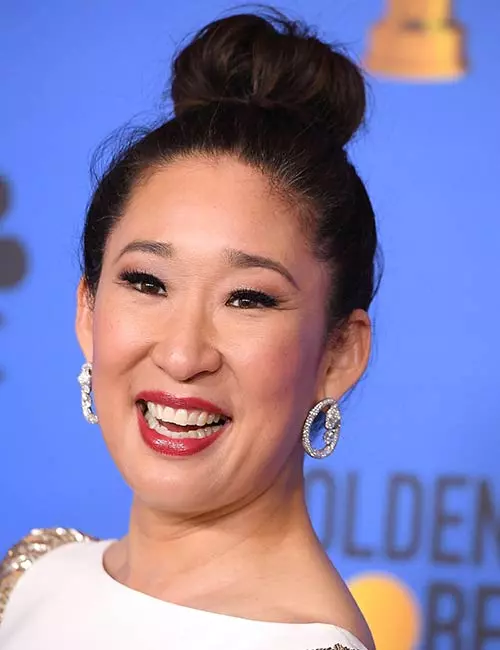
47. Elegant Top Knot
What You Need
- Comb
- Donut bun-maker
- Elastic bands
- Bobby pins
How To Do
- Gather all your hair to your crown and tie it in a high ponytail.
- Hold the ponytail up and place the donut maker at the top, near the ends of your hair.
- Roll the bun and hair towards the base of the ponytail.
- Use pins to secure the bun in place.
48. Black Braided Back Bun
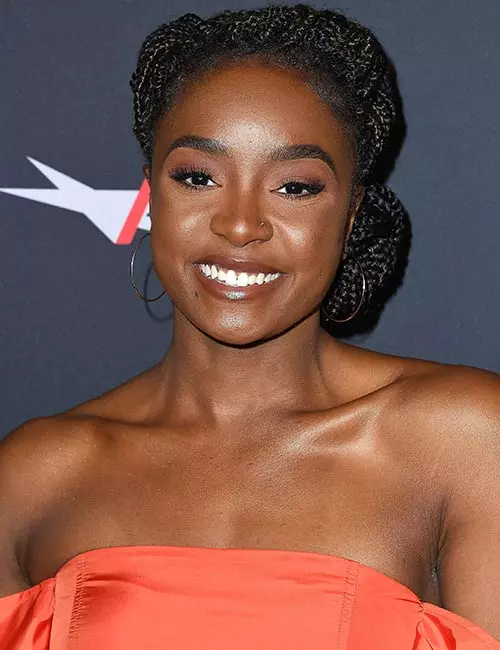
What You Need
- Comb
- Elastic bands
- Bobby pins
How To Do
- Part your hair on one side.
- Divide the rest of your hair into two equal sections.
- Weave each section into a twist or a braid closely aligned to the scalp at the sides.
- Once you reach the back hairline, weave the rest of the hair into a regular braid or twist.
- Wrap both the twists/braids in a bun and secure it with an elastic band and bobby pins.
49. Low Wrapped Bun
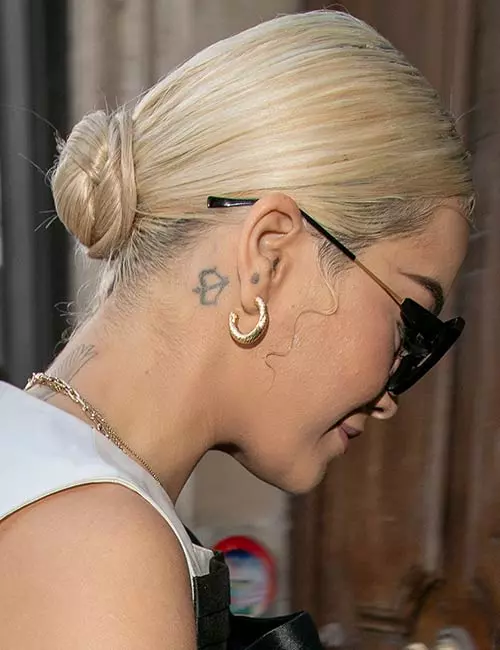
What You Need
- Comb
- Mousse
- Bobby pins
- Hairspray
How To Do
- Comb your hair down with mousse.
- Applying mousse instead of a gel will give your hair a smooth, unoiled appearance.
- Gather all your hair at the nape of your neck.
- Leaving a small section of hair, wrap your hair in a bun.
- Twist the small section of hair and wrap it around the base of the bun.
- Use bobby pins to secure the bun and the twists.
50. Mohawk esque Bun
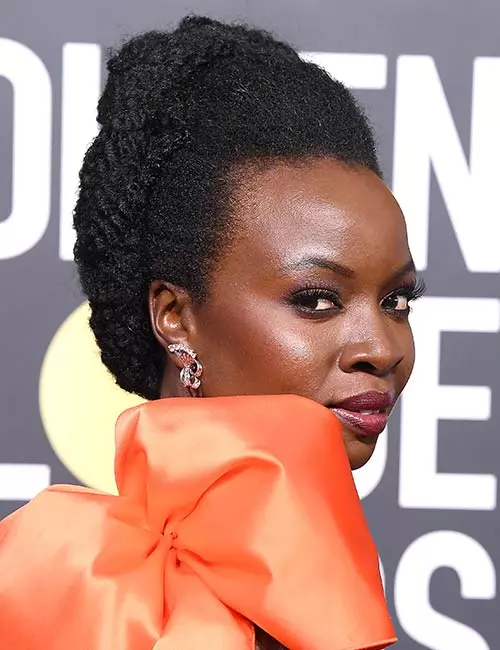
What You Need
- Comb
- Bobby pins
- Hairspray
How To Do
- French twist your hair from top to bottom to create a mohawk.
- Pin your hair in place and spritz on a good amount of hairspray.
51. Sleek Big Bun
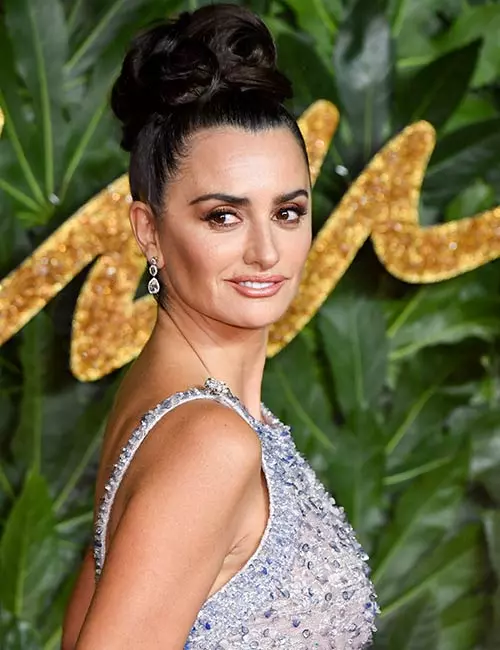
What You Need
- Mousse
- Comb
- Bobby pins
- Elastic band
- Curling iron
How To Do
- Apply mousse to your hair and gather it all at the crown.
- Wrap it in a bun, but leave the ends out.
- Use bobby pins to secure the bun.
- Curl the ends to take the look up a notch.
52. Pouf Bun With Side Bangs
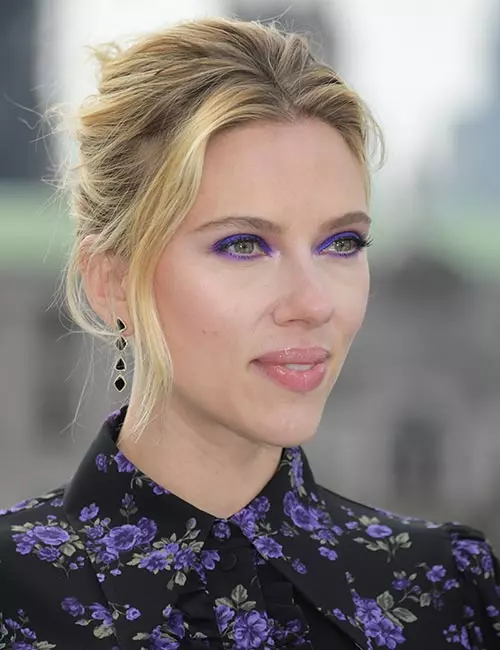
What You Need
- Comb
- Bobby pins
- Elastic band
- Hairspray
How To Do
- Part your hair down the middle.
- Gather all your hair at the back and wrap it in a low bun.
- Use an elastic band to secure the bun.
- Push the bun up to create a very slight pouf.
- Use bobby pins to secure the pouf.
- Pin the bun in place and spritz some hairspray all over your hair.
53. Bantu Knots
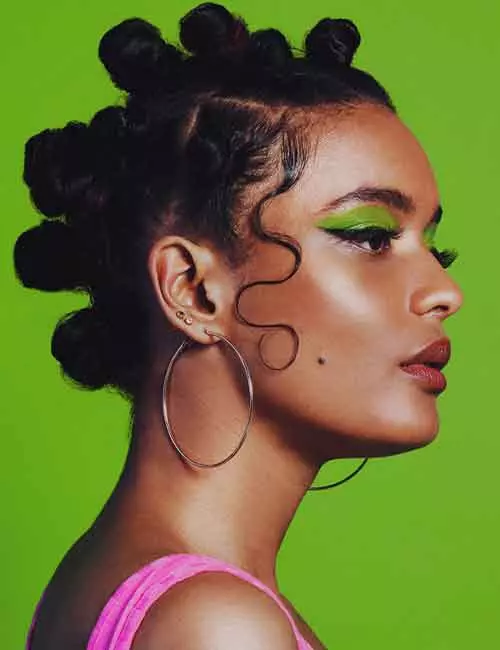
What You Need
- Hair moisturizer or leave-in conditioner
- Styling gel or cream
- Hair brush
- Hair ties or clips
How to Do
- Start with clean, damp hair.
- Apply a generous amount of moisturizer or leave-in conditioner to hydrate the hair.
- Part your hair into sections based on your desired knot size.
- Take each section, apply styling gel or cream, and detangle with a hair brush.
- Twist the section and then wrap it around itself to form a knot.
- Secure the knot with a hair tie or clip.
- Repeat this until you have covered all sections.
- Allow the knots to dry overnight or use a hooded dryer.
- Carefully unravel knots in the morning for beautiful, defined curls.
Now that you’ve seen these beautiful bun styles, you’re probably wondering which one will suit you the best. Learn a few tips on finding the perfect buns that suit your specific look in the next section.
Key Takeaways
- There is a bun hairstyle for everyone, regardless of their hair type, texture, and occasion
- You may opt for a modern French twist or a braided base or glided bun for formal events and work settings.
- For special occasions, choose between romantic styles, such as the Gibson bun, Juliet updo, or braided crown bun.
- If you need something fun and playful, you may opt for tight braids with mini space buns or a scarfed bun.
Tips For Choosing The Right Bun Hairstyle
Whether heading to a casual meet-up, a corporate meeting, or a glamorous event, a well-styled bun can instantly make anyone look better. With so many options to choose from, it’s very important to consider a few key factors, like your face shape, hair type, and the occasion to pick the right hairstyle for you. Here are some tips to help:
- Face Shape
Buns complement face shapes in different ways. So, it is really important to know what face shape you have. For example, higher bun, like top knots, give your face a lift. So they are perfect for round faces. Lower buns, like a low chignon, softens sharp jaw angles of square-shaped faces. Heart-shaped faces look great in loose buns paired with face-framing bangs.
- Hair Texture
Another very important factor is your hair type. Fine hair will look fuller when styled in textured or messy buns as they can add volume. Thick hair looks neat with structured, sleek buns. Curly hair generally looks great in a fun voluminous, messy bun embracing the texture.
- Occasion
Lastly, a casual evening out may call for a messy bun, while a formal event would need a polished, elegant updo. So remember to always dress your hair to the occasion and feel confident when you leave the house.
So now you know how to pick the right hairstyle for any occasion, but how do you make it stand out? Accessories, of course! They take the final look to a whole new level of magnificence. Learn how to accessorize your bun for any event or occasion in the next section.
How To Accessories Your Bun
Hair accessories make a huge difference in how your bun looks. They can make even the simplest of buns bold and statement-worthy. Here are some stunning accessories you should consider:
- Decorative Pins
Depending on the style of the decorative pin you choose, your bun can look sophisticated and chic or elegant and romantic. A pearly or diamond decorative pin is perfect for formal business events, while a floral or rhinestone one will turn heads at weddings. Choose a design that pairs well with your outfit.
- Scarves
Drape a colorful or patterned scarf loosely around the base of the bun and tie up the loose ends. You can also drape it over the head and allow it to flow at the back for a more bohemian look. Scarves are highly convenient and change your style in an instant.
- Mix and Match
Don’t be afraid to wear multiple styles all at once. Delicate chains over clips make for a stunning look, especially if it reflects your personality.
- Hair Ties Or Scrunchies
Keeping elastics or scrunchies under the bun is one of the easiest ways to ensure your hairstyle remains securely in place and also add a little oomph. Fabric-covered elastics or soft scrunchies are much better at minimizing hair breakage. Go ahead and experiment with different styles and patterns with your buns to see what looks best.
Infographic: Top 7 Amazing Bun Hairstyles
The bun is the most versatile yet comfortable hairstyle that goes perfectly with almost every occasion and outfit. You can tie your hair in a top knot or a low bun to take your look to the next level. We have rounded up a few stunning bun hairstyles that you can easily recreate at home. Check out the infographic below to know more!
Some thing wrong with infographic shortcode. please verify shortcode syntaxYou can try out many hairstyles if you have long, beautiful hair. The bun hairstyle is versatile and simply ageless. It is suitable for all hair types and offers you a gorgeous feminine look. You can pair this hairstyle with many outfits and occasions. Stunning updos, pouf buns, ballerina buns, braided crowns, glided buns, and braided base buns are some popular bun hairstyles for long hair that you can try. Additionally, use the right kind of hair accessories like flowers or jewelry and go ahead and get that perfect bun with accessories look.
Illustration: Stunning Bun Hairstyles You Need To Check Out Now!
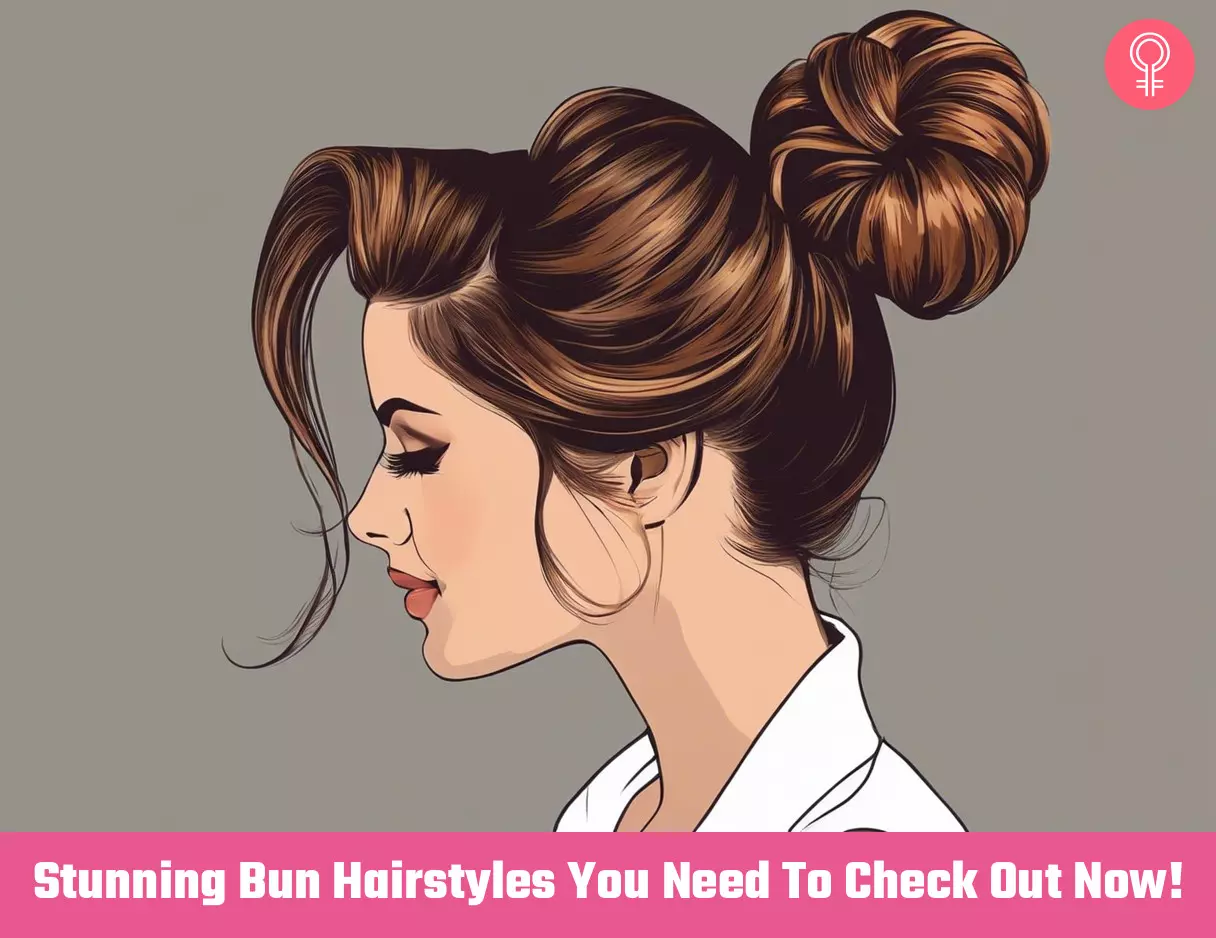
Image: Stable Diffusion/StyleCraze Design Team
Frequently Asked Questions
What’s the difference between a top knot and a bun?
A top knot involves pulling all your hair up to make a knot – it could be a high ponytail or a high bun. A bun can be high or low and must be wrapped around itself.
Are low buns better than high buns?
The shape of your face determines whether a high bun or a low bun is more suitable for you. Low bun hairstyles look good on a long, slim face as they pull back all the hair to open up the face. A high bun suits rounder or fuller faces, giving it a slimmer appearance.
How long does your hair have to be for a top bun?
Your hair has to be about 10-15 inches long for a neat top bun without flyaways.
Do buns damage your hair?
Yes. Wearing a bun regularly, or for extended periods of time, pulls on the scalp, causing tension and leading to breakage.
How can I make my bun last all day?
Apply on some styling gel, foam, cream, or mousse (depending on your hair type) before you style your locks. Style your hair in the preferred bun style and use hair-colored bobby pins or hair ties to secure it. Then spritz on some hairspray to secure the hairstyle in place. Carry a small hairspray with you so you can use it whenever you notice any stray strands.
Are there any hairstyles that work well for thinner hair?
If you have thin hair, and you want it to look full and thick, opt for a messy or back-combed bun or loose top knot as these styles show texture and fullness. You can also use bun makers to make your hairdo look fuller.
Check out this amazing video on beautiful low-bun hairstyles for ladies! Learn how to create the perfect hairstyles for long hair with this easy bun style tutorial.
Personal Experience: Source
StyleCraze's articles are interwoven with authentic personal narratives that provide depth and resonance to our content. Below are the sources of the personal accounts referenced in this article.
i. How To Do A Fast Messy Bunhttps://www.youtube.com/watch?v=5F_dglZFboI
Read full bio of Casey Simmons
Read full bio of Anjali Sayee
Read full bio of Shatabdi Bhattacharya
Read full bio of Pahul Nanra



Community Experiences
Join the conversation and become a part of our empowering community! Share your stories, experiences, and insights to connect with other beauty, lifestyle, and health enthusiasts.