How To Do Winged Eyeliner: 6 Easy Methods For Beginners
Your liner game can be the strongest out there if you just perfect these little details.

Image: Shutterstock
Perfectly winged eyes are a work of art that needs skill and patience. And if you are a beginner, learning the first steps of how to do eyeliner, especially a winged eyeliner should be on the top of your to-do list. But, fret not. We’ve got you! Creating an eyeliner wing can be a bit tricky but the perfect wings can add drama to your eyes. They add a touch of sexy and elegance to your look and accentuate your facial features. Just invest in the right beauty cosmetics and eyeliner and get that perfectly defined cat-eye. If shaky hands keep you from achieving the precise look, with the right hacks, you can create a sharp look in no time. Swipe up for the details!
 Keep In Mind
- Prep Your Eyelids: Before applying winged eyeliner, make sure your eyelids are clean and dry. Applying an eyeshadow primer or concealer can help to create a smooth base and prevent creasing or smudging.
- Eye Shape: Winged eyeliner can enhance the shape and size of smaller or hooded eyes, creating the illusion of lifted and elongated eyes. It can also balance out larger or rounder eyes by creating a more defined and elongated shape.
- Hairstyle: A sleek, pulled-back hairstyle can help draw attention to the eyes and make the winged eyeliner stand out.
- Skin Tone: For fair skin, a brown or soft black eyeliner can look more natural, while darker skin tones can pull off jet black and bold eyeliner looks.
In This Article
Winged Eyeliner Vs. Cat Eye
These terms are often used interchangeably as both techniques require extending the eyeliner beyond the lash lines to manipulate the shape of the eye. However, there is a subtle difference between winged and cat eyeliners.
Winged eyeliner is an umbrella term for all liner looks that extend beyond the lash lines. It may be short or long, sharp or smudged, fine or thick. Based on these details, it may have a more specific name.
A cat eye refers to a winged eyeliner look with a thick and bold liner that extends both the lower and upper lash line, converging together with a gentle upward flick. This is meant to mimic a cat’s eye. It needs more precision than a regular winged liner to achieve perfectly symmetrical cat eyes.
Now, without further ado, let’s jump into simple tutorials to execute a basic winged liner.
Key Takeaways
- Winged eyeliners are probably the perfect way of adding drama to your eyes.
- An angled brush is the best way to apply gel eyeliner.
- A tape can also help. Placed at the outer corner of the eye and directed toward the temple, it can be used as a guide to get the right angle.
- Even a spoon can be used for application. The handle is placed to make an angle and the spoon to draw the curve of your liner.
How To Do Winged Eyeliner?
Method 1: How To Create Winged Eyeliner With Angled Eyeliner Brush?
This one has been specially designed to help you with your winged eyeliner woes. The angled eyeliner brush helps to achieve precise wings. Its angled tip helps achieve a clean definition and helps to create even thin lines in smooth, short strokes. Honestly speaking, it does not get any easier than the following steps. You can also wet the brush slightly for a super neat result.

Step By Step Tutorial
- Dip the angle brush in your eyeliner pot and place it on the outer edge of your eye creating an angle with your temples
- Place the same brush over the line you just drew in an inverted fashion to create the upper curve of your wing
- Fill in the blank space between the lines with your eyeliner brush and extend the liner to the inner corner as you normally do.
 Fun Fact
Method 2: Free Hand Guide
Yes, it needs a steady hand, but with a little patience and practice, you can learn to apply the perfect, neat winged eye-liner.

Step By Step Tutorial
- Take a pencil eyeliner and draw an extended line on the outer edge of your eyes making an angle with your eyebrows. Adjust the length according to your desired length of the wing
- Now, place the pencil where this line ends and draw a line that flicks inward with a slight curve and extend the line to the inner corner of your eye. If you find it difficult to extend the same line in on one go, extend it at least halfway into your upper lash line and then continue till the inner corner. Try to make sure that the line thins gradually, especially if you have smaller eyes
- Now, fill up the gap until no skin peeps through from between the upper and the bottom line that forms your wing.
- If you are ok with a softer finish, leave it as it is. But if you want your wings to be more striking and bold, take a liquid eyeliner and carefully trace along the lines you have created with your pencil eyeliner. Also, if you are planning to include this step, you can allow your lines to be a little rough on the edge while using the pencil eyeliner. The liquid eyeliner will cover up the rough edges to give a perfectly smooth finish.
Quick Note: When applying eyeliner with a free hand, make sure to rest your elbows on a flat and steady surface. This will give a good amount of control over your hand movements.
Shivangi Sharma, a YouTuber, provides a tutorial on achieving the perfect winged eyeliner, offering tips for precision and ease. She says, “If you’re a complete beginner, and your precision is not really in place right now, then you can definitely consider getting sketch liners… from my experience, I have found sketch liners to be way more easier than you know brush liners….” Stressing the importance of a steady hand, she recommends a comfortable setup, keeping the mirror close, “You definitely need to relax yourself, take your time, sit comfortably…. I’ve been doing it for years but I still mess it up sometimes, but practice does help a little (i).”
If this guide doesn’t do the job for you, then you probably require some additional help to master those killer wings. Fret not. Your solution lies in everyday items like spoon, scotch tapes or brushes specifically meant for the purpose.
Check out the following hacks and find out how you can create dramatic winged eyeliner with the right items.
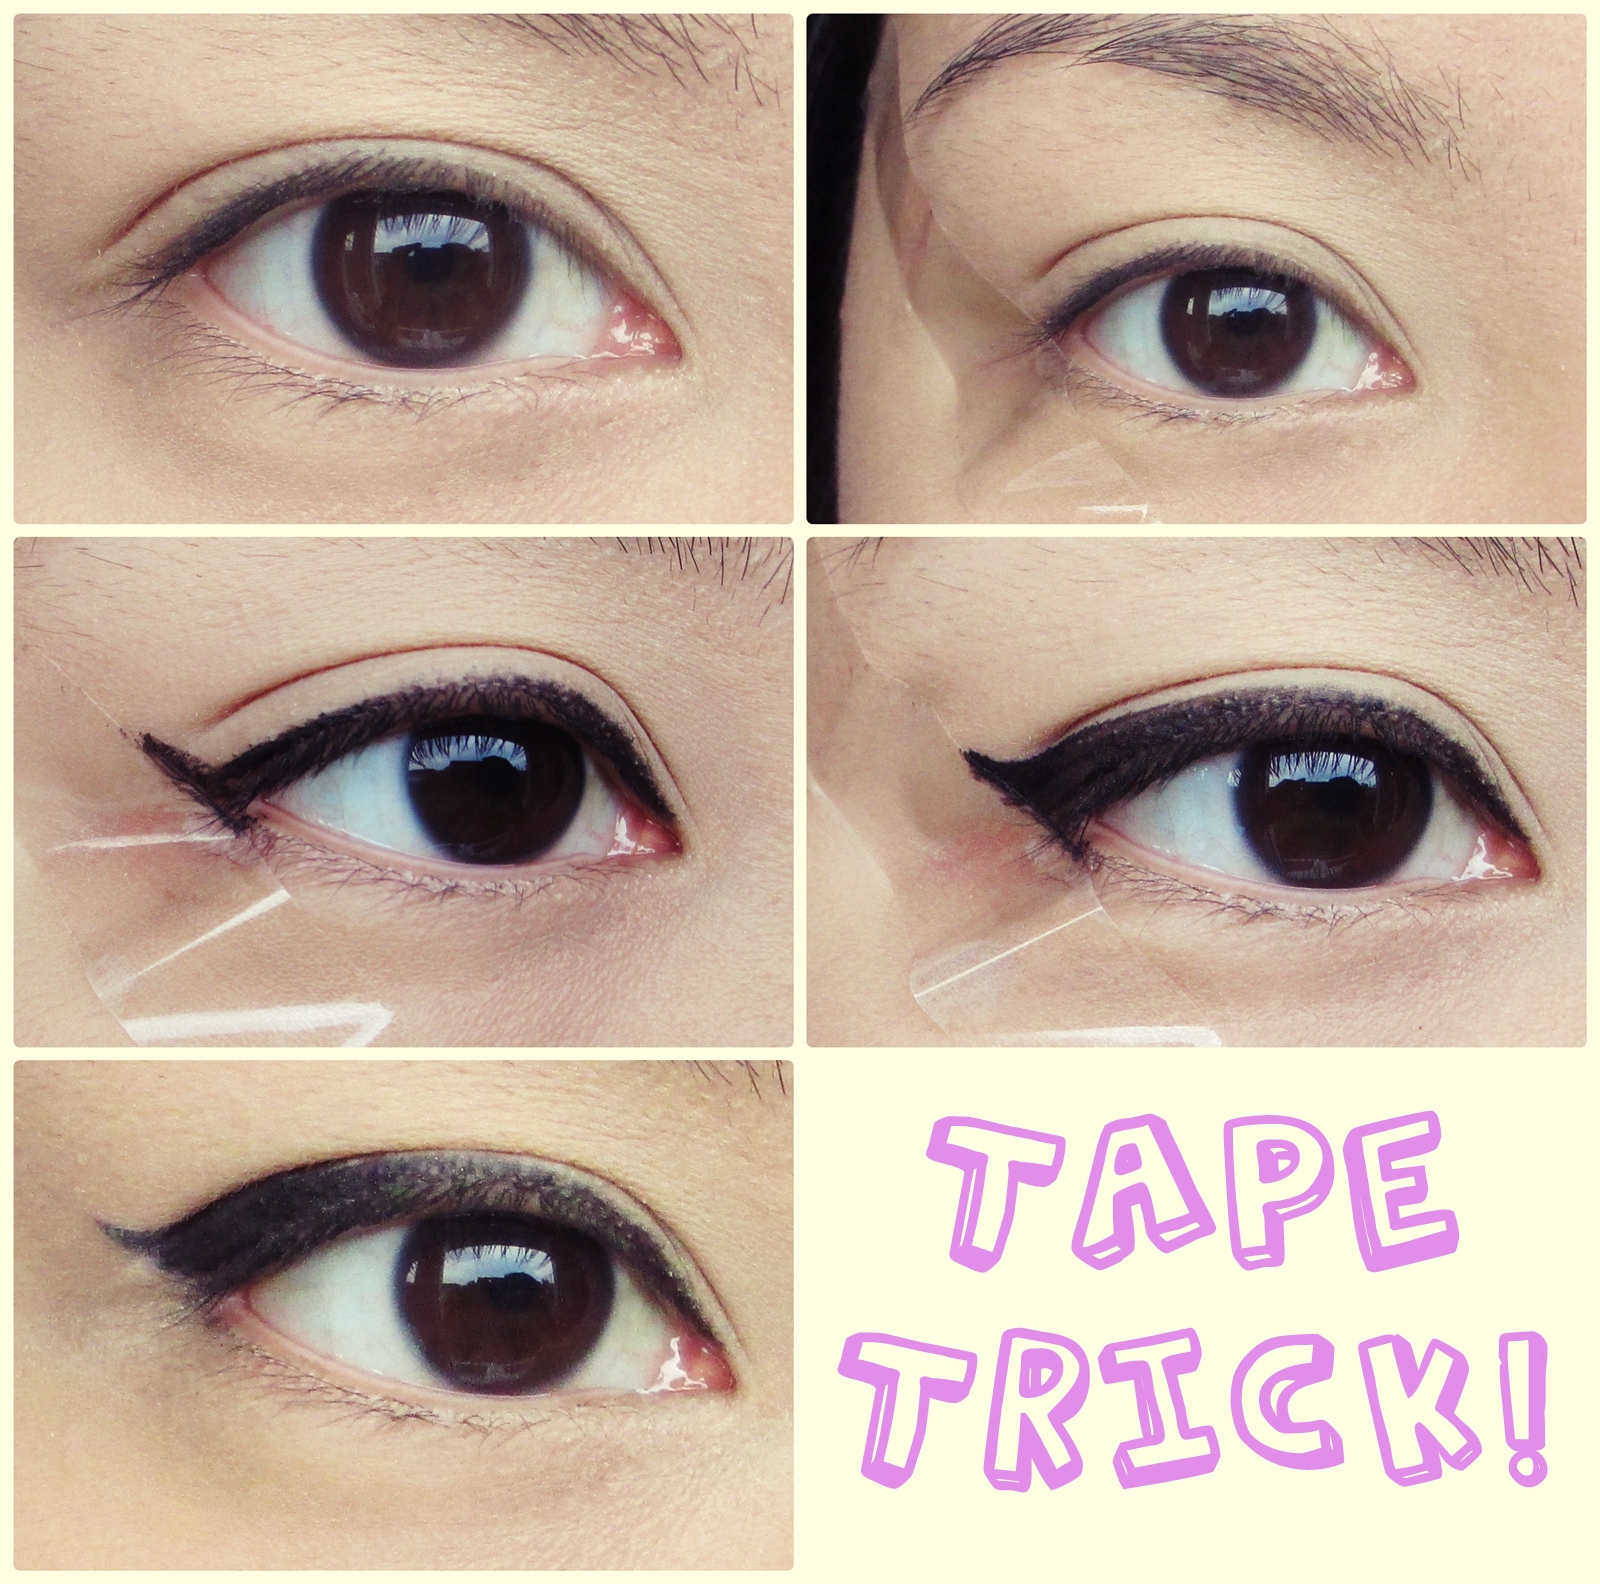
Method 3: How To Do Winged Eyeliner With Tape?
An easy and effective alternative method is using scotch tape or good old cellophane tape to help you achieve the perfect wing.

Step By Step Tutorial
- Cut a tape measuring about 2 cm and stick along the outer edge of your eyes in an angle you would want your wings to be.
- Trace along the angled edge with your eyeliner to draw the wing using the outlines of the tape as guidance.
- Finish off by extending the line along your upper lash line.
 Quick Tip
Method 4: How To Create Perfect Winged Eyeliner With Spoon?
Head to your kitchen and pick up a spoon to give you the perfect winged eyeliner you always desired. The straight edge of the handle and the curve of the spoon is a perfect tool to guide for neat and precise wings.

Step By Step Tutorial
- Hold the handle of the spoon at the outer corner of your eye.
- Draw a straight line with your eyeliner following the line of the handle.
- Now, place the rounded portion of the spoon and cup your eyelids.
- Use the rounded edge to create the curvy tip of your wing.
- Fill in the space between two lines with eyeliner and extend the liner onto your upper lash line like you normally do.
Method 5: How To Create A Perfect Winged Eyeliner With A Business Card?
Your solution to expertly draw winged eyeliners is probably sitting in your purse. Just fish out a business card you no longer have any use of, and make your personal winged eyeliner stencil.

Step By Step Tutorial
- Take a business card and draw a line roughly to match the size of your eyes and the way you want your wings to be
- Take a scissor and cut out the pattern you have drawn
- Use the cut-out as a stencil for your wings
Method 6: Creating Winged Eyeliner With Swipe Card

Use your credit or debit card for helping you draw your winged eyeliner, instead of paying to buy expensive stencils and tools for achieving neat wings with your eyeliners.
Step By Step Tutorial
- Hold the straight edge of the card at the outer corner of your eye making a slight oblique with your temples.
- Trace along the straight edge with eyeliner to create the wings.
- Extend the eyeliner to the inner corners of your eyes along the upper lash line.
P.S.
You can also use a pen or a pencil or basically any straight object and follow the same method to achieve a straight wing. However, in these cases, the wing is likely to be sharper and less curvy.
Tips And Precautions To Be Followed While Applying Winged Eyeliner
- Be careful with the choice of your eyeliner type. Eyeliners mainly come in three avatars: liquid, gel, and pencil. While liquid and gel liners give a more bold and striking finish, it can be a little messy to work with, especially for beginners. On the other hand, pencils give a softer and subtler finish, offer great control, and are thus recommended for beginners.
- Winged eyeliner and cat-eye look super hot on almost everyone and can be worn for any occasion or even on a daily basis. You can, however, play with the length and sharpness of the wings depending on the level of drama you are going for. Also, find out the placement and shape of the wings that complement the shape of your eye, and adjust it accordingly.
- Find out the placement and shape of the wings that complement the shape of your eye, and adjust it accordingly. If you have almond-shaped eyes, create a straight, non-curved wing to elongate your eyes. Whereas, if you have hooded eyes, extend and lift the line upwards and outwards to make your eyes appear bigger. Those with round-shaped eyes can create a straight wing with an upward pull. But, if you have monolids, extend the eyeliner upward to create a thick and dramatic lift. The ones with downturned eyes can go for a mini wing that points just slightly upwards.
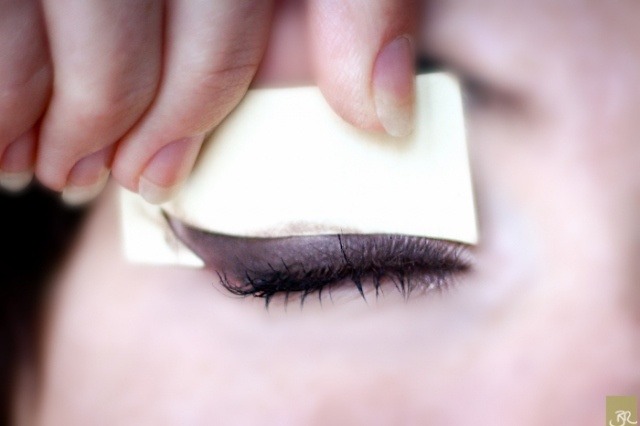
- If you are a beginner, it’s but natural to mess up eyeliners even with all the guidance. Don’t worry if you make a mistake. Use a small brush with concealer to clean up the edges and make both sides match. You can also dip a cotton swab in petroleum jelly and gently erase the smudge with it. For quick fixes, you can also use a cotton swab dipped in micellar water.
- To have even better control over liquid eyeliner, toss it in a refrigerator for 10-15 minutes. This will harden the applicator to make it easier to control. If you are wondering how to apply liquid eyeliner with confidence, this little trick can help you maintain steady strokes and create sharp, clean lines for your desired look.
Infographic: 3 Simple Ways To Master The Winged Eyeliner
The winged eyeliner look has become an obsession, and it’s obvious given that it always unifies any look. Those who can execute it properly without assistance or problems are regarded as winged Goddesses!
With these easy and simple tricks using objects around your home, you can join them. Check out the infographic to learn more!
Some thing wrong with infographic shortcode. please verify shortcode syntax
The winged eyeliner look is a classic that should definitely be a part of your makeup arsenal. This versatile, glamorous, and dramatic look has stood the test of time, and it does not seem to be going anywhere. This is an easy way to create eye-catching looks, so you’ll want to give it a try. This article teaches you how to do winged eyeliner in six easy ways. It might take a bit of practice to achieve the perfect wing, but with the right technique and tricks soon you will be winging it like an expert, and it will all be worth it!
Frequently Asked Questions
Can all eye shapes wear winged eyeliner?
Yes, winged eyeliner is versatile and fits all eye shapes. You also can add mascara to add more drama.
Does winged eyeliner make eyes bigger?
Yes, winged eyeliner can give an illusion of bigger eyes. But ensure to avoid thick eyeliners as they make the eyes appear smaller.
Some thing wrong with illustration image shortcode. please verify shortcode syntaxCreate a beautiful winged eyeliner in just 5 easy steps. Follow along with the video below and charm everyone with your winged eyes.
Personal Experience: Source
StyleCraze's articles are interwoven with authentic personal narratives that provide depth and resonance to our content. Below are the sources of the personal accounts referenced in this article.
i. HOW TO CREATE THE PERFECT WINGED LINER | EASY TUTORIALhttps://www.youtube.com/watch?v=XEImnG7s4L0
Read full bio of Nyssa Green
Read full bio of Shalini Roy
Read full bio of Madhumati Chowdhury
Read full bio of Bhumika Daga


Community Experiences
Join the conversation and become a part of our empowering community! Share your stories, experiences, and insights to connect with other beauty, lifestyle, and health enthusiasts.