28 Elegant Formal Hairstyles For Girls To Try In 2025
Create your unique fashion statement with trendy and easy-to-do hairstyles.
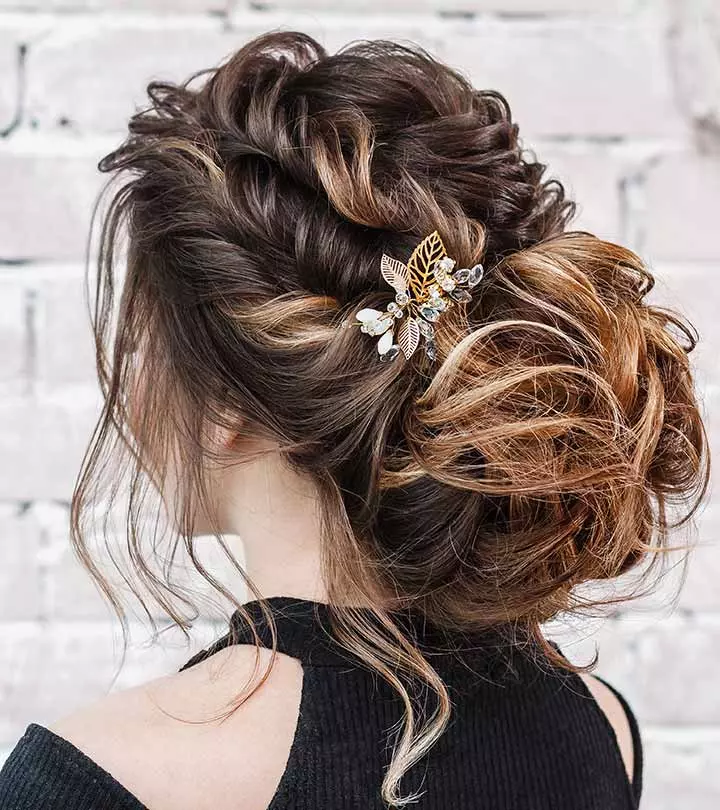
Image: Shutterstock
Homecoming, prom, winter formal…the list goes on!
Girls have a lot of events to dress up for, and you can’t sport your regular casual hairstyle to them: homecoming, prom, and the winter formal hairstyles, all of them need to be different! You need a hairstyle that looks elegant and stylish and suits your dress’s fashion statement. However, you also don’t want your hair to upstage your dress. Another thing to keep in mind is trends. All girls want to keep up with the latest trends with their fancy hairstyles, and it’s only natural that you want to be on top of your A-game.
We have compiled a list of the top trending formal hairstyles to help you have the best experience at any social occasion with their elegant flair. You’ll want to try them out even if you don’t have an event coming up!
 Before You Get Started
- Bun hairstyles like accessorized low bun and braided low bun complement round and oval face shapes.
- Add accessories like a hairband or a sparkly hair clip to take your hairstyle up a notch.
- If you are running late, opt for quick hairstyles like a messy high bun, half top knot, and high ponytail that can be achieved in minutes.
- Formal gatherings call for sophisticated hairstyles like French neat buns and slick high ponytails.
In This Article
28 Elegant Formal Hairstyles For Girls
Be it formal hairstyles for girls with long hair or short hair, there are countless options to choose from that can suit any occasion and add elegance and style to the overall look.
1. Braid Wrapped High Bun
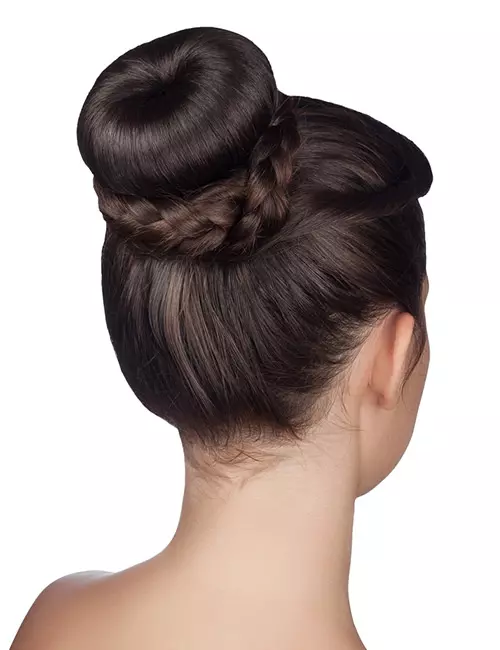
What You Need
- Comb
- Hair spray
- Hair donut (donut bun maker)
- Bobby pins
- A hair tie
How To Do
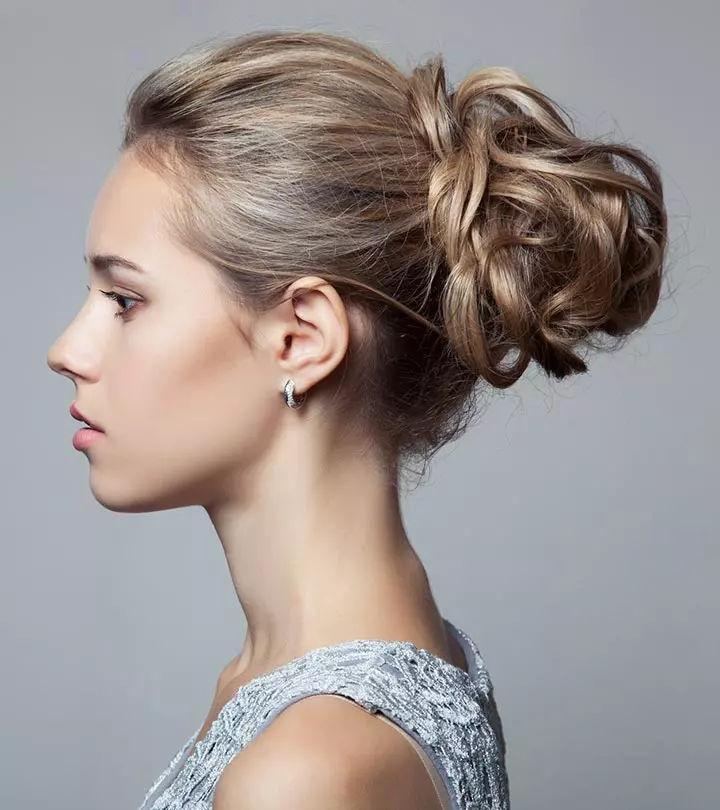
- Comb your hair to remove any knots.
- Take out two small sections of hair from the front on both sides. Clip them up
- Gather the rest of your hair and tie it in a high ponytail at the crown.
- Separate a small section of hair from the high ponytail.
- Lift up the rest of the high ponytail and place the hair donut at the top.
- Roll the tips of your hair downward to cover the donut maker.
- Then roll the donut and the rest of your down to form a bun at the center of your crown.
- Secure it with a hair color hair tie.
- Take the separated small section of hair and weave it in a braid.
- Wrap the braid around the base of the donut bun and tuck the ends underneath the start of the braid.
- Secure the tucked braid with hair pins.
- Unclip one of the front sections of hair and twist it. Do the same with the other front section of hair.
- Criss-cross both sections and tuck the ends underneath the bun. You can use hair pins to secure them.
- Spritz hairspray on the hairstyle to secure it.
2. Space Bun
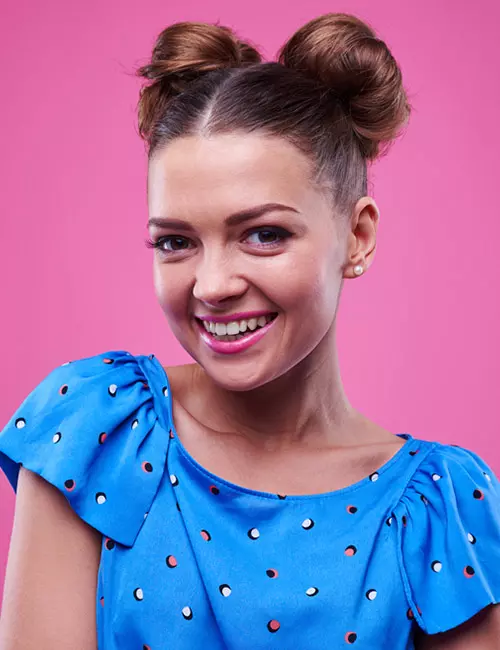
What You Need
- Comb
- Hair spray
- Hair ties
How To Do
- To create this formal hairstyle, start by brushing your hair to remove any tangles.
- Part it down in the center from your front hairline to the nape to create two sections of hair.
- Make two pigtails with each section on either side of the crown. Secure them with hair ties.
- Tease your pigtails by backcombing your hair lightly. Don’t be too harsh when doing this as it can make your hair look too messy.
- Take one pigtail, neatly comb the top layer of hair so it doesn’t look too messy.
- Twist the first pigtail away from your face to make a rope.
- Wrap the rope around the base of the pigtail to make a bun.
- Tuck the end of the pigtail under the bun. Secure it with a hair tie.
- Similarly, twist the other pigtail and coil it into a bun.
- To keep the buns in place for a long time and avoid stray strands, spritz them generously with hairspray.
3. Low Bun
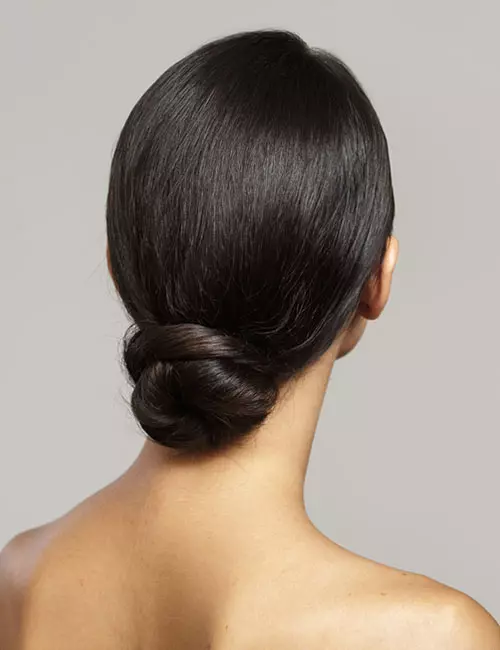
What You Need
- Bobby pins
- Curling iron
- Hairspray
How To Do
- Brush your hair to remove all knots and tangles.
- Using a curling iron, curl your tresses lightly. You want your hair styled in loose curls.
- Brush out the curls to make them look more relaxed.
- Gather all your hair – leaving out your bangs and some strays – and wrap it in a low messy bun at the back.
- Secure the bun in place with bobby pins. Spritz on some hairspray to set the hairdo in place and prevent any frizz and flyaways.
In regard to this, Alicia James, a blogger, shared her experience on why she likes the low bun hairstyle. She said, “I am in love with my low buns and it just works for my lifestyle. I work out every morning and then I have to go to work. So, the bun has been a great hairstyle to just be able to stay in shape and look professional at work (i)!” Alicia also feels it’s a simple yet classic hairstyle that works for every occasion.
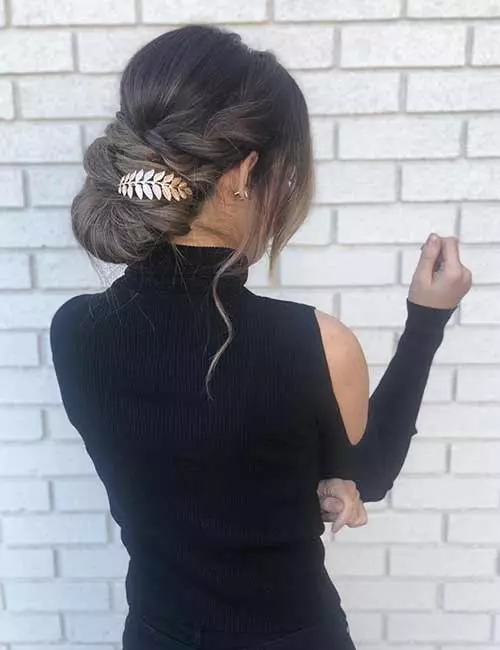
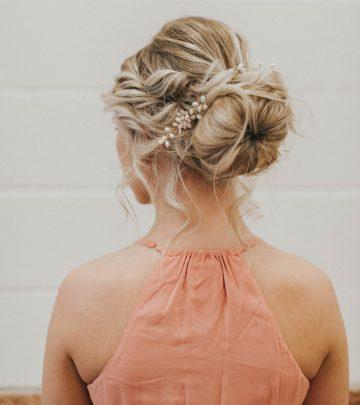
4. Accessorized Low Bun
What You Need
- Bobby pins
- Sectioning clips
- Headband
- Elastic bands
- Comb
- Curling iron
- Barrette
- Hairspray
How To Do
- Curl your hair using a curling iron and spritz on some hairspray to give it some hold.
- Brush your curls out and divide your hair horizontally into two sections, from ear to ear. Clip up the top section.
- Put the headband on, leaving the lower section underneath it.
- Twist hair from the sides of the lower section and tuck them into the headband.
- Gather the rest of the lower section and flip it within the headband a few times to form a bun.
- Pin the ends underneath the bun to hide them from view.
- Unclip the top half and create a pouf with the hair at the crown.
- Twist the side sections of hair and pin them over the bun.
- Accessorize with a fancy barrette and spritz on some hairspray to complete the look.
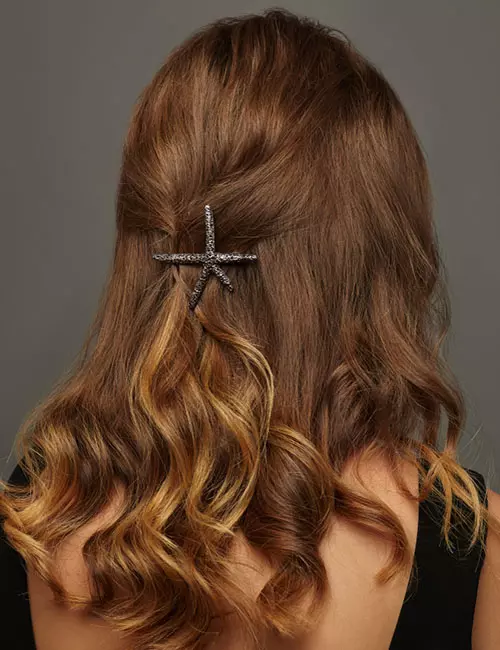
5. Crossed Half Updo
What You Need
- Bobby pins
- Elastic bands
- Comb
- Curling iron
- Hairspray
How To Do
- Brush your hair with a comb to remove all knots and tangles.
- Curl your hair from mid-way down and spritz some hairspray on it.
- Comb the hair at the top and front of your head backward. If you have thin hair, tease it to give it some height.
- Comb the hair at the front backward and pin it at the crown.
- Pick up some hair from the sides, cross it over the pin, and tuck it underneath the pinned hair. Secure it in place with the help of bobby pins.
- Arrange your hair with the comb or your fingers to give it a natural look.
- Finish off the look by accessorizing it with a starfish-like barrette.
 Quick Tip
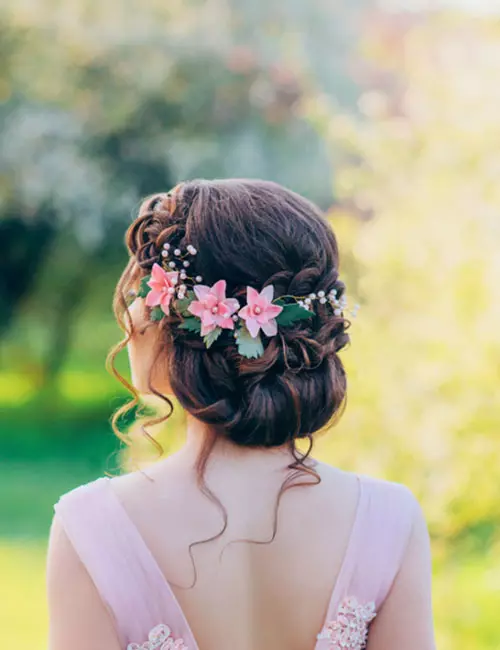
6. Dreamy Updo
What You Need
- Brush
- Curling iron
- Elastic bands
- Bobby pins
- Hairspray
How To Do
- Brush your hair down to remove all knots.
- Using a curling iron, style your hair in loose curls. Curl your hair in medium or small sections.
- Pick up some hair from one side and weave it into a braid. Repeat the same on the other side as well.
- Gather the rest of your hair and pull it back, so it falls behind your shoulders.
- Wrap one curled section of hair at the back and pin it.
- Take another curled section of hair and wrap it around the previous section. Pin it in place.
- Keep wrapping the curls in this manner.
- Once all the sections are wrapped in a bun, wrap the braids around the bun and pin them in place.
- Now, using your fingers gently pull a few strands and tease your bun to make it look fuller and a bit messy.
- Finish off by adding a floral hair accessory to give a fresh, elegant look to your hairdo.
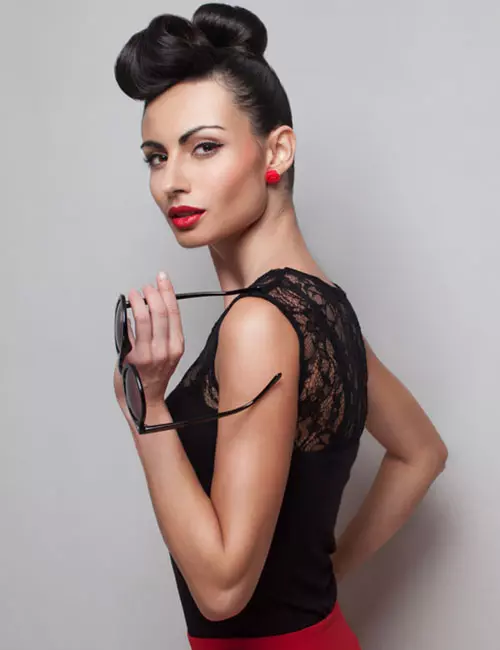
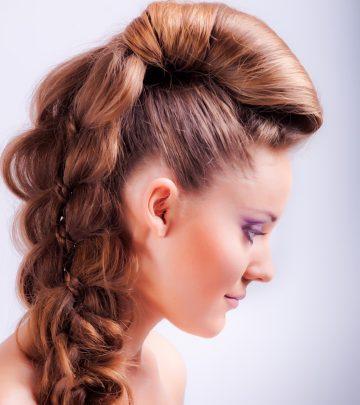
7. Rolled-In Mohawk
What You Need
- Round brush
- Bobby pins
- Hair gel
- Fancy U-pins
How To Do
- Apply some gel foam to your hair and brush it towards the center to fashion it into a mohawk. Use bobby pins to keep it in place.
- Using the round brush, curl your hair in sections. Gather a section of hair, place the round brush on top of the section and the bottom and roll it towards your head.
- Make sure you don’t push the hair into the round brush. Roll the hair around the brush delicately. Once it’s rolled all the way, remove the brush carefully.
- Once all your hair is rolled in place, accessorize it with some fancy U-pins.
8. Braided Low Bun
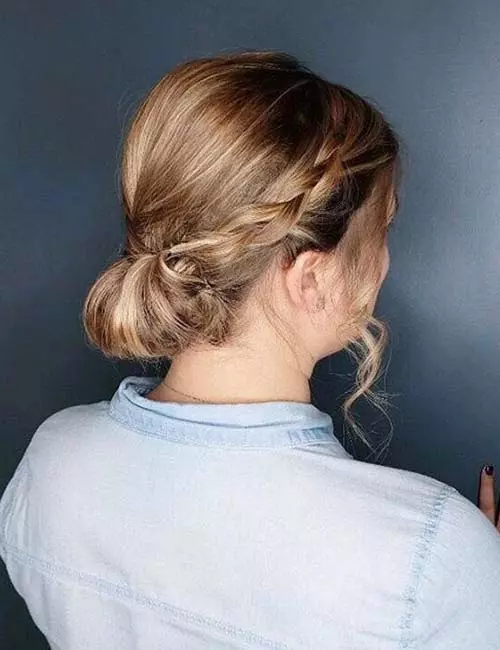
What You Need
- Big elastic band
- Hairspray
- Comb
How To Do
- Gather hair from one side and weave it into a braid.
- Weave a braid on the other side as well.
- Pancake the braids to give them a boho vibe.
- Gather the rest of your hair and tie it in a low ponytail.
- Topsy-tail the ponytail a few times to form the bun.
- Once you reach the end of your hair, pin the ends underneath the bun.
- Tuck the ends of the braids under the bun and pin them in place.
9. Messy Fishtail Braid
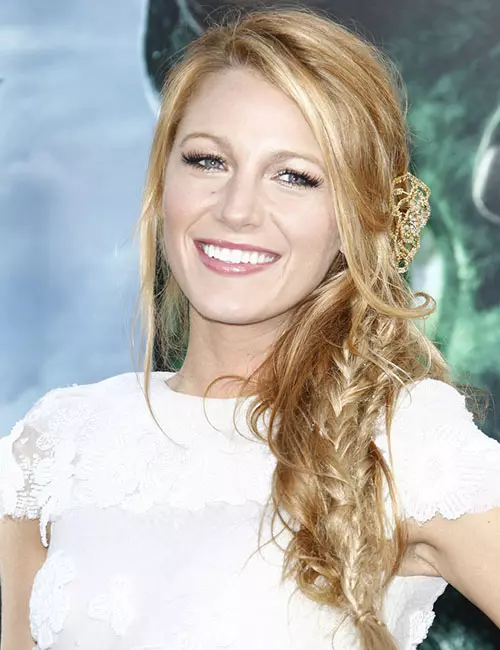
What You Need
- Rat-tailed comb
- Bobby pins
- Elastic bands
How To Do
- Back-comb the hair at the top of your head to create a pouf and add height to your hairstyle.
- Gather the rest of your hair behind your shoulders and divide it into two sections: 1 and 2.
- Pick up a small section of hair from the outer side of section 1, cross it over and join it with the inner side of section 2.
- Then, pick up some hair from the outer side of section 2. Cross this over section 2 and merge it with the inner side of section 1.
- Keep weaving the braid in this fashion until you reach the end.
- Secure the ends with an elastic band.
- Pancake the braid and gently pull a few strands for a messier feel to complete the look.
10. Bouffant Low Bun
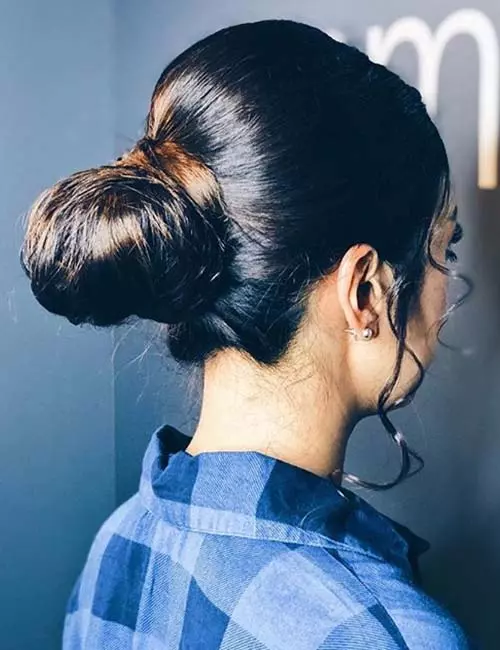
What You Need
- Bobby pins
- Elastic bands
- Comb
- Hairspray
How To Do
- Tease the hair at the top of your head to form a bouffant.
- Gather the rest of your hair, leaving out just a small section of hair at the bottom.
- Wrap your hair in a tight bun. You can use hair gel to make it slick if needed.
- Secure the bun with bobby pins.
- Wrap the small section of hair around the base of the bun and pin it in place.
- Give the bun a generous hit of hairspray to secure it in place.
 Quick Tip
11. Braided Mohawk
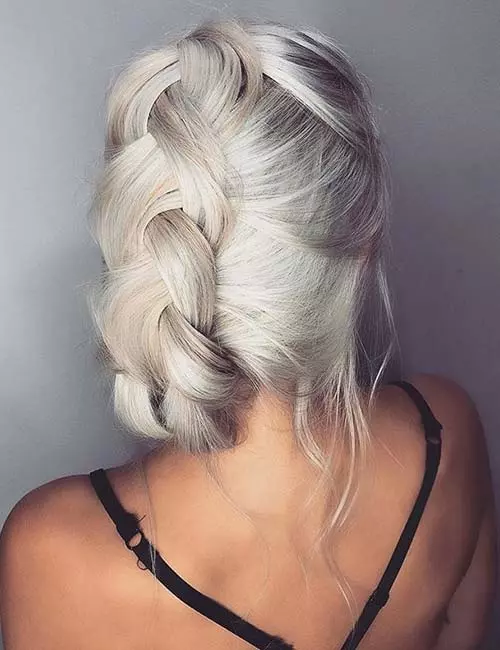
What You Need
- Bobby pins
- Elastic bands
- Comb
- Hairspray
How To Do
- Brush all your hair at the back, so it falls behind your shoulders.
- Begin weaving a loose Dutch braid.
- Once you reach your back hairline, weave the braid like a regular braid.
- Secure the ends with an elastic band.
- Tuck the ends within the braid using bobby pins.
- Pancake the braid to add a romantic vibe to the look.
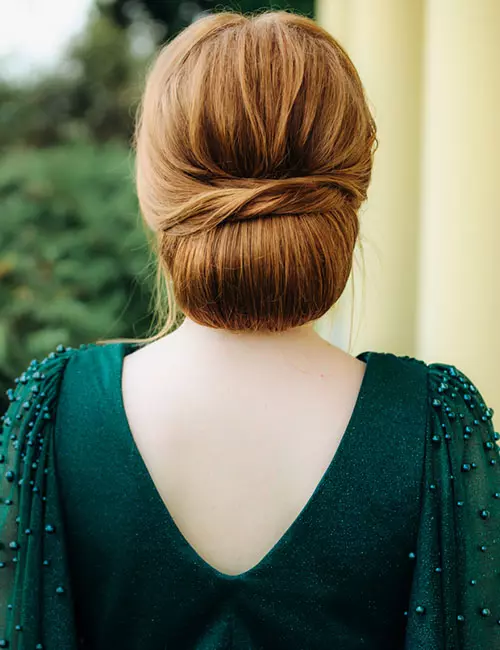
12. French Neat Bun
What You Need
- Comb
- Bobby pins
- Hairspray
How To Do
- Gather all your hair, leaving out medium-sized sections of hair from the front on each side.
- Tie your hair in a low ponytail with an elastic band.
- Topsy-tail the ponytail a few times to form a bun.
- Once you reach the end, tuck the remaining hair within the bun.
- Pick up one of the sections from the front, cross it over to the other side, and wrap it around the bun.
- Repeat the same with the other section of hair.
- Use bobby pins to secure the hair in place in a polished chignon bun style.
- Spritz on some hairspray and go slay!
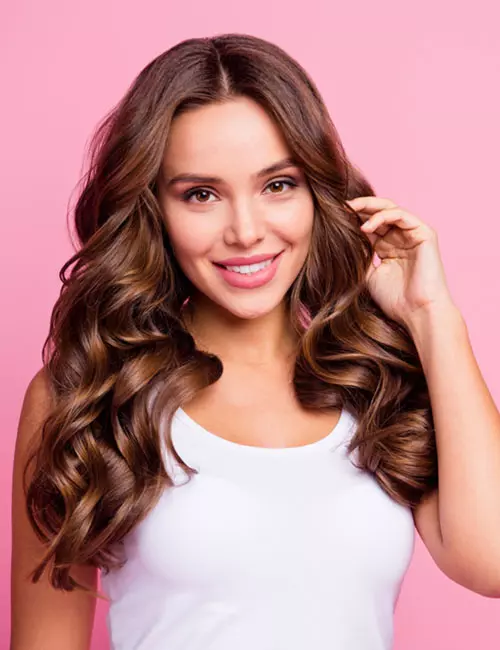
13. Curly Locks
What You Need
- Curling iron
- Comb
- Hairspray
How To Do
- Comb your hair to remove all knots and tangles.
- Curl your hair in medium-sized sections to add volume to your tresses.
- After curling all your locks, spritz on some hairspray and run your fingers through them to add a relaxed vibe to the look.
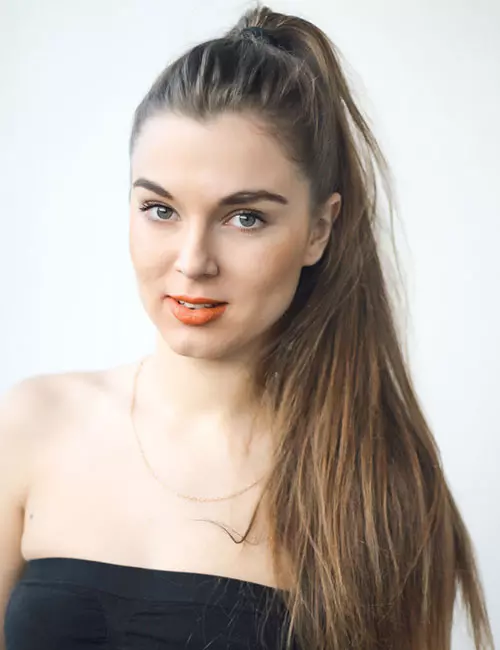
14. High Ponytail
What You Need
- Brush
- Elastic band
- Curling iron
- Hollow hoop clip
- Hairspray
How To Do
- Brush all your hair up and gather it at the crown.
- Secure it with an elastic band.
- Clip on the hoop clip.
- Curl the ends of your hair with the curling iron.
- Spritz on some hairspray to finish off the look.
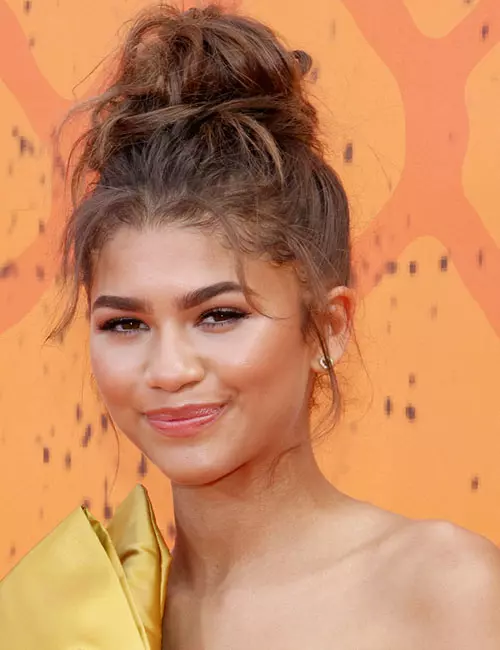
15. High Messy Bun
What You Need
- Comb
- Brush
- Bobby pins
- Hairspray
How To Do
- Gather all your hair in a ponytail at the top of your head. Allow your bangs and a few stray strands of hair to fall loose.
- While holding the base of the ponytail, loosen the hair around your head.
- Wrap the ponytail in a loose, messy bun and secure it with bobby pins.
- Finish off the look with a few hits of hairspray.
16. Dutch Braid
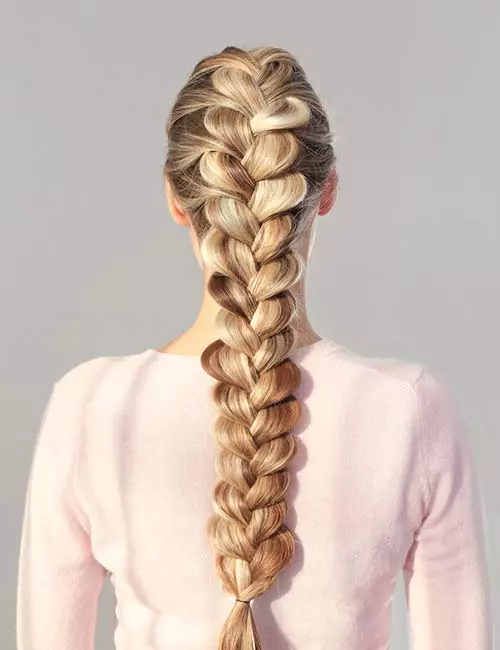
What You Need
- Brush
- Rat-tailed comb
- Elastic bands
- Hairspray
How To Do
- Brush your hair back and weave it in a Dutch braid.
- Keep adding hair to the middle section with each stitch to do this braid.
- Secure the braid at the end with an elastic band.
- Using the end of the rat-tail comb, gently tug out hair from each stitch to add dimension to the braid. You will also have to use your hand to ensure you don’t pull out excess hair or ruin the braid.
- Pancake the braid to flatten it and make it look bigger.
- Spritz on some hairspray to prevent frizz and flyaways.
17. French Braid
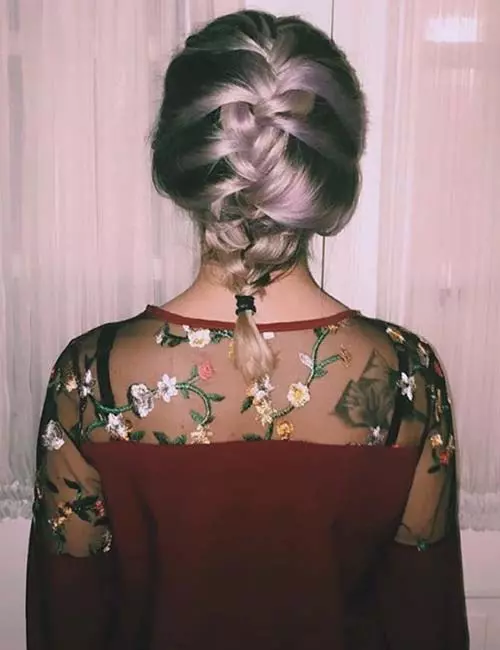
What You Need
- Comb
- Elastic bands
- Hairspray
How To Do
- Detangle your hair with a comb.
- Pull some hair back as you would when tying a half-ponytail. Divide it into three sections: the left, the middle, and the right.
- Braid the hair for one stitch.
- Add some hair to the side sections before doing the next stitch.
- Keeping adding hair to the braid this way until you reach the end. Secure the end with an elastic band.
- Adjust the braid as you like. If you want the braid a bit loose, pancake it gently.
18. Slick High Ponytail
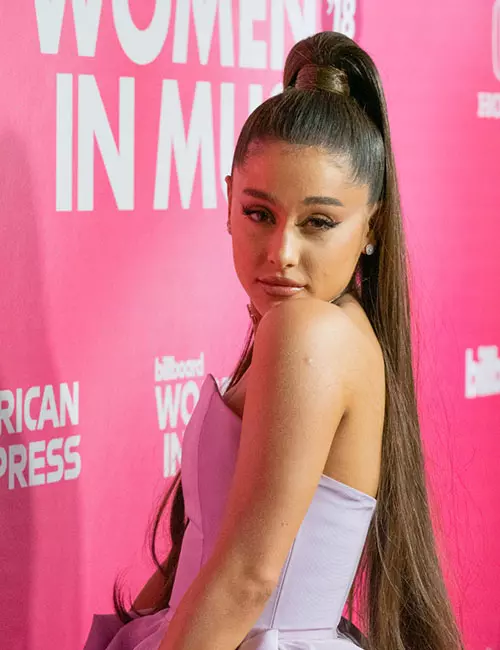
What You Need
- Brush
- Elastic band
- Hairspray
How To Do
- Brush your hair to detangle it.
- Tie it in a high ponytail with an elastic band.
- Pick up a small section of hair from the ponytail and wrap it around the elastic band. Tuck the ends within the elastic band.
- Spritz on some hairspray to finish off the look.
19. Curly Ponytail
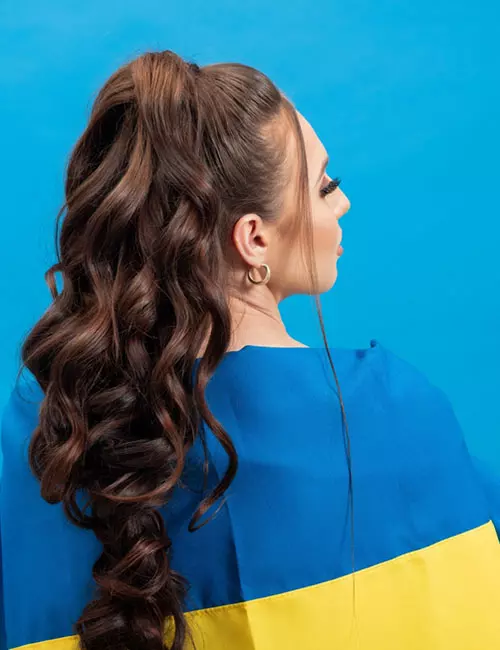
What You Need
- Elastic band
- Comb
- Curling iron
- Hairspray
How To Do
- Back-comb the hair at the top and center of your head. Neatly comb down the top section of that hair.
- Curl the ends of your hair using a curling iron.
- Gather all your hair and tie it in a high ponytail with an elastic band.
- Run your fingers through the curls and spritz on some hairspray to complete the look.
20. Beehive Updo
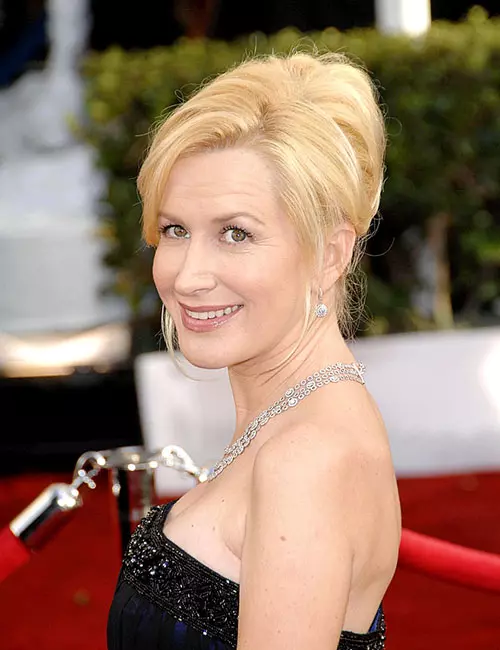
What You Need
- Bobby pins
- Elastic band
- Comb
- Hairspray
How To Do
- Back-comb the hair at the crown of your head.
- Mold the teased hair to form a bouffant. Use bobby pins to secure it in place.
- Gather the rest of your hair and wrap it in a low bun at the back.
- Secure the bun with an elastic band.
- Hit the entire hairdo with hairspray to set it in place.
21. Crown Braid
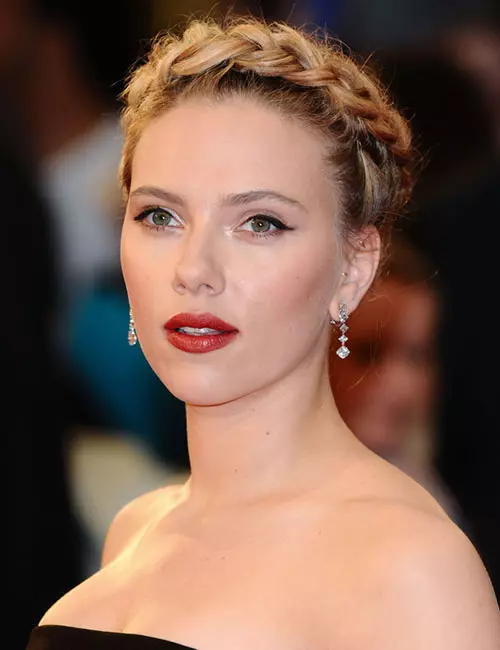
What You Need
- Rat-tailed comb
- Elastic band
- Bobby pins
How To Do
- Tease the hair at the top of your head and pin it in a slight pouf.
- Brush the rest of your hair to remove the tangles.
- Begin weaving a French braid below the pouf and follow it around the circumference of your head.
- Once you reach the back hairline again, weave a regular braid.
- Secure the end with an elastic band.
- Wrap the braid along the crown braid and pin it in place wherever it ends.
22. Messy Low Bun
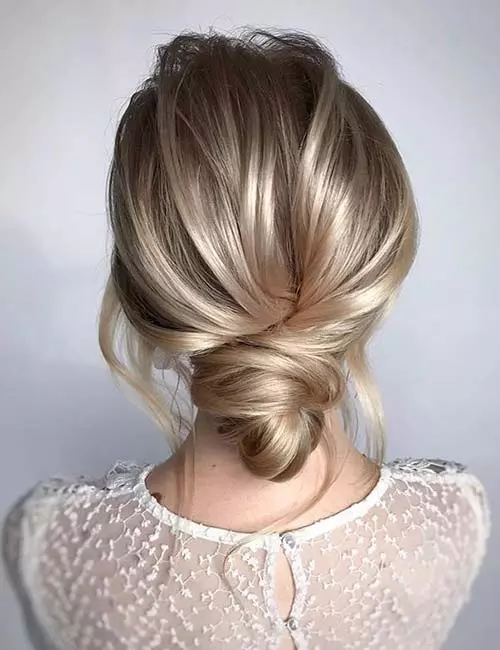
What You Need
- Hair brush
- Bobby pins
- Hairspray
How To Do
- Brush your hair to remove all tangles.
- Gather it at the back, making sure to keep it loose.
- Twist the hair and wrap it around to create a bun.
- Use bobby pins to secure the bun in place.
- Allow the stray strands to hang loose.
- Hit the hairdo with some hairspray to set it in place.
23. Rose Gold ‘do
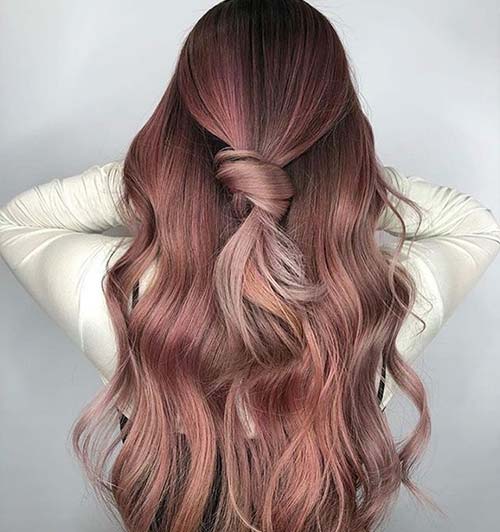
What You Need
- Comb
- Rose gold hair dye
- Petroleum jelly
- Old clothes and a towel
- Curling iron
- Bobby pins
- Hairspray
How To Do
- Put on old clothes as the dye can drip and stain them. Apply petroleum jelly to the skin close to your hair as the first step to creating this formal hairstyle for girls.
- Drape a towel over your shoulders.
- Mix the activator and developer as per the instructions printed on the dye box.
- Apply the dye to your hair thoroughly.
- If you have brown hair, the rose gold will end up looking rose brown, which is another trending shade.
- Keep the dye on for the instructed duration of time. Keep checking your hair every 5 minutes to monitor the color.
- Once it has reached a shade you like, wash the dye off and let your hair air-dry.
- Once your hair is damp, spritz on some hairspray and style it in some light curls with a curling iron.
- Gather some hair from the top and tie it in a loose top knot. Use bobby pins to secure it in place.
24. Half Top Knot
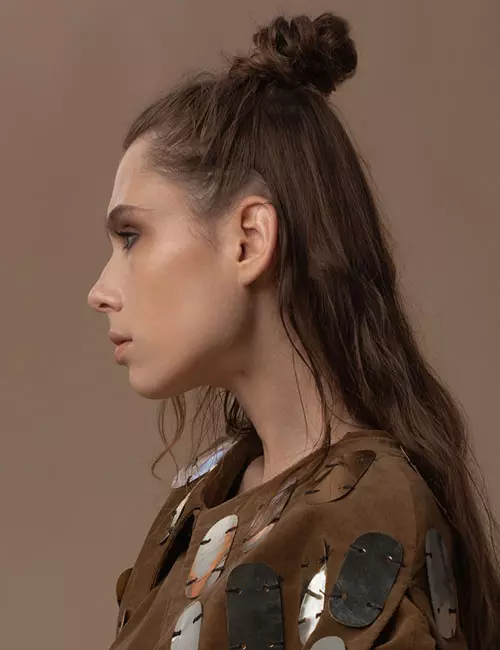
What You Need
- Elastic band
- Comb
- Hairspray
How To Do
- Brush your hair to remove all knots and tangles.
- Gather hair from the top and front and collect it at the crown.
- Pass the elastic band once over the gathered hair. Then, twist it and pass it over once more, but this time fold the hair with the band.
- Pancake the top knot and spritz on some hairspray.
25. Double Dutch Braid
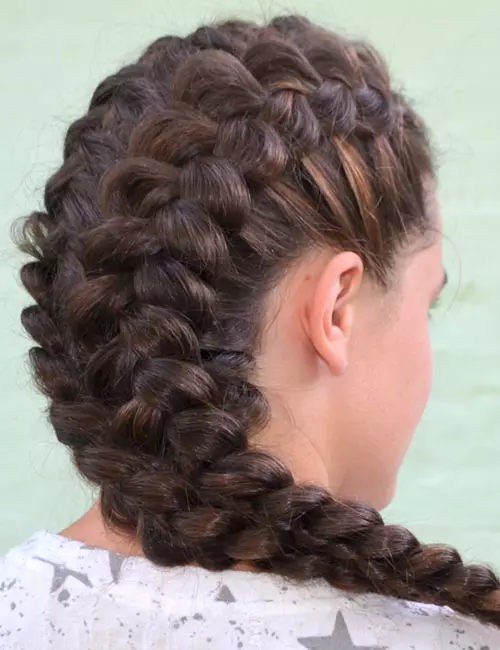
What You Need
- Brush
- Elastic band
- Bobby pins
- Hairspray
How To Do
- Divide your hair vertically in half (from the center of the forehead to the nape of your neck) and clip up one half.
- Brush out down the unclipped half and begin weaving a Dutch braid with it.
- Once the Dutch braid reaches the nape of your neck, secure it with an elastic band.
- Braid the other half the same way.
- Merge the tails of both braids together and tie them in a ponytail or you can braid them till the end.
26. Waterfall Braid
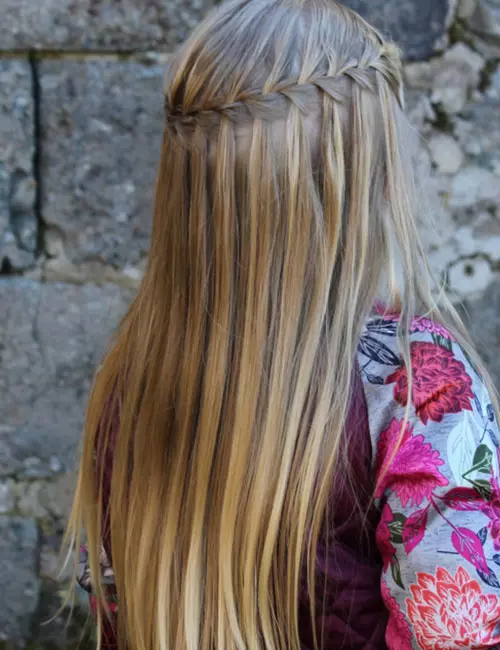
What You Need
- Bobby pins
- Comb
- Hairspray
How To Do
- Take some hair from one side, near the front.
- A waterfall braid consists of three sections: top, middle, and bottom. Weave a stitch as you would a regular braid and drop the bottom section.
- Pick up a new section of hair from the top, making it the new top section.
- Now that you’ve dropped the bottom section, add in a new bottom section.
- Keep doing this until you reach the other side of your head.
- Pin the braid underneath your hair to cover the ends.
- Don’t forget that final hit of hairspray!
This is one of the elegant and easy hairstyles for long hair. You can carry it with all kinds of formal attire.
27. Kinky Low Side Bun

What You Need
- Comb
- Thick elastic band
- Bobby pins
How To Do
- Start by stretching out your kinky locks.
- Gather all your hair to one side, leaving out the bangs free. Tie the hair in a low side ponytail with the thick elastic band.
- Part your bangs down the middle and pin the ends to the sides. Make sure you don’t flatten the bangs when you pin them. Keep them loose to make them look messy and add height.
- Spread out the hair in the ponytail and fluff it up a bit, so it looks thicker. Roll your hair and pin it to form a bun.
- Pancake your hair wherever necessary to add to the messy boho vibe.
- Accessorize with a metallic headband and metallic smokey eye makeup to finish off the look.
28. Bouncy Curls
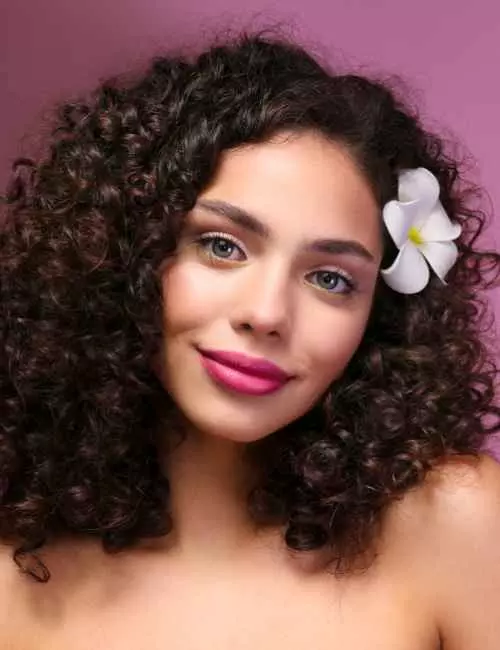
What You Need
- Curling iron
- Heat protectant spray
- Comb
- Styling mousse
- Texturizing spray
How To Do
- Comb and detangle your hair
- Apply heat protectant spray evenly to safeguard your hair from the hot styling tools.
- Take a small section of hair and wrap it around the curling iron. Hold in place for about 8-10 seconds or adjust based on your hair’s thickness.
- Gently release the curled section from the iron. Allow the curl to cool before moving on to the next section.
- Move section by section until your entire head is full of curls .
- Gently run your fingers through the curls to loosen them. This will allow for a softer, more natural look
- Apply a styling mousse to set the curls and ensure longevity.
- Finish off with a texturizing spray to add extra texture and volume.
You can make a strong and unforgettable impression with these hairstyles by considering your hair type, length, and texture, and how the style will look on your hair specifically. Also, consider the theme of the occasion and your outfit’s aesthetics for a seamless pairing with your formal hairstyle. If you are overwhelmed with the options, consider some widely trending styles like relaxed and refreshing half-up-half-down looks, intricately braided updos, and sophisticated sleek low buns. Such styles are quite the rage right now and can express your professionalism as well as fashion tastes, making you a trendsetter among your peers.
Key Takeaways
- Formal hairstyles like updos, braids, and half dos are ideal for all occasions, from prom nights to family dinners.
- Use hair accessories like clips or headbands to spruce up formal hairdos.
- The most popular formal hairdos include styles like sleek French buns and high ponytails.
- You can experiment with formal hairstyles such as accessorized low bun, crossed half updo, and Dutch braid.
Infographic: Formal Fashion – Dos and Don’ts
There is always a hack in the world of fashion to creatively work around all rules of fashion. However, formal occasions are called so because there are always strict rules in place. Although it depends on how flexible the organizers are, you must maintain some basic etiquette. Check the infographic below to know about the dos and don’ts of formal attire.
Some thing wrong with infographic shortcode. please verify shortcode syntax
Licensed cosmetologist Dawna Jarvis agrees with our picks. She says, “All of these looks are timeless and can be worn on so many different occasions.” Looking perfect at a formal event is of utmost importance. And, your hair plays just as big a role here as your dress. So, which of these formal styles do you want to try? Comment below and let us know!
Frequently Asked Questions
How do I choose the right formal hairstyle for my face shape?
To choose the right formal hairstyle for your face shape, consider styles that balance your features, such as soft waves for square faces or updos that elongate round faces.
Can I wear my hair down for a formal event?
Yes, you can wear your hair down for a formal event, especially if styled with soft waves or curls. Just ensure to use some texture or setting products to make it look neat and polished.
What are the best accessories for formal hairstyles?
The best accessories for formal hairstyles include hairpins, clips, and tiaras in neutral shades and minimal ornamentation. The key is to achieve a minimally attractive look that complements your eye for fashion without overpowering your professionalism.
Can you wear your hair down to a formal event?
Yes, you can wear your hair down to a formal event. You can leave it natural or switch up your hair type (go curly if you have straight hair or straight if you have curly hair). You may want to use some bobby pins or hairspray to keep your hair in place. You can also opt for half-up and half-down prom hairstyles.
What is the hairstyle with formal dress?
Any elegant hairstyle, preferably updos (the most popular and versatile being the French twist), low buns, sleek ponytails, knotted ponytails, intricate braids, and romantic half updos can be worn with formal clothes. These styles are perfect examples of formal hairstyles for long hair that add sophistication and elegance to any formal outfit.
Is a bun professional for an interview?
Yes, a bun is a formal hairstyle that can be worn for an interview, and it is also one of the easy hairstyles for long hairs that provides a polished and professional look.
Check out this video for 3 easy and stylish hairstyles for work. Perfect for busy mornings, these looks help save time while you look your best at work!
Personal Experience: Source
StyleCraze's articles are interwoven with authentic personal narratives that provide depth and resonance to our content. Below are the sources of the personal accounts referenced in this article.
i. Maintaining and Growing My Natural Hair With Bunshttps://aliciajames.wordpress.com/2014/07/02/maintaining-growing-my-natural-hair-with-buns/
Read full bio of Dawna Jarvis
Read full bio of Anjali Sayee
Read full bio of Madhumati Chowdhury
Read full bio of Pahul Nanra



Community Experiences
Join the conversation and become a part of our empowering community! Share your stories, experiences, and insights to connect with other beauty, lifestyle, and health enthusiasts.