41 Adorable Hairstyles For School Girls
Make everyday school routine fun for your little girl with adorable and trendy hairstyles.
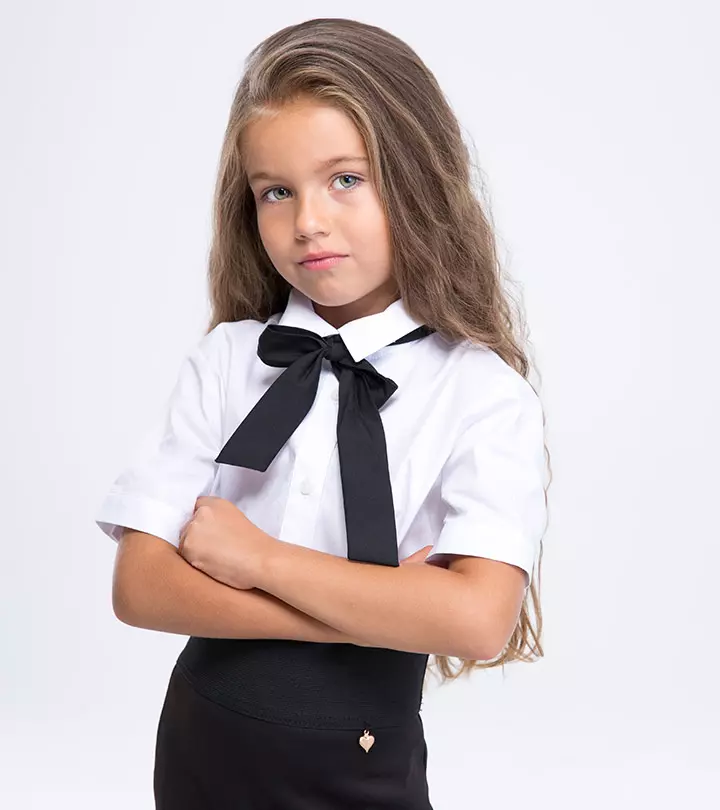
Image: shutter stock
It is not an easy-breezy morning if you have a kindergartener at home. You have to wake her up, prepare food for her, pack her lunch, tie her hair, and whatnot. Amidst these tight-packed hours, you often do not get new hairstyle ideas, and we are here to help you with some cool hairstyles for schools. The easy yet cute hairstyles we discuss here will not take a lot of time, and you can get back to your other chores in a minute. Your daughter would love to flaunt different hairstyles each day. Be it the princess-like hairstyles or the pretty and adorable hair buns and braids – we have covered everything here. So, what are you waiting for? Scroll down to check out the 41 easy, cute, and trending hairstyles for school girls, ranging from curly hairstyles to straight hairstyles. You will also find detailed instructions to do these hairstyles. Keep reading to check them out!

 Before You Get Started
- Check with the school’s dress code policy before deciding on elaborate hairstyles for school.
- A hairdo for school needs to stay in place for 6-8 hours. Plan the hairstyle accordingly.
- Medium-length hair is always easier to manage for school hairstyles. Short hair is always untamed and long hair takes time and effort.
- In case of short hair, accessories like fabric headbands and bow clips can keep the hair out of the face.
In This Article
41 Adorable Hairstyles For School Girls That Your Daughter Will Absolutely Love
School hairstyles should be comfortable, manageable, and presentable. They must also align with the school’s hairstyle policy. Here we have listed some practical and trendy hairstyle ideas that should check all the boxes and make for cutesy looks. We have chosen these styles based on their popularity, ease of styling, and cultural appropriateness. They ensure your little one looks cute while keeping up with the busy school day. These adorable hairstyles are perfect for school settings, offering a blend of style and practicality. You can customize these styles by adding your personal touch with small tic-tacs, clips, ribbons, and other accessories to your little one’s hair, provided it is allowed in school.
1. Simple Back Knot
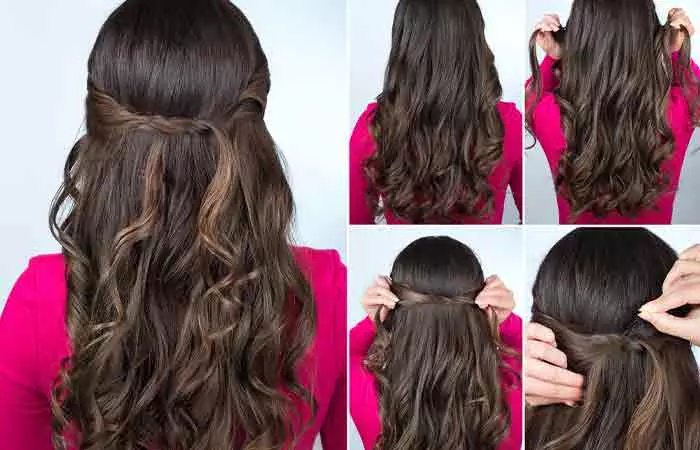
Let’s begin with a simple one! You cannot underestimate how a tiny detail can impact the overall look of a hairstyle. If your child has wavy hair, this style will hold easily and add dimension to her loose hair with minimum effort.
What You Need
- Bobby pins
How To Style
- Roughly pull out two small sections of hair from the temples on either side.
- Bring them at the back of the head and knot them around each other once.
- Use bobby pins to keep the knot in place.
2. Single Colorful Braid
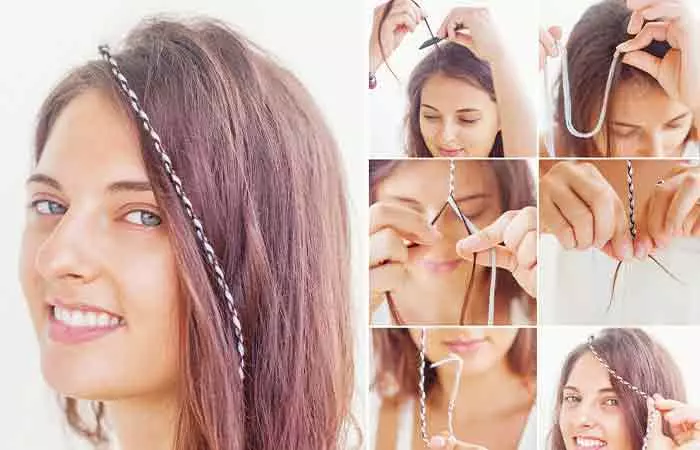
Another simple hairdo to liven up your little one’s face! This cutesy style comprises a slim braid on one side of the head done using a ribbon. It is such a tiny detail, but it adds a pop of color to a regular braid. Your little girl is sure to love showing it off to her friends! It also takes barely 5 minutes of your time.
What You Need
- Rat-tail comb
- Thin satin ribbon (any color)
- Elastic hair tie
How To Style
- Part your hair on one side using a rat-tail comb.
- Comb out a 1-inch section of hair at the parting for the braid.
- Wrap the middle of the ribbon at the base of the sectioned hair and start braiding from there.
- Braid till the end of the hair and tie a knot with the ribbon ends. If the ribbon is not long enough, you may use an elastic tie to secure the braid and finish the look.
3. Heart Knot
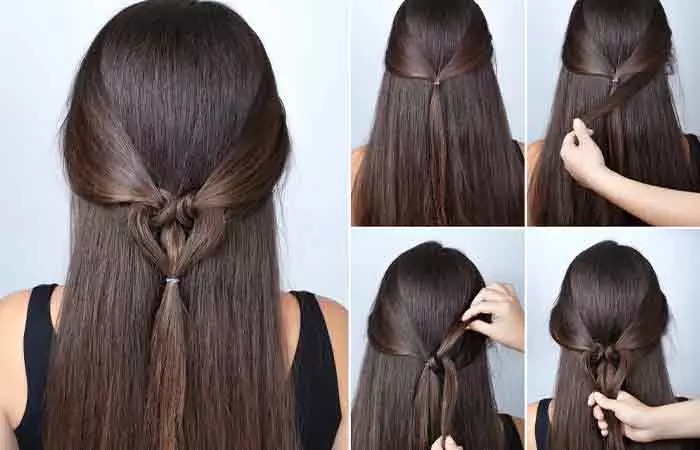
This cute hairstyle for little girls can be both adorable and practical. Who needs accessories when your kid’s hair can be shaped into one! This easy heart knot looks like a fancy clip at the back of the head. This hairstyle is going to be an instant hit once it’s done. Do keep in mind that the knot requires long and straight hair to sit well without looking awkward.
What You Need
- Rat-tail comb
- Sectioning clips
- Hair elastic
How To Style
- Comb out two one-inch sections of hair on either side of the face. Make sure both the sections on each side are one above the other.
- Use sectioning clips on the lower sections to keep them out of the way.
- Take the upper sections from both sides and pull them back, such that they conceal the tops of the lower sections. Secure these upper sections into a ponytail with an elastic tie at the back.
- Now pull back one of the lower sections, insert it above the pony, and weave it out between the upper and lower sections on the same side.
- Repeat the same on the other side. These woven out lower sections will form the top curve of the heart.
- Gather the ends of these sections about two inches below the previous pony and tie them all together with a hair tie to finish the knot.
4. Pinned Braided Heart
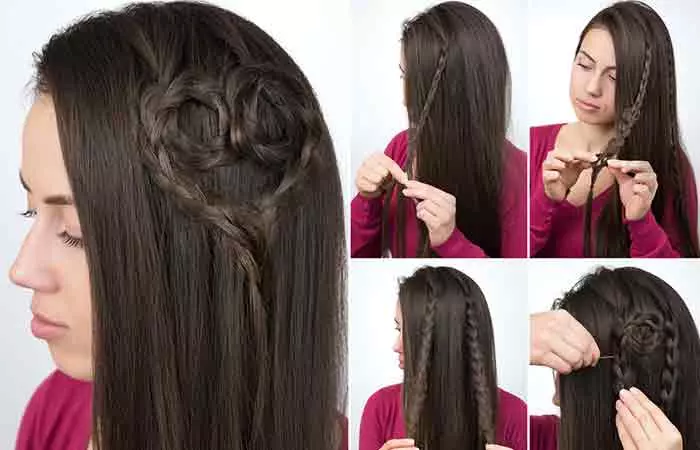
Here’s another style that works with a heart pattern and looks charming on young girls. This pattern is done on one side of the head, as is the trend these days, and it is super easy to do!
What You Need
- Hair elastics
- Bobby pins
How To Style
- Make a deep side part and neatly comb the hair on both sides.
- At the parting line, take out two sections of hair from the bigger part.
- Braid both sections individually and secure them with an elastic tie each. These braids must fall on the bigger side.
- Twirl these braids to form opposing sides of the heart and use bobby pins as you go to keep the pattern in place. Pin the braids at the bottom to finish the shape.
- You may leave the ends of the braids as they are, or remove the elastic ties to let them merge with the rest of the hair.
5. Double Braid Headband
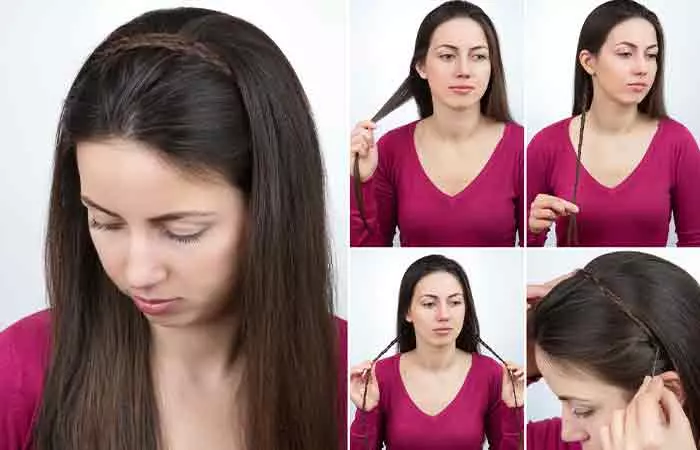
These braided headbands have such a cottagecore vibe! It is the kind of style illustrated on fantasy fairies and pixies. Also, this hairdo looks completely different on different hair textures. Using a colored ribbon to make these braids can add a touch of liveliness to the hairstyle.
What You Need
- Hair elastics
- Bobby pins
How To Style
- Take a small section of hair from behind the ear and braid it down to its ends.
- Secure the braid with an elastic tie. Repeat it on the other side.
- Take one braid and circle it over the crown just behind the ears. Secure the ends behind the ear on the other side using a bobby pin.
- Repeat the process with the braid on the other side to complete the look and create this stunning crown braid hairstyle.
6. Stacked Braid Hairdo
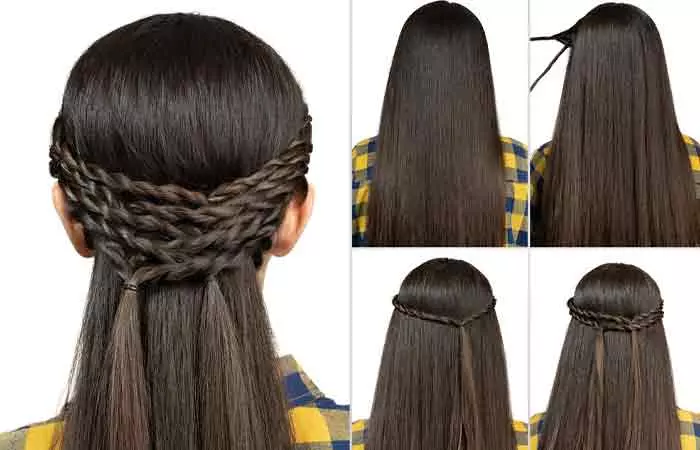
A single braid can bring an unmatched allure to an otherwise simple hairstyle. But, what if the hairstyle had multiple braids? No, not the protective styles kind. Rather something that is easy and takes less time! This stacked braid hairdo is stylish, and it will also keep hair away from your kid’s face.
What You Need
- Sectioning clips
- Hair elastics
How To Style
- Roughly pull out a small section of hair at the temples and divide it into two.
- Twist these two sections around each other till the end and hold it in place using a section clip.
- Repeat the same on the other side.
- Gather these two twists at the back and secure them with an elastic tie slightly off the center of the head. Remove the sectioning clips and let the remaining hair after the tie fall freely. This is the first layer of the stack.
- Repeat steps 1-3 with two more sections of hair from the temples. However, this time, gather them off-center on the other side at the back.
- Secure them with an elastic tie to form another layer of the stack right below the previous one.
- You now have two layers of the stack. Similarly, make as many layers as you want till you are satisfied with the look.
7. Half Ponytail With Side Twists
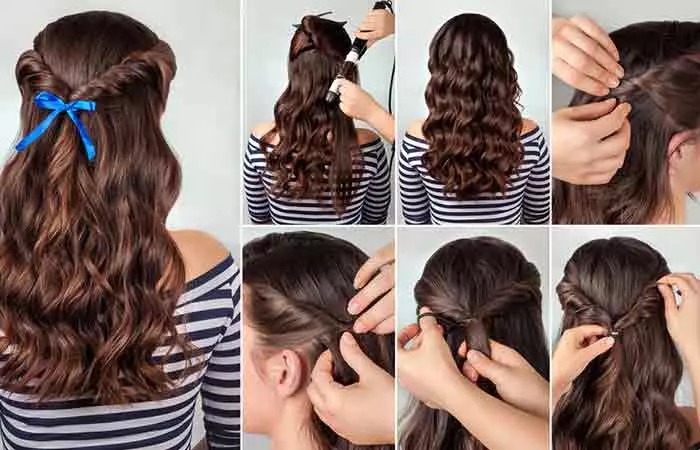
Hairstyles with twisted sides seem to be popular with young girls. These twists form the illusion of a tiara. Surprise your little one with this hairstyle if she fancies the princess look. It will make for a dreamy and delightful look!
What You Need
- Hair elastics
- Satin ribbon
- Sectioning clips
- Curling wand
- Heat protectant
How To Style
- Start by applying heat protectant and curling your child’s hair.
- Comb out two two-inch sections of hair from both sides in the front, wrap them together, and hold with a section clip for later.
- Take one section out of the sectioning clip and begin twisting it from the top. Use another sectioning clip to secure the twist when it is long enough to reach the center at the back.
- Repeat the previous with the other section. Remove the sectioning clip and secure both the twists together with an elastic tie.
- Gently tug at a few strands along the length of the twists to add more voluminous texture to them.
- Use the satin ribbon to tie a bow around the elastic tie and finish off the look.
8. Fancy Three-Strand Braid
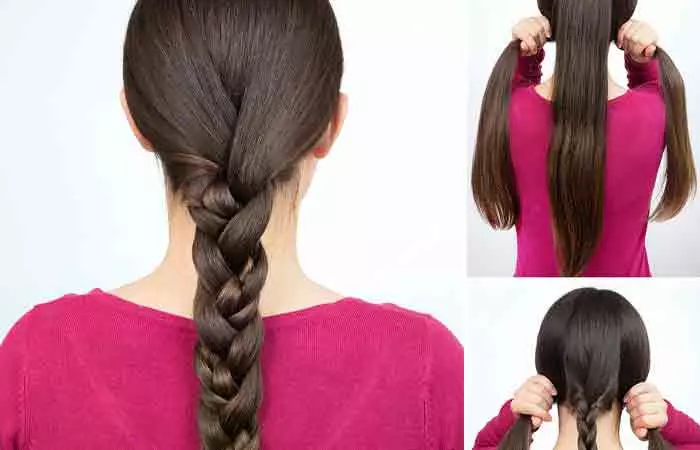
As much as you love braids, it’s about time you get a little experimental with them. This fancy braid will make the overall hairstyle look intricate and mysterious while being pretty simple to do. Try this out on your little one for a look she will certainly be excited to flaunt!
What You Need
- Sectioning clips
- Hair elastics
How To Style
- Comb all the hair back and divide it into three equal sections at the nape.
- Use section clips to set aside the outer sections for later.
- Make a regular three-strand braid with the middle section. Secure it with an elastic tie.
- Remove the section clips from both the outer sections. Using the middle braid as one of the three strands and make a braid along with the outer sections.
- Secure the fancy braid at the bottom.
9. Fancy Dutch Braid
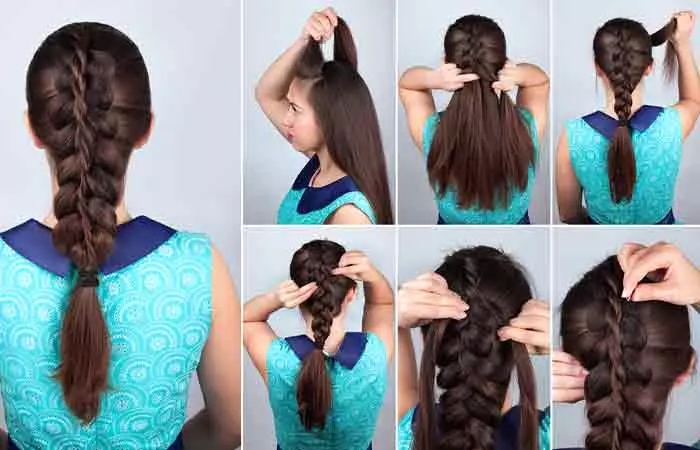
If you are searching for hairstyles for girls with long hair, this is a great choice. This is the perfect hairstyle for any schoolgirl’s playdates! This fancy Dutch braid looks super adorable on young girls. All the classmates will be left fawning over your little girl. Try it on her and let her bask in the limelight!
What You Need
- Sectioning clips
- Hair elastics
- Bobby pins
How To Style
- Comb out a three-inch section of hair from the front of your kid’s crown, knot it, and use a section clip to set it aside.
- With the remaining hair, make a Dutch braid of desired length. Secure it with an elastic tie.
- Free the sectioned hair from the front and divide it into two. Twist the two sections around each other. Keep it slightly loose in the front.
- As your twist reaches the top of the Dutch braid, pin it to the braid using a bobby pin.
- Continue twisting the top section and pinning it to the Dutch braid every two inches as you move down.
- When the twist reaches the end of the braid, tie it together with the braid using an elastic tie to finish.
10. French Braided Crown Ponytail
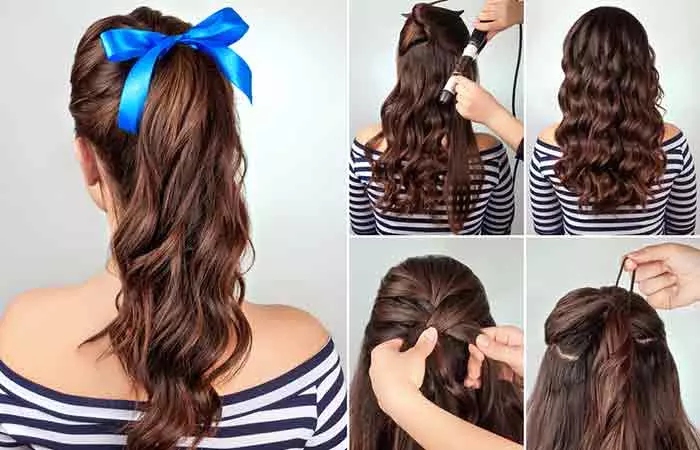
This ponytail is totally worth obsessing over! It retains the school girl innocence while also giving the air of a complete fashionista. It is also a style that looks delightfully refreshing no matter what kind of outfit you pair it with. It is an ideal braid for little girls. And don’t even get me started on how perfect it will look in photos. No matter the occasion, this is a must-try!
What You Need
- Rat-tail comb
- Sectioning clips
- Curling wand
- Heat protectant
- Hair elastics
- Paddle brush
- Satin ribbon
How To Style
- Apply heat protectant and curl your child’s hair.
- Use a rat-tail comb to divide the hair horizontally at the back into top and bottom sections.
- Knot the top half and use a sectioning clip on it to keep it out of the way.
- Free the top section to make a French braid with it. Secure the braid into a pony with an elastic tie just above the horizontal partition.
- Use a regular paddle brush to gather the bottom section at the base of the pony. Secure it with a hair elastic to form the full ponytail.
- Tie a bow with a satin ribbon at the base of the ponytail for an extra dose of cuteness.
11. Loose Side Braid With Pin-Up Bow
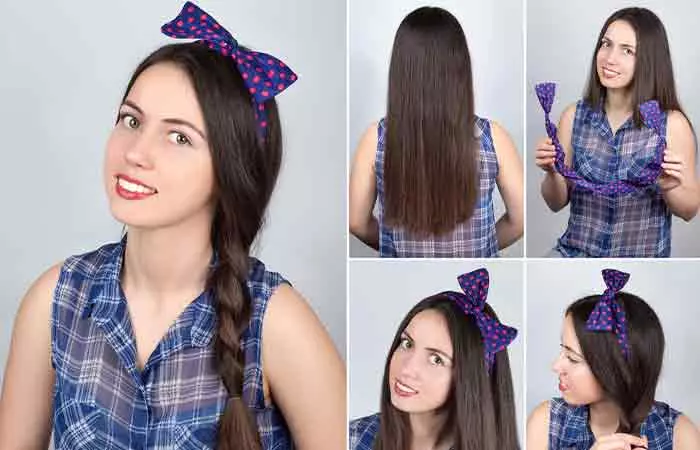
This is exactly the kind of haircut that grandparents adore! Big bows in polka dots seem to be favorites, but solid colors, stripes, checks, and other patterns are equally pretty. A family gathering would be the best time for your little girl to flaunt this look!
What You Need
- Wired fabric headband
- Hair elastic
How To Style
- Make a neat side part on detangled hair. Push all the hair behind the shoulder and roughly divide it into a front and back section right above the ears. Let the front section fall in front of the shoulder.
- Wrap a wired fabric headband through the gap between the front and back sections at the nape and turn it around so that the ends of the band are at the crown.
- Twist the ends around each other snugly to form a bow.
- Gather the rest of the hair on one side and weave a loose braid.
- Tie it with a hair elastic to secure the look.
12. Double Dutch Braided Pony
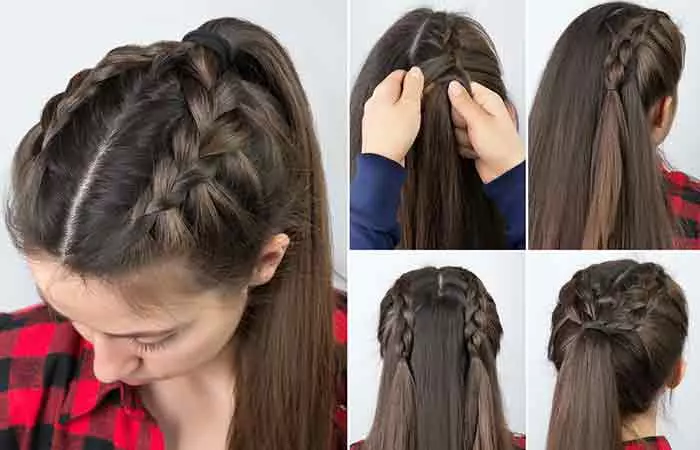
A double Dutch hairstyle is meant to add oodles of charisma. The neat yet dramatic braids at the crown compliment the inner diva of young girls who are eager to make an impression. This is definitely a hairstyle that can help your kid shine!
What You Need
- Rat-tail comb
- Sectioning clips
- Hair elastics
How To Style
- Use a rat-tail comb to divide the hair into an upper and lower section horizontally. Make the parting bend upward in the middle at the back so that it forms an inverted V. Clip the lower half to work on later.
- Make a center part till the tip of the inverted V, and divide the upper half into two equal sections. The parting now looks like an inverted Y.
- Make a Dutch braid with each top section and secure it with an elastic tie an inch below the parting line.
- Free the lower half of the hair and use a paddle brush to gather it with the two braided ponies at the top.
- Secure with a hair elastic to finish off the look.
13. Scrunchy Bubble Hairdo
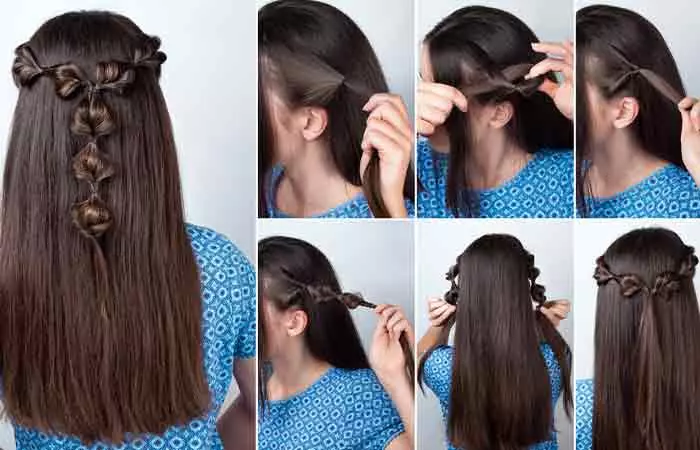
If your little one is enamored by elves and faeries, this style is going to be right up her alley. This scrunchy bubble hairstyle resembles a crown made of wild fruits and nuts. It is quite simple too, so try it out.
What You Need
- Hair elastic
How To Style
- Roughly pull out a section of hair from the temple. About two inches from the scalp, tie a hair elastic around the section to form the first bubble. It’s flat-ish now but the look will come together.
- Grab the free hair below the tie, insert it through a gap in the bubble from the back, and pull. The sides of the bubble must appear twisted.
- Tie another hair elastic two inches below this bubble and repeat the second step. It gets a little scrunchy and puffy now.
- Make three of these scrunchy bubbles on both sides.
- Gather these scrunchy bubble ponies at the back of your head and secure them with a hair elastic at the ends of the last bubbles.
- Continue to make three more scrunchy bubbles to form the tail-end of the style.
- You may tie a ribbon at the intersecting tie for an added appeal.
14. Half Top Knot
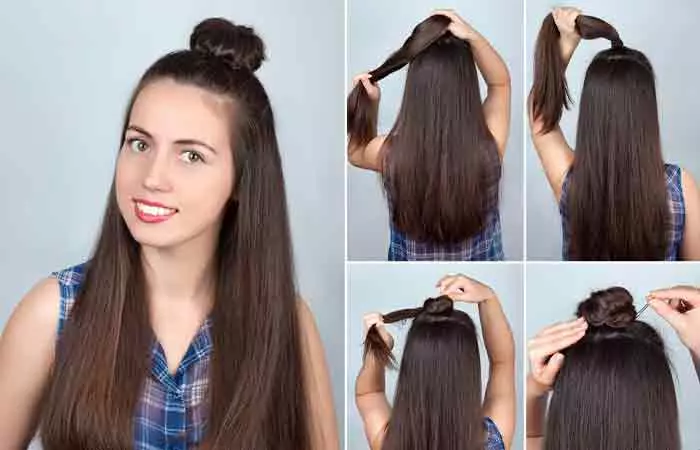
Here’s a basic hairdo that is all the rage across all age groups these days. Simple, quick, and cute – this hairstyle has a certain innocent pull to it. This can be a convenient everyday look for classes as well as playdates.
What You Need
- Rat-tail comb
- Hair elastics
- Bobby pins
How To Style
- Part the hair horizontally to divide it into top and bottom halves using a rat tail comb. The top half comprises hair from the crown and is smaller than the bottom half.
- Comb the top half at the top of the crown and make a ponytail using a hair elastic.
- Wrap the loose hair from the ponytail around its base to form a knot.
- Use another hair elastic to secure the top knot.
- You may also use bobby pins to keep the top knot in place if it’s not tight enough.
15. Braided Crown Half Top Knot
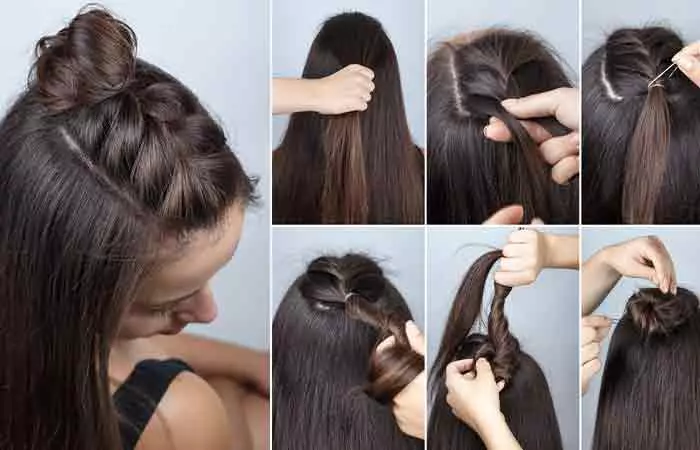
If you thought the top knot was cool, wait till you try this fancy top knot out! The top knot is slightly towards the back of the head, while the crown sports a gorgeous woven pattern.
What You Need
- Rat-tail comb
- Hair elastics
- Bobby pins
How To Style
- Using a rat-tail comb, make two side parts.
- Gather the hair in the middle and make a horizontal part at the crown, connecting the side part lines. This should form a vertical, rectangular section of hair along the middle of the head.
- Make a French braid using this middle section of hair and secure it into a ponytail at the horizontal parting line.
- Wrap the free hair from the pony around its base to form your knot and secure it with another hair elastic.
- Use bobby pins to keep this knot in place and finish your braided crown half top knot.
16. Braid Wrapped Bun
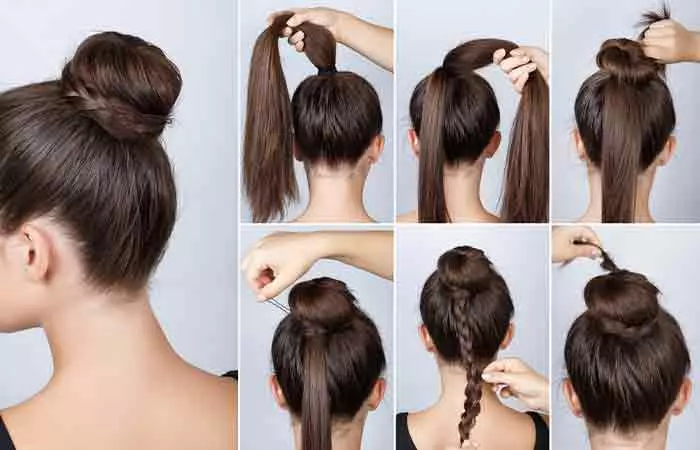
Here’s a neat and classic ballerina-style updo with a braided base. With all her hair out of her way, your daughter is going to be more cheerful and cooperative. It will also save you the energy of running after her to fix her hair. The braided base simply adds a stylish touch to a good ol’ top bun.
What You Need
- Hair elastics
- Bobby pins
How To Style
- Comb and gather all the hair at the crown and tie it into a neat ponytail.
- Pull a one-inch section out of the tail for the braid and use the remaining hair to wrap a bun around itself. Secure it with a hair elastic and bobby pins.
- Now weave the previously pulled-out section of hair into a braid and secure it with a hair tie.
- Gently tug at each stitch of the braid to give it a fuller look.
- Wrap this braid around the base of the bun. Use bobby pins to hold the style in place.
17. Braid Wrapped Half Donut Bun
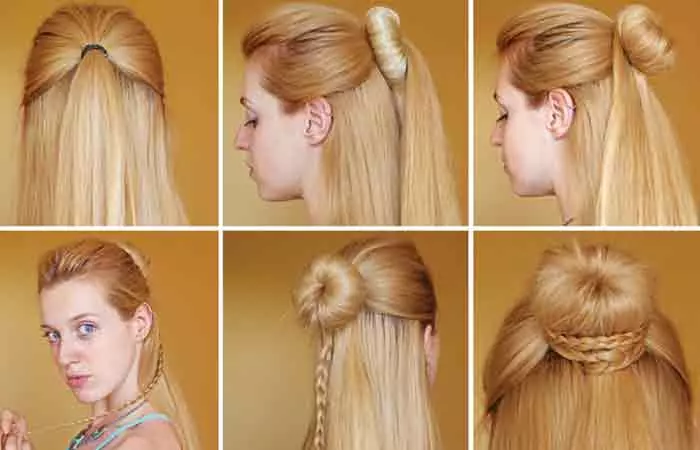
This style is similar to the previous one, except it is a half-up hairstyle. The use of the donut gives the bun a distinct appearance with an air of sophistication. Little girls always seem to be mimicking the adult ladies around them. So, try this hairdo on them for a classy look.
What You Need
- Hair elastics
- Hair donut
- Bobby pins
How To Style
- Comb back the hair from the crown and temples and make a half-up ponytail at the back of the head.
- Pull the ponytail through a hair donut till the donut settles at the base of the pony.
- Spread the ponytail around the donut till it is uniformly covered and use an elastic tie to keep this arrangement in place.
- Neatly comb the hair left from the donut arrangement downward. From the center of this remaining hair, pull out a section to make a thin braid and secure it with a hair elastic.
- Wrap this braid around the base of the donut bun and secure it with bobby pins.
18. Braided Low Space Buns
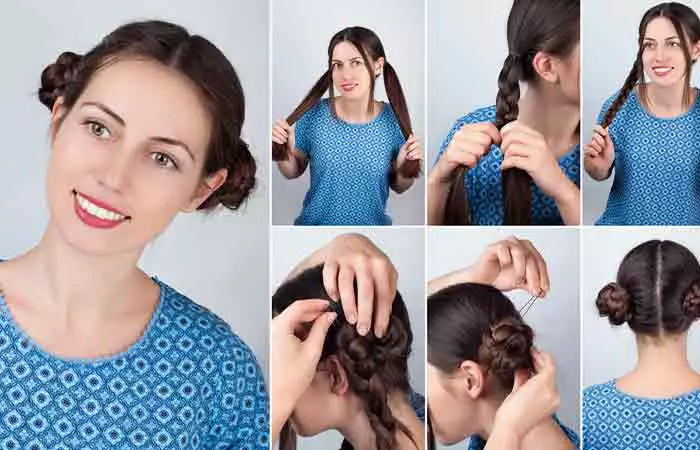
With the majority of anime, comic con cosplay, and Halloween looks sporting space buns, it has become a highly sought-after hairdo. Regular space buns can be done simply by making a bun on either side of the head at any height. However, if you want to take your space bun game up a notch, you must try this braided space bun on your little girl.
What You Need
- Rat-tail comb
- Hair elastics
- Bobby pins
How To Style
- Use a rat-tail comb to make a middle parting. Tie the hair on both sides into neat ponytails.
- Braid both the ponies almost to their ends and use hair elastics to secure them.
- Wrap the braids around the bases of their respective ponies and use bobby pins to keep the space buns in place.
19. Space Buns With Dutch-Braided Back
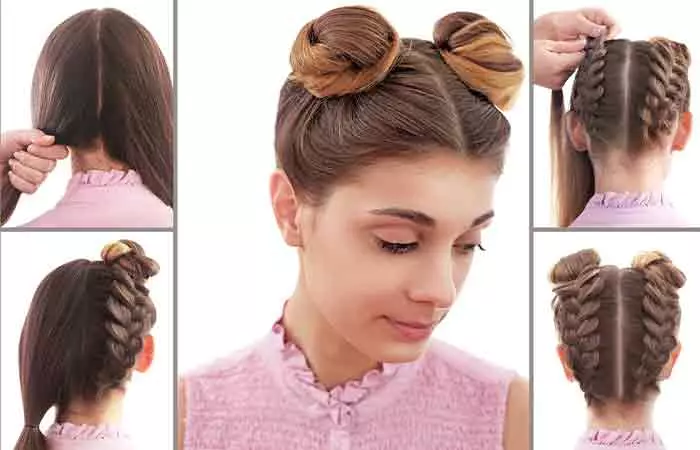
In case the previous space bun was not fancy enough for you, we have another option! While this style looks like regular space buns from the front, the back of the head sports Dutch braids snaking up the head. It makes such a sharp and impressive look that most people will be left speechless!
What You Need
- Rat-tail comb
- Hair elastics
- Bobby pins
How To Style
- Use a rat-tail comb to make a center part all the way back till the nape.
- Gather all the hair from one side at the nape and start making a Dutch braid from the nape, moving it up toward the crown.
- When the braid reaches the top of the crown, use a hair elastic to make a ponytail with the remaining hair at the top.
- Now wrap the tail of the pony around its base to make a space bun. Secure it in place with bobby pins.
- Repeat the same process with the other section of hair.
20. Messy Loop Chignon
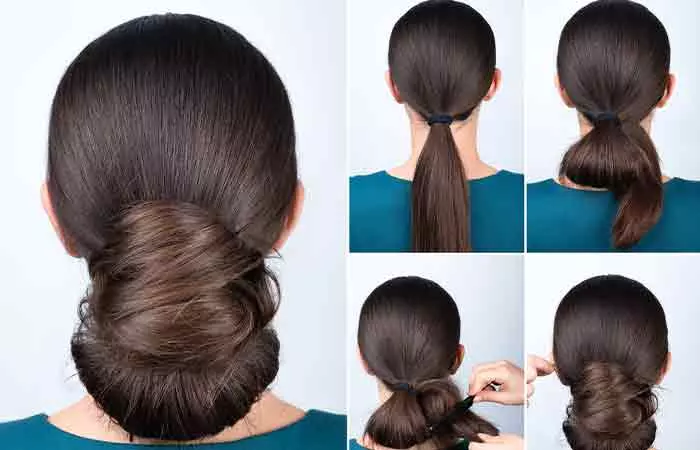
If your little darling has long hair and you wish to tame it in a span of minutes, this style is a blessing in disguise. This is one of those deliberate messy looks where the hairdo is a mess and yet has a classy vibe to it.
What You Need
- Rat-tail comb
- Hair elastics
- Bobby pins
How To Style
- Comb all the hair back and tie a neat low ponytail.
- Fold the ponytail under the base such that a few inches at the top of it form a loop and the rest of the hair hangs loose. Secure this loop with a hair elastic.
- Gently spread the loop to make it look fuller. Use the rat-tail comb to tease the remaining hair after the loop. This will help create a messy texture.
- Wrap these messy strands around the base of the loop and use bobby pins to secure the chignon in place.
21. Hair Bow
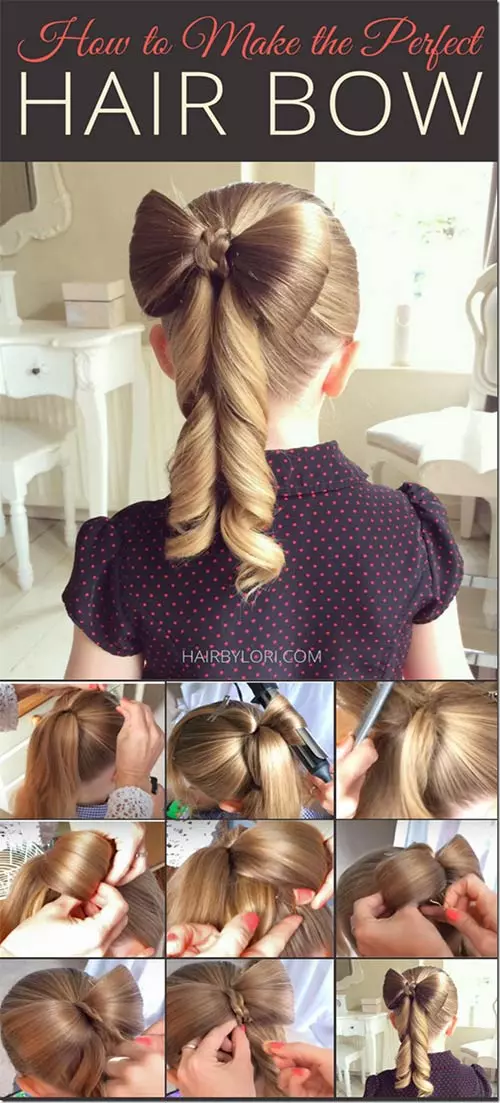
Who doesn’t believe that their beautiful daughter is a gift from up above? So, dress her up like one and adorn her hair in an adorable little bow. This is a timeless accessory that is also perfectly suited for holidays and special occasions. Not only will she look cute, it will also have her classmates fawning over her gorgeous hairstyle.
What You Need
- Hair elastics
- Bobby pins
- Sectioning clip
- Big curling iron
- Teasing brush
- Fine toothed comb
- Strong hold hairspray
How To Style
- Start off by tying your little one’s hair in a neat mid-level ponytail.
- Pick up a 2 inch section of hair from the very top of her ponytail and section it away with a sectioning clip.
- Pick up 1/3rd of your ponytail from the left side and curve the top part of it with a curling iron.
- Tease down this top part with a teasing brush to create volume.
- Smoothen out the teased hair with a fine toothed comb.
- Bend this section of hair into one half of a bow shape and secure it to her head from underneath with some bobby pins.
- Repeat steps 3 to 6 on a section picked up from the right side of her ponytail.
- Unclip the section of hair you separated at the beginning and simply braid it about a third of the way down.
- Place it along the center of her bow and pin it to her head, right under the base of the ponytail.
- Create 2 big curls with the tail of the ponytail.
- Spritz on some strong hold hairspray to set the hairdo in place.
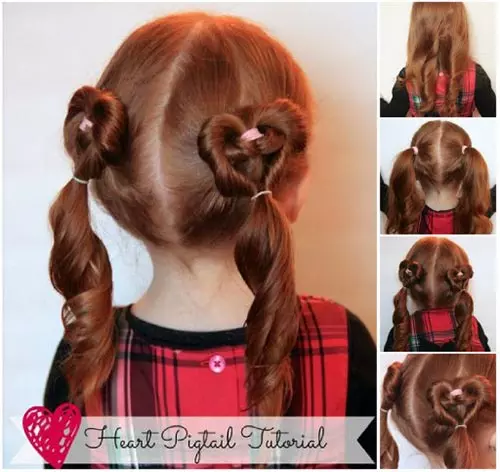
22. Heart Pigtails
Style your sweetheart’s hair with some sweet hearts, why don’t you? Besides looking oh-adorable, this cute Valentine’s heart pigtails style takes just about 5 minutes to do. No one will be able to stop themselves from awww-ing when they see your cutie’s pigtails. All that gushing is also going to cheer her up on a gloomy day.
What You Need
- Hair brush
- Hair elastics
How To Style
- Start off by brushing all the knots from your daughter’s hair and tying it into 2 mid-level pigtails.
- Using your fingers, create a gap in the hair right above the hair elastic tied around her right pigtail.
- Flip her pigtail over and into this gap to topsy tail it.
- Topsy tail her pigtail one more time.
- Now divide her pigtail into 2 sections.
- Start twisting these sections until they start curving upwards to create the two halves of a heart.
- Bring both the sections together and tie them up with a hair elastic to create a heart.
- Repeat steps 2 to 7 on the left pigtail to complete the look.
23. Triple Low Updo
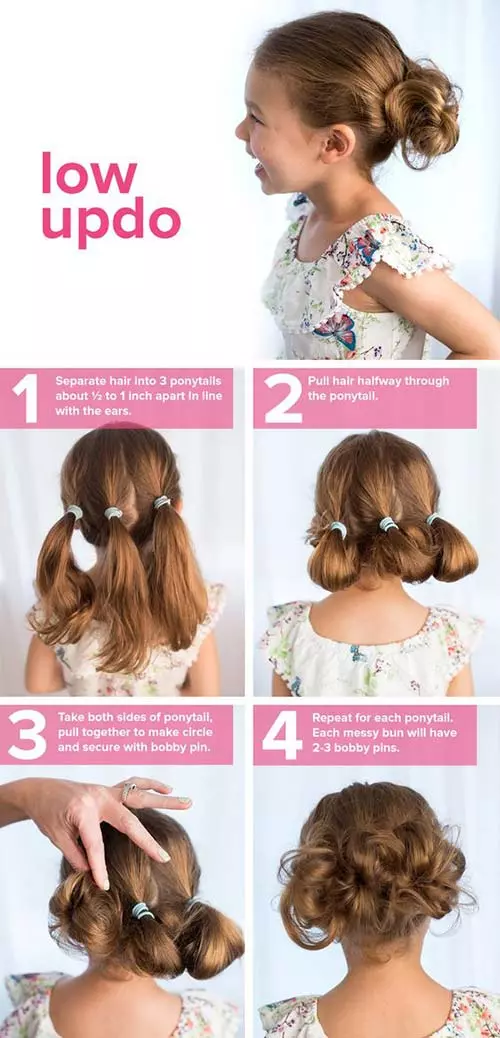
Sometimes, the hairstyles that take less than 3 minutes to do are the ones that look the fanciest. Case in point, this triple low buns updo. It’s perfect to do on second or third day hair, especially on days when your daughter has gym class.
What You Need
- Hair elastics
- Bobby pins
How To Style
- Start off by tying your little lady’s hair in 3 ponytails horizontally next to each other.
- Loop the ponytails halfway through the hair elastics.
- Spread out this looped hair to create messy circular buns and secure them to her head with bobby pins.
24. Faux Waterfall

How many times and how many different waterfall braid tutorials have you watched before getting daunted and giving up on doing it completely? Too many, I assume. Well, this simple hack of a hairstyle is so pretty that your daughter can sport it to the many birthday parties she gets invited to.
What You Need
- Hair elastic
- Bobby pins
How To Style
- Part her hair deeply on one side.
- From the side with more hair, pick up a 3 inch section of hair, braid it right till the end and secure it with a hair elastic.
- Insert your thumb and index finger through the center of the first stitch of the braid and pick up a small section of hair from the front of your head.
- Pull this section of hair through the stitch of her braid.
- Keep repeating steps 3 and 4 down the braid until the waterfall effect has reached in line with her parting on the other side.
- Pin the end of the braid at the back of her head, under her hair, to finish off the look.
 Quick Tip
25. Easy Under Braids
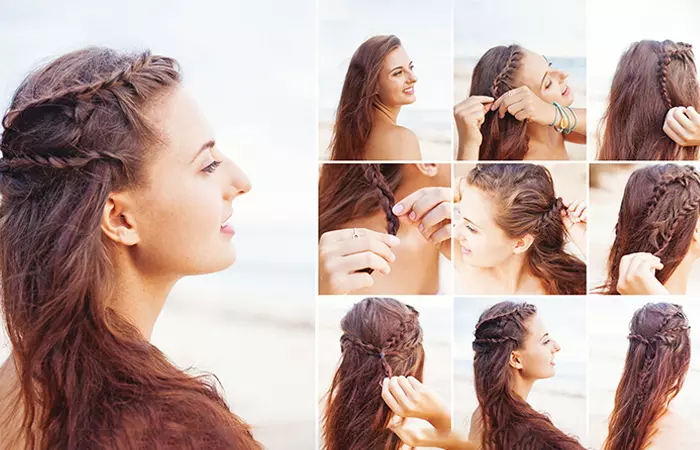
Now, this hairstyle is so easy, your daughter can do it herself in no time! (After all, even mums need a break every once in a while.) This sweet little hairstyle is chic, pretty and bound to make your little one the belle of the ball, or rather, the class. (Though, really, this shouldn’t be the kind of thing she should be worrying about. All that she should be working towards are her grades.)
What You Need
- Hair elastics
- Bobby pins
How To Style
- Part her hair on one side.
- From the side of her parting with more hair, pick up a medium sized chunk of hair, braid it right till the end and secure it with a hair elastic.
- Pick up another section of hair from beside this first braid and repeat the previous step.
- Pancake these braids by tugging them apart to make them look wider.
- Pull back these braids and pin them under the hair at the back of her head to finish off the look.
26. Rose Bun
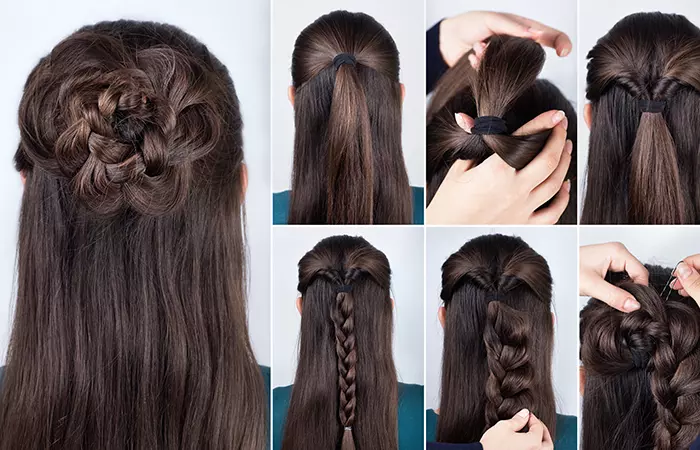
Struggling to come up with a hairstyle every time she has a class party/school dance to attend? Here’s a hair look that will get you out of your pinch swiftly. These rose buns are super pretty and bound to make your daughter look like the gorgeous flower child that she is.
What You Need
- Hair elastics
- Bobby pins
- Texturizing spray
How To Style
- Divide the top half of your little one’s hair into 3 sections.
- Individually braid these 3 sections and secure their ends with hair elastics.
- Pancake the left side of all 3 braids.
- Spritz some texturizing spray on them.
- Hold down the top of the first braid with one hand and start rolling the braid around it in a clockwise direction with the other hand.
- Keep pinning down the braid to her head every time you finish a half circle.
- Tuck the end of the braid under the completed rose and secure it down with some bobby pins.
- Repeat steps 5 to 7 with the other two braids to complete the look.
27. Elsa’s Braid
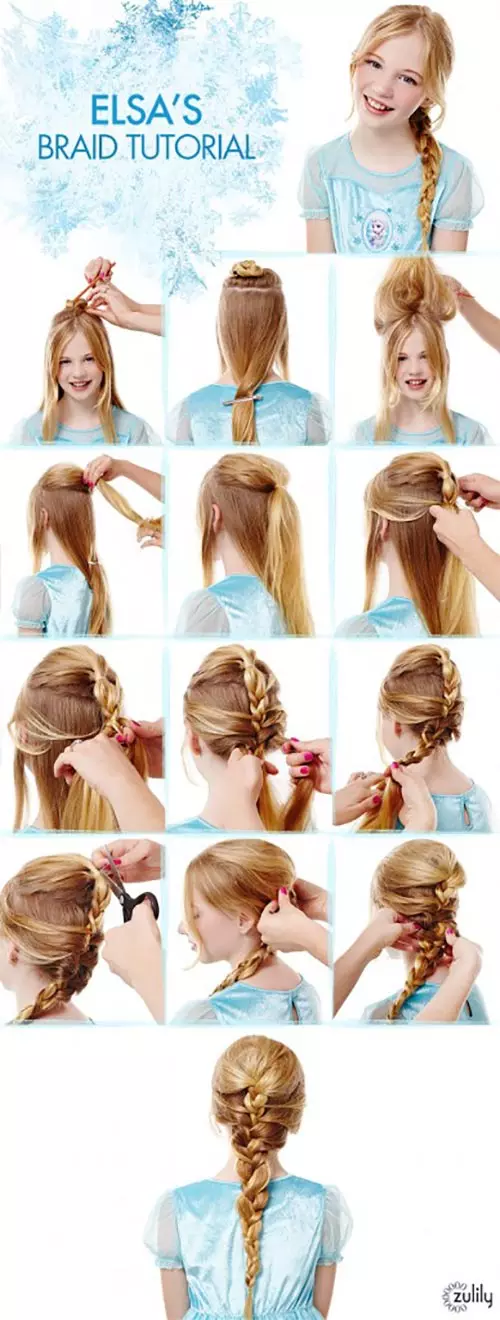
Face it. Your little angel has driven you up the wall with her obsession with Frozen and her constant need to sing Let It Go on top of her lungs. Make her day by doing her hair up in this Elsa-inspired braid that she’ll absolutely love you for. (Not that she doesn’t love you otherwise. This will just earn you some brownie points.)
What You Need
- Sectioning clips
- Teasing brush
- Fine toothed comb
- Hair elastics
How To Style
- Leaving out the front sections of her hair to frame her face, part her hair horizontally (from ear to ear) to divide it into 2 sections.
- Clip the bottom section with a sectioning clip to keep it out of the way.
- Tease down the top section of hair to create volume.
- Smoothen down the top of the teased section and tie it all in a ponytail with a hair elastic.
- Start braiding this half ponytail.
- Once you have braided for about 3 stitches, unclip the bottom section and start adding sections of hair from the sides into the braid with each stitch (start French braiding, basically).
- Once you run out of hair to add into the braid (when you’ve reached the nape of her neck), simply braid right till the end and secure with a hair elastic.
- Cut off the hair elastic at the top of her braid.
- Tug apart and loosen the braid to make it look wider and give it a softer vibe.
Anna, a blogger, likes to do a similar simple French braid to keep her hair out of her face. She states in one of her blog posts, “I’ve gotten so fast at doing a French braid on myself that I can do it anytime, anywhere, and without a mirror. The perfect portable life-saver (i)!” Anna complete this style by pulling a few hair strands from the front. She adds, “I like to pull out some shorter hair around my face from the French braid, to soften the style and… so I don’t look scalped.”
28. Elsa’s Coronation Bun
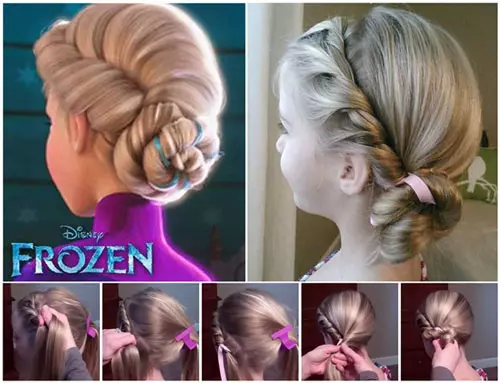
Now, here’s another Frozen-inspired hairstyle that your daughter will adore. This time it is the regal French twisted side bun sported by Queen Elsa at her coronation. This one may look complicated to do but can actually be done in the minutes before sending your little princess off to school.
What You Need
- Sectioning clip
- Rat tail comb
- Hair elastic
- Bobby pins
- Ribbon
- Hairspray
How To Style
- Part your little lady’s hair on one side.
- With the tail end of a rat tail comb, create a horizontal partition from the end of her first partition to her ear on the opposite side.
- Separate the rest of the hair at the back of her head with a sectioning clip.
- Pick up a medium sized section of hair from right next to the partition and divide it into two sections.
- Start French twisting these two sections by flipping the front section over the back section and adding more hair into the twisted braid from the side of her head with each twist.
- Once the French twisted braid has gone past her ear and you’ve run out of hair to add, simply secure it with a hair elastic.
- Insert one end of your ribbon into the hair elastic.
- Gather all of her hair and twist it into a side bun under the French twisted braid.
- Secure the bun to her head with loads of bobby pins.
- Spritz on some hairspray to set the updo in place.
29. Messy Mermaid Braid
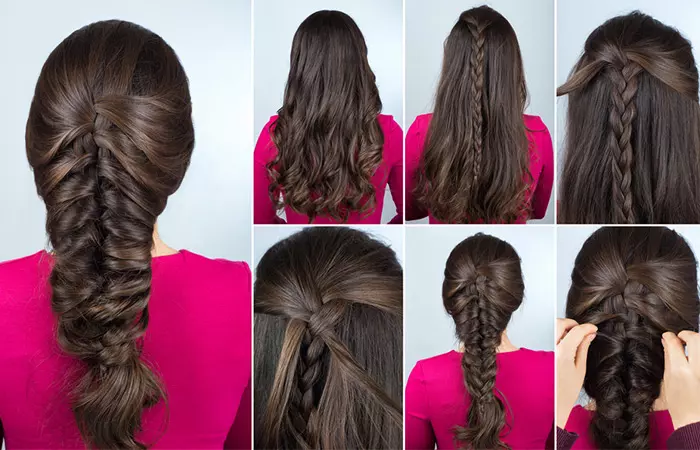
“I’m sure your little lady dreams about being a mermaid every single day. Though that may be a very unrealistic dream to have, it doesn’t mean you can’t fulfil it in your own little way. Do up her hair in this gorgeous mermaid tail style and watch her squeal with delight when you’re done!”
What You Need
- Heat protectant
- Curling iron
- Hair elastics
- Bobby pins
How To Style
- Prep your little one’s hair with some heat protectant and curl the lower half of all her hair.
- Pick up a big section of hair from right on top of her head and braid it right till the end.
- Secure the end of the braid with a hair elastic.
- From the left side, pick up a 2 inch section of hair from the front, twist it right till the end, and insert it into the first stitch of her braid.
- Now, from the right, pick up another section of hair, twist it right till the end, and insert it into the second stitch of braid.
- Alternating sides this way and working down the braid, weave all her hair into the braid.
- Secure the ends with another hair elastic.
- Pin down any sections of hair hanging loose.
- Gently tug the braid apart to give it a fuller look.
30. Triple Braid
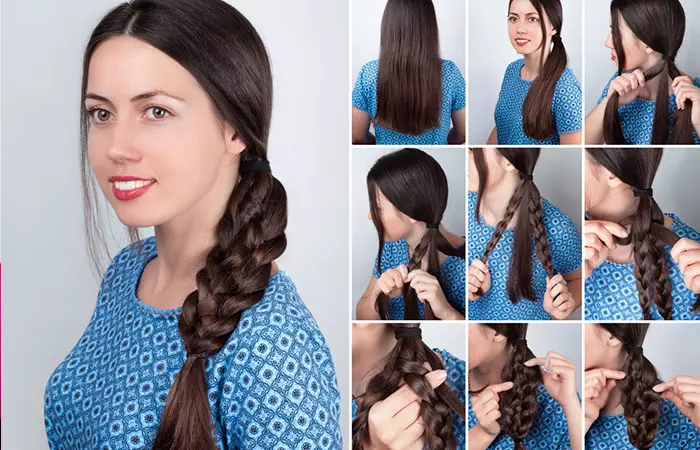
I know you have those days when you don’t feel like getting out of bed to send your kid to school. What makes it worse is the thought of going through all the motions of dressing her up. On those lazy days, here’s a simple hairstyle for girls that will take less than 5 minutes to do and still make your daughter look presentable at school.
What You Need
Hair elastics
How To Style
- Make a ponytail.
- Divide the ponytail into 3 sections.
- Individually braid these 3 sections and secure the ends with hair elastics. You should end up with 3 braids lying right next to each other.
- With these three braids acting as individual strands, braid them into one giant braid and secure it at the end with a hair elastic.
 Quick Tip
31. Dutch Pigtails

Here’s a hairstyle that will be perfect for your little angel when she has any kind of sports class or tournaments. Besides looking oh-so-trendy, Dutch pigtails can work great to keep all of her hair neatly off of her face. Another bonus for you is that it will be super easy to brush out her hair after untying these braids as they will prevent knots and tangles from forming in her hair.
What You Need
Hair elastics
How To Style
- Part your little one’s hair slightly off-center.
- Continue parting till the nape of her neck to divide all her hair into 2 sections.
- From the very front of the left section of her hair, pick up a 3 inch section of hair and divide it into 3 sections.
- Start Dutch braiding these 3 sections by alternately flipping the side strands under the middle strand and adding more hair into the braid from both sides with each stitch of braiding.
- Once the Dutch braid has reached the nape of her neck and you’ve run out of hair to add into it, simply braid the rest of the way down and secure the ends with a hair elastic.
- Repeat steps 3 to 5 on the right section of her head to complete the look.
32. Messy Bun

Hit the snooze button way too many times, did you? And now there’s no time to do your kid’s hair. But, wait a minute! This is exactly the time that Zoella will come to your rescue! Her simple messy bun will take you about 2 minutes to do on your baby’s hair and make her look super cute.
What You Need
- Hair brush
- Hair elastics
How To Style
- Brush out all the knots and tangles from her hair.
- Tie all her hair in a high ponytail.
- Twist the ponytail right till the end.
- Roll the twisted ponytail into a bun and place it flat against her head. Make sure the ends are tucked under the bun.
- Secure the bun with a hair elastic.
- Pull out some sections from the front to frame her face.
- Secure any loose sections of the bun with bobby pins to finish off the look.
33. Easy Twisty Bun
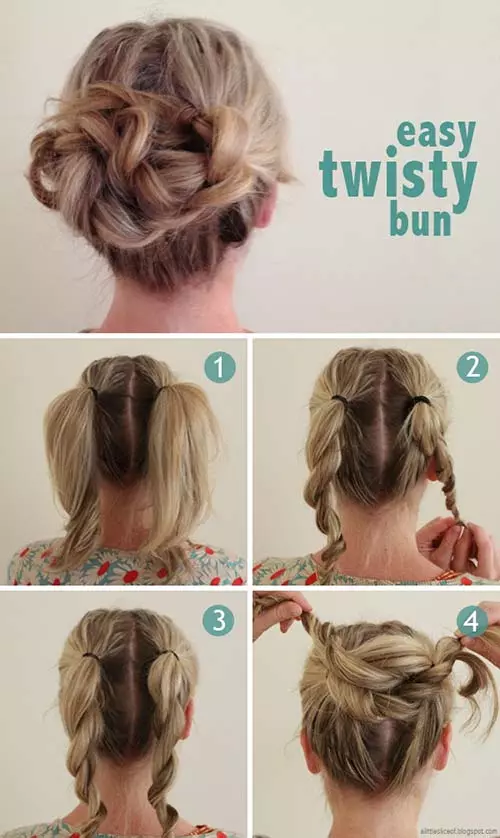
Reaching the end of the school year and the summer heat is starting to set in? There’s only one way your little lady can be prevented from driving herself (and you) up the wall because of the heat – by tying her hair into an adorable twisted updo.
What You Need
- Hair elastics
- Bobby pins
How To Style
- Part your daughter’s hair down the middle and divide it into sections.
- Tie both the sections into ponytails right at the back of her head.
- Divide the left ponytail into 2 sections.
- Individually twist these two sections right till the end.
- Intertwine the two twisted sections with each other and secure the end with a hair elastic.
- Repeat steps 3 to 5 on the right ponytail.
- Wrap these two twisted ponytails with each other into a bun and secure it to her head with some bobby pins.
- Gently loosen the twisted bun to give it more dimension and finish off the look.
34. Classy Pony

Too often, kids complain about their tight ponytails giving them a headache. Here’s a simple hack hairstyle that will solve the problem and add a cute little twist to an otherwise ordinary ponytail. All you need is a couple of bobby pins to perfect this look. Keep it high, keep it tight, and don’t do it so often that it stresses the hairline!
What You Need
- Hair elastic
- Bobby pins
How To Style
- Leaving out the front section of her hair, tie all her hair at the back into a mid-level ponytail.
- Part her front hair on one side.
- Pick up all the hair on the side of her parting with lesser hair and pull it back.
- Place this section of hair across the top of her ponytail and pin it down on the opposite side, right next to the hair elastic.
- Repeat the previous step with the front section of hair on the other side to finish off the look.
35. Bubble Ponytail
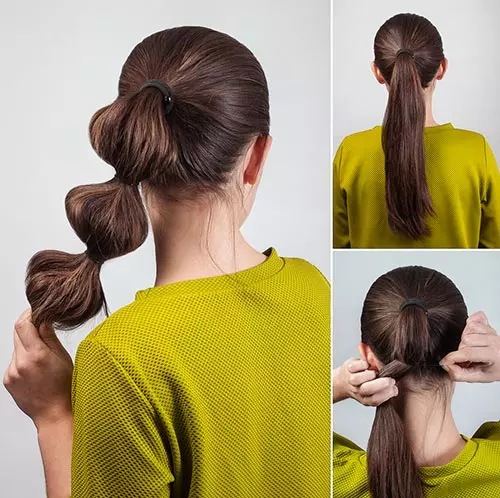
Easy to do and looks super cute, this bubble ponytail is another favorite hairstyle for girls who are in school. With just a few hair elastics, transform her boring ol’ ponytail into a stylish hairstyle that she will beg you to do every single day.
What You Need
- Hair brush
- Hair elastics
How To Style
- Brush back all her hair and tie it into a ponytail at the back of her head.
- About 1/3rd of the way down her ponytail, tie another hair elastic.
- Now, pull up and apart the hair between the hair elastics to give it a bubble effect.
- Keep tying hair elastics and “bubbling” up her hair until you reach the end of her ponytail.
36. Rope Twisted Ponytail
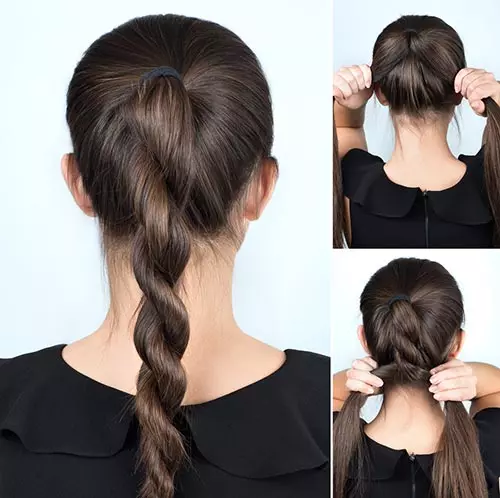
Trying to send your child off to school with a simple ponytail but she starts protesting that it’s “too boring”? A quick hack to get out of this situation is to incorporate this twisted style into her ponytail. Takes about 2 seconds to do and you’re both happy!
What You Need
Hair elastics
How To Style
- Tie your baby girl’s hair into a high ponytail.
- Divide the ponytail into 2 sections.
- Individually twist both the sections in a clockwise direction right till the ends.
- Intertwine both the twisted sections with each other in an anticlockwise direction till the end.
- Secure the end with a hair elastic.
37. Bumped Up Ponytail
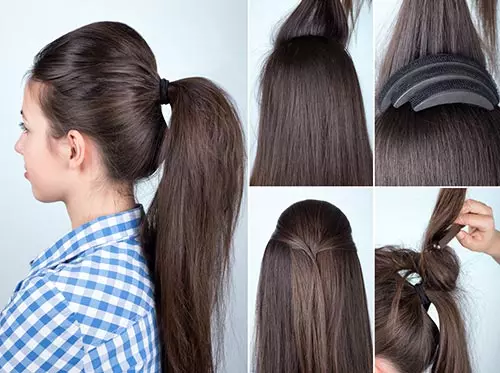
Your little girl is growing up and pretty soon she’ll want to rock hairstyles that will make her look ~cool~ at school. Be prepared for that day by trying out this ponytail look that is appropriate for school but still looks chic.
What You Need
- Hair elastic
- Bumpit
- Fine toothed comb
- Teasing brush
How To Style
- Insert a bumpit under the hair at the crown of her head.
- Use a fine toothed comb to smoothen down hair over the bumpit.
- Gather all her hair and tie it into a mid-level ponytail.
- Tease down the hair at the base of her ponytail.
- Smoothen down hair over the teased hair using a fine toothed comb to finish off the look.
38. Triple Twisted Ponytail
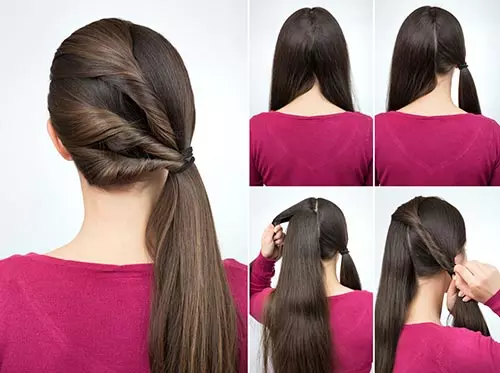
Try out all the funky cute hairstyles on your little one while you still have time because pretty soon she’ll become an irritable teenager who won’t let you anywhere near her hair. This adorably twisted side ponytail style is one such look you definitely need to try on her.
What You Need
Hair elastics
How To Style
- Part your little one’s hair down the middle and continue the parting till the nape of her neck to divide her hair into 2 sections.
- Tie one section into a low side ponytail.
- Pick up 1/3rd of the other section, twist it right till the end and tie it with the side ponytail.
- Pick up another 1/3rd section from right under the first one and repeat the previous step.
- Add the last section of hair to the ponytail in the same manner to finish off the look.
39. Ballerina Bow Bun
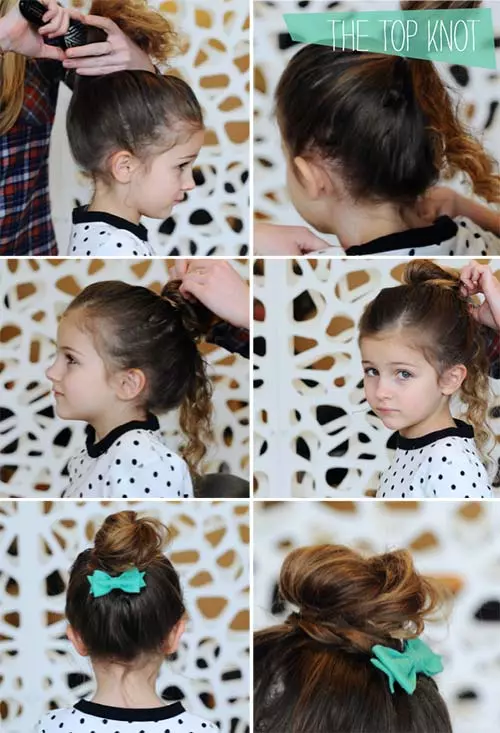
Make your sweet little princess look like a ballerina (even if she isn’t one) with the help of this hairstyle. This adorable bun style will neatly keep her hair out of her face while still making her look oh-so-cute. All you need is a little hair bow to complete the sweet look.
What You Need
- Hair elastics
- Bobby pins
- Hair bow
How To Style
- Tie your little one’s hair into a high ponytail.
- Leaving out a 2 inch section of hair from the bottom, roll her ponytail into a bun and secure it to her head with some bobby pins.
- Divide the left out section of hair into 2 sections, twist them right till the end, and intertwine them with each other.
- Wrap this twisted up hair around the base of her bun and pin it in place.
- Pin her hair bow under the bun to finish off the look.
40. The 2 Way Braid
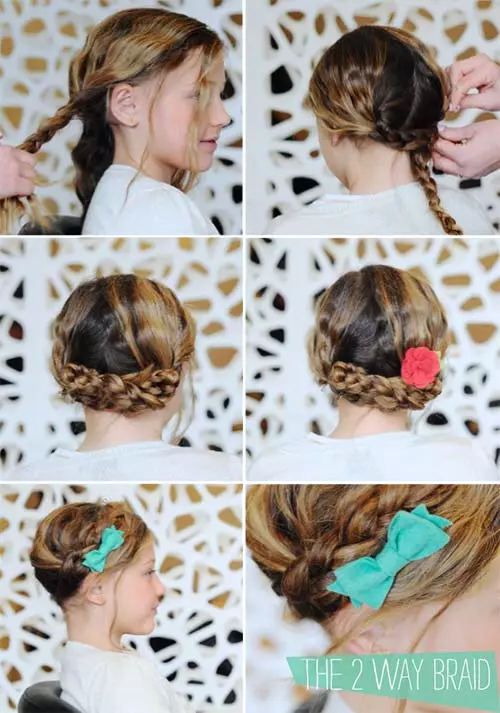
Get ready to thank me because I’m about to show you 2 hairstyles at the time and effort of one. This braided updo style can be done up in 2 ways that look equally gorgeous. Ask your little lady what style she wants to go for that day and leave the decision up to her!
What You Need
- Hair elastics
- Bobby pins
- Bow/floral accessories
How To Style
- Part your little girl’s hair down the middle and divide it into 2 sections.
- Braid both the sections of hair right till the end and secure them with hair elastics.
- One way to style this look is by placing the braids across the back of her head, folding and tucking the ends under, and securing them with bobby pins.
- Another way is to place the braids across the top of her head and pinning them down behind her ears on the opposite sides.
- Finish off the look by clipping on a cute hair bow or flower.
41. Wispy Dutch Braid Updo
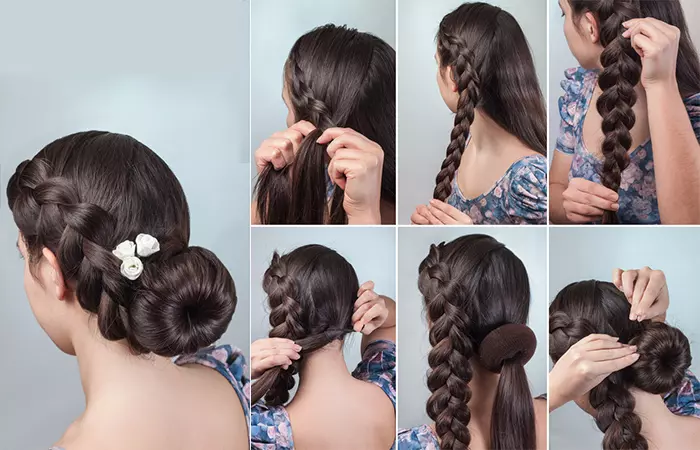
The Dutch braid updo looks elegant on every hair texture and makes it easy to manage the hair in school with style.
What You Need
- Hair elastic
- Bobby pins
- Donut bun maker
- Rat-tail comb
How To Style
- Part your hair into two sections from the middle.
- Take a thin section from the left side and divide it into three equal strands.
- Cross the left strand under the middle strand and the right one under this new middle strand.
- Take some hair from the left side, add it to the left strand, and use the above step to braid.
- Repeat the same process for the right strand.
- Repeat the above steps until you reach the nape, and keep braiding till the end of the strands.
- Pull the other half of the hair into the donut bun maker.
- Roll the hair strands and pin it in a bun.
- Take the Dutch braid and wrap it around the updo.
Key Takeaways
- Check on the school dress code before deciding a style.
- A simple back knot looks stylish and holds your child’s hair.
- Twist a thick strand of hair on both sides and tie it in a ponytail for a princess look.
- For a fancy yet simple hairstyle, put a bow and tie your hair in a loose side braid.
Infographic: 4 Fun Hairstyles For School Girls
Why stick to the same old hairstyles when you can experiment with different hairstyles for your little one? There are many cute hairstyles that won’t take much time and will make your daughter or sister look like a star. We have rounded up 4 fun hairstyles that will make your little one stand out in school. Check out the infographic below to learn more about these adorable hairstyles.
Some thing wrong with infographic shortcode. please verify shortcode syntax
Nowadays, a simple ponytail is not good enough for school. But, why would you want to stick to plain old hairstyles when you can experiment and play around with your daughter or sister’s hair? From cutesy pigtails, fishtail braids, and sleek ponytails to intricate bow and bun styles, the hairstyles for school girls listed above will make your child want to go to school to flaunt her cool new hairstyle. Once you have mastered these DIY tutorials, you can experiment with new hairstyles for school girls and achieve more trendy looks. Use cute accessories within the school dress code policy to spruce up the look. Now that you have so many adorable hairstyle options, try each one out.
Frequently Asked Questions
Which hairstyles are easy for school?
A simple ponytail and the basic three-strand braid are easy hairstyles for school.
How can I make a hairstyle last all day?
Apply a lightweight hair gel to the hair before styling it. Use bobby pins to secure the loose strands, and finally spritz some hairspray to set the hair in place.
Which hairstyles are suitable for sports activities?
Braided styles such as Dutch braids or fishtail braids are ideal for sports. They keep the hair set away from the face. You can also tie your hair in a high ponytail and secure the baby hair with bobby pins.
What are the most common hairstyles for school?
The most common hairstyles for school include pigtails, braids, ponytails, and buns, depending on the accepted dress code policy set forth by the school.
What are the best tips for styling hair for school?
The best tip for styling hair is to keep elastic bands, clips, and a comb handy. The easiest hairstyles do not require a lot of accessories and take less time.
How can I keep my hair looking neat and tidy all day at school?
To keep your hair looking neat and tidy all day at school, use a leave-in conditioner before styling or use some hairspray after styling to tame any flyaways and keep the hairstyle intact.
What are the most popular hair accessories for school?
The most popular hair accessories for school are scrunchies, scarf headbands, colorful ribbons, elastic bands, clips, and stickers.
Illustration: Adorable Hairstyles For School Girls
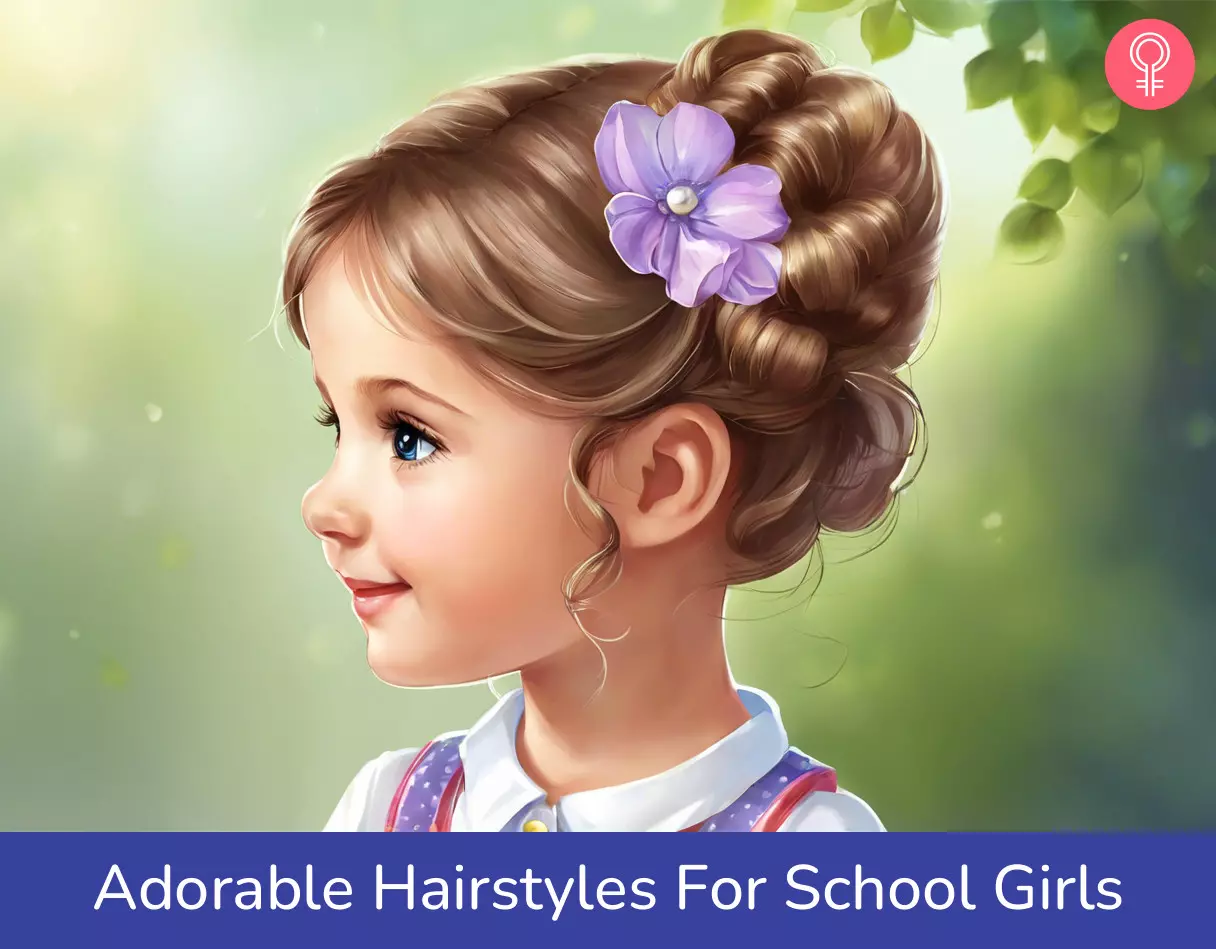
Image: Stable Diffusion/StyleCraze Design Team
Need quick hairstyle ideas for school? Check out this video for 13 cute hairstyles that are perfect for busy mornings to ensure you look your best always!
Personal Experience: Source
StyleCraze's articles are interwoven with authentic personal narratives that provide depth and resonance to our content. Below are the sources of the personal accounts referenced in this article.
i. Day 4: Simple French braidhttps://lifewithoutalatte.wordpress.com/2018/10/18/day-4-simple-french-braid/
Read full bio of Julien Farel
Read full bio of Arshiya Syeda
Read full bio of Subhrojyoti Mukherjee
Read full bio of Aparna Harry





Community Experiences
Join the conversation and become a part of our empowering community! Share your stories, experiences, and insights to connect with other beauty, lifestyle, and health enthusiasts.