How To Do The Uttanasana And What Are Its Benefits
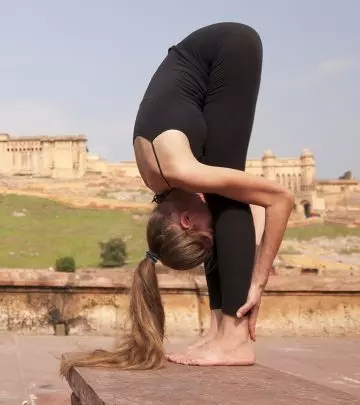
Image: shutter stock
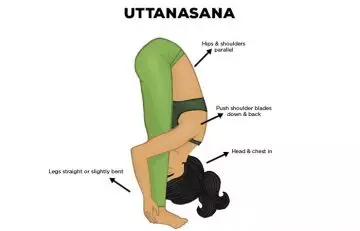
Uttanasana, Intense Forward-Bending Pose, Intense Stretch Pose, Standing Forward Bend, Standing Forward Fold Pose, or Standing Head to Knees Pose is an asana. Sanskrit: उत्तानासन; Ut – Powerful, Tan – To Stretch, Asana – Posture; Pronounced As – OOT-tan-AHS-ahna
When you translate Uttanasana literally into English, it means a powerful stretch pose. In English, this asana is called the Standing Forward Bend. But no matter what it is called in whichever language, this asana has some amazing effects on your body. It not only heals but also rejuvenates your body. In this asana, your head is below the heart, and this allows for blood circulation in your head instead of your feet, giving your cells a rush of energizing oxygen. Take a look at what more this amazing asana can do for you!
Everything You Need To Know About The Uttanasana
- What You Should Know Before You Do The Uttanasana
- How To Do The Uttanasana
- Precautions And Contraindications
- Beginner’s Tip
- Advanced Pose Variation
- The Benefits Of Uttanasana
- The Science Behind The Uttanasana
- Preparatory Poses
- Follow-Up Poses
What You Should Know Before You Do The Uttanasana
You must make sure to keep your stomach and bowels empty before you practice this asana. Have your meals at least four to six hours before you do the asana so that your food gets digested and there is enough energy for you to expand during the practice.
It is best to practice yoga first thing in the morning. But in the event you cannot work out in the morning, it is alright to practice it in the evening.
Level: Intermediate
Style: Hatha Yoga
Duration: 15 to 30 seconds
Repetition: None
Stretches: Hips, Hamstrings, Calves
Strengthens: Knees, Thighs
How To Do The Uttanasana
- Stand straight on your mat, and rest your hands on your hips. Inhale.
- Exhale and gently soften your knees and bend forward, folding from your hips. You need to counterbalance the weight of your body. To do this, you must move your hips and tailbone slightly back as the rest of your body moves forward.
- Remember to keep your knees soft as you do all of this. This will allow your buttocks to point up and your hips to move forward into the upper thighs.
- Let your hands rest on the ground, next to your feet. Your feet must be parallel to each other, and your second and middle toes must point forward. Let your chest float over your feet. Widen the space between your chest bone and pubis. Feel the fold and the stretch from your hip bone. If you feel it from the rounding of your lower back, you are doing something wrong.
- You must feel a stretch in your hamstrings as well, and if you are not yet feeling it, extend your knees a little more.
- Turn your thighs inward, and root yourself into your heels. This will allow better alignment.
- Your head must be left to dangle, such that the crown reaches the floor. Look through your legs, and hold the pose.
- When you wish to release the pose, contract the core and the abdomen muscles. Inhale and place your hand on the hips. Rise slowly, ensuring there is an elongation in your back. Let there be a distance between your pubis and your chest bone. Slowly stand up.
Precautions And Contraindications
These are some points of caution you must keep in mind before you do this asana.
- Avoid this asana if you have the following problems:
a. A lower back injury
b. A tear in the hamstrings
c. Sciatica
d. Glaucoma or a detached retina
- If you have a back injury, do this asana keeping your knees bent. You can also do the Ardha Uttanasana by placing your hands on a wall, such that they are parallel to the floor. Make sure your legs are perpendicular to your torso.
Beginner’s Tip
As a beginner, it might be hard to increase the stretch. To make it easier, gently bend your knees, and imagine the sacrum sinking deep into the back part of the pelvis. Now, decrease the distance between your tailbone and the pubis. As you feel the resistance, push the top part of your thighs back and press your heels down. Straighten your knees. But be sure you don’t lock your knees when you straighten them.
Advanced Pose Variation
To increase the stretch in the back and legs, lean forward, and lift your body on the balls of your feet as you pull the heels about half-inch off the floor. Pull the inner part of your groin into your pelvis. Then, from the groin height, lengthen your heels back on to the floor.
The Benefits Of Uttanasana
These are some amazing benefits of the Uttanasana.
1. This asana gives your back, hips, calves, and hamstrings a good stretch.
2. It calms your mind and relieves anxiety. It also helps quiet the mind.
3. It helps relieve headaches and insomnia.
4. This bend gives your digestive organs a good massage, thereby improving digestion.
5. The kidneys and liver are activated.
6. The thighs and knees become strong.
7. Menopause and menstrual problems are alleviated.
8. This asana helps cure high blood pressure, asthma, infertility, sinusitis, and osteoporosis.
The Science Behind The Uttanasana
This asana stretches the back of the body entirely. It covers every part from the soles of the feet right up to the back of the leg. It spans to the lower, mid, and upper part of the back, all the way up to the neck, goes all the way up to the scalp, then down to the forehead, and ends in between the eyebrows. As you go into this asana, you stretch the entire expanse of the muscles and the connective tissues.
You might not realize it, but this is a big job for your body. You must prepare for it, so always remember to warm up before you get into this asana.
Preparatory Poses
Adho Mukha Svanasana
Janu Sirsasana
Paschimottanasana
Supta Padangusthasana
Follow-Up Poses
Standing poses, inversions, or seated forward bends.
Now that you know how to do Uttanasana, what are you waiting for? Yoga is not all about reaching for those toes. It is about tapping into your ideas – what do you want? Where do you want to be? What do you want to achieve when you are there? Although this is a typical pose that you will probably do in every single yoga class, each time you do it, you will have a different experience. These various experiences make the stretch worthwhile.


